
While wedding DIY in general features a beautiful diversity of wedding styles, Chelsea's personal inspiration plays with the elevated potential of mixed media. For this project collection, she has crafted a texture-rich smorgasbord of wood veneer, leather, felt, and chiffon. Splashed with a modern color palette of burgundy, lilac, olive, and coral orange, these projects prove that handmade can also feel bespoke and professionally finished even for DIY beginners.
Whether you are looking for modern reception signage, a romantic 3D petal veil, or thoughtful keepsakes, the secret to this high-end look lies in the tactile details, so here are 15 ways to use your Cricut to turn unique and everyday favorite materials into wedding day magic!
Part 1: The Stationery & Keepsakes
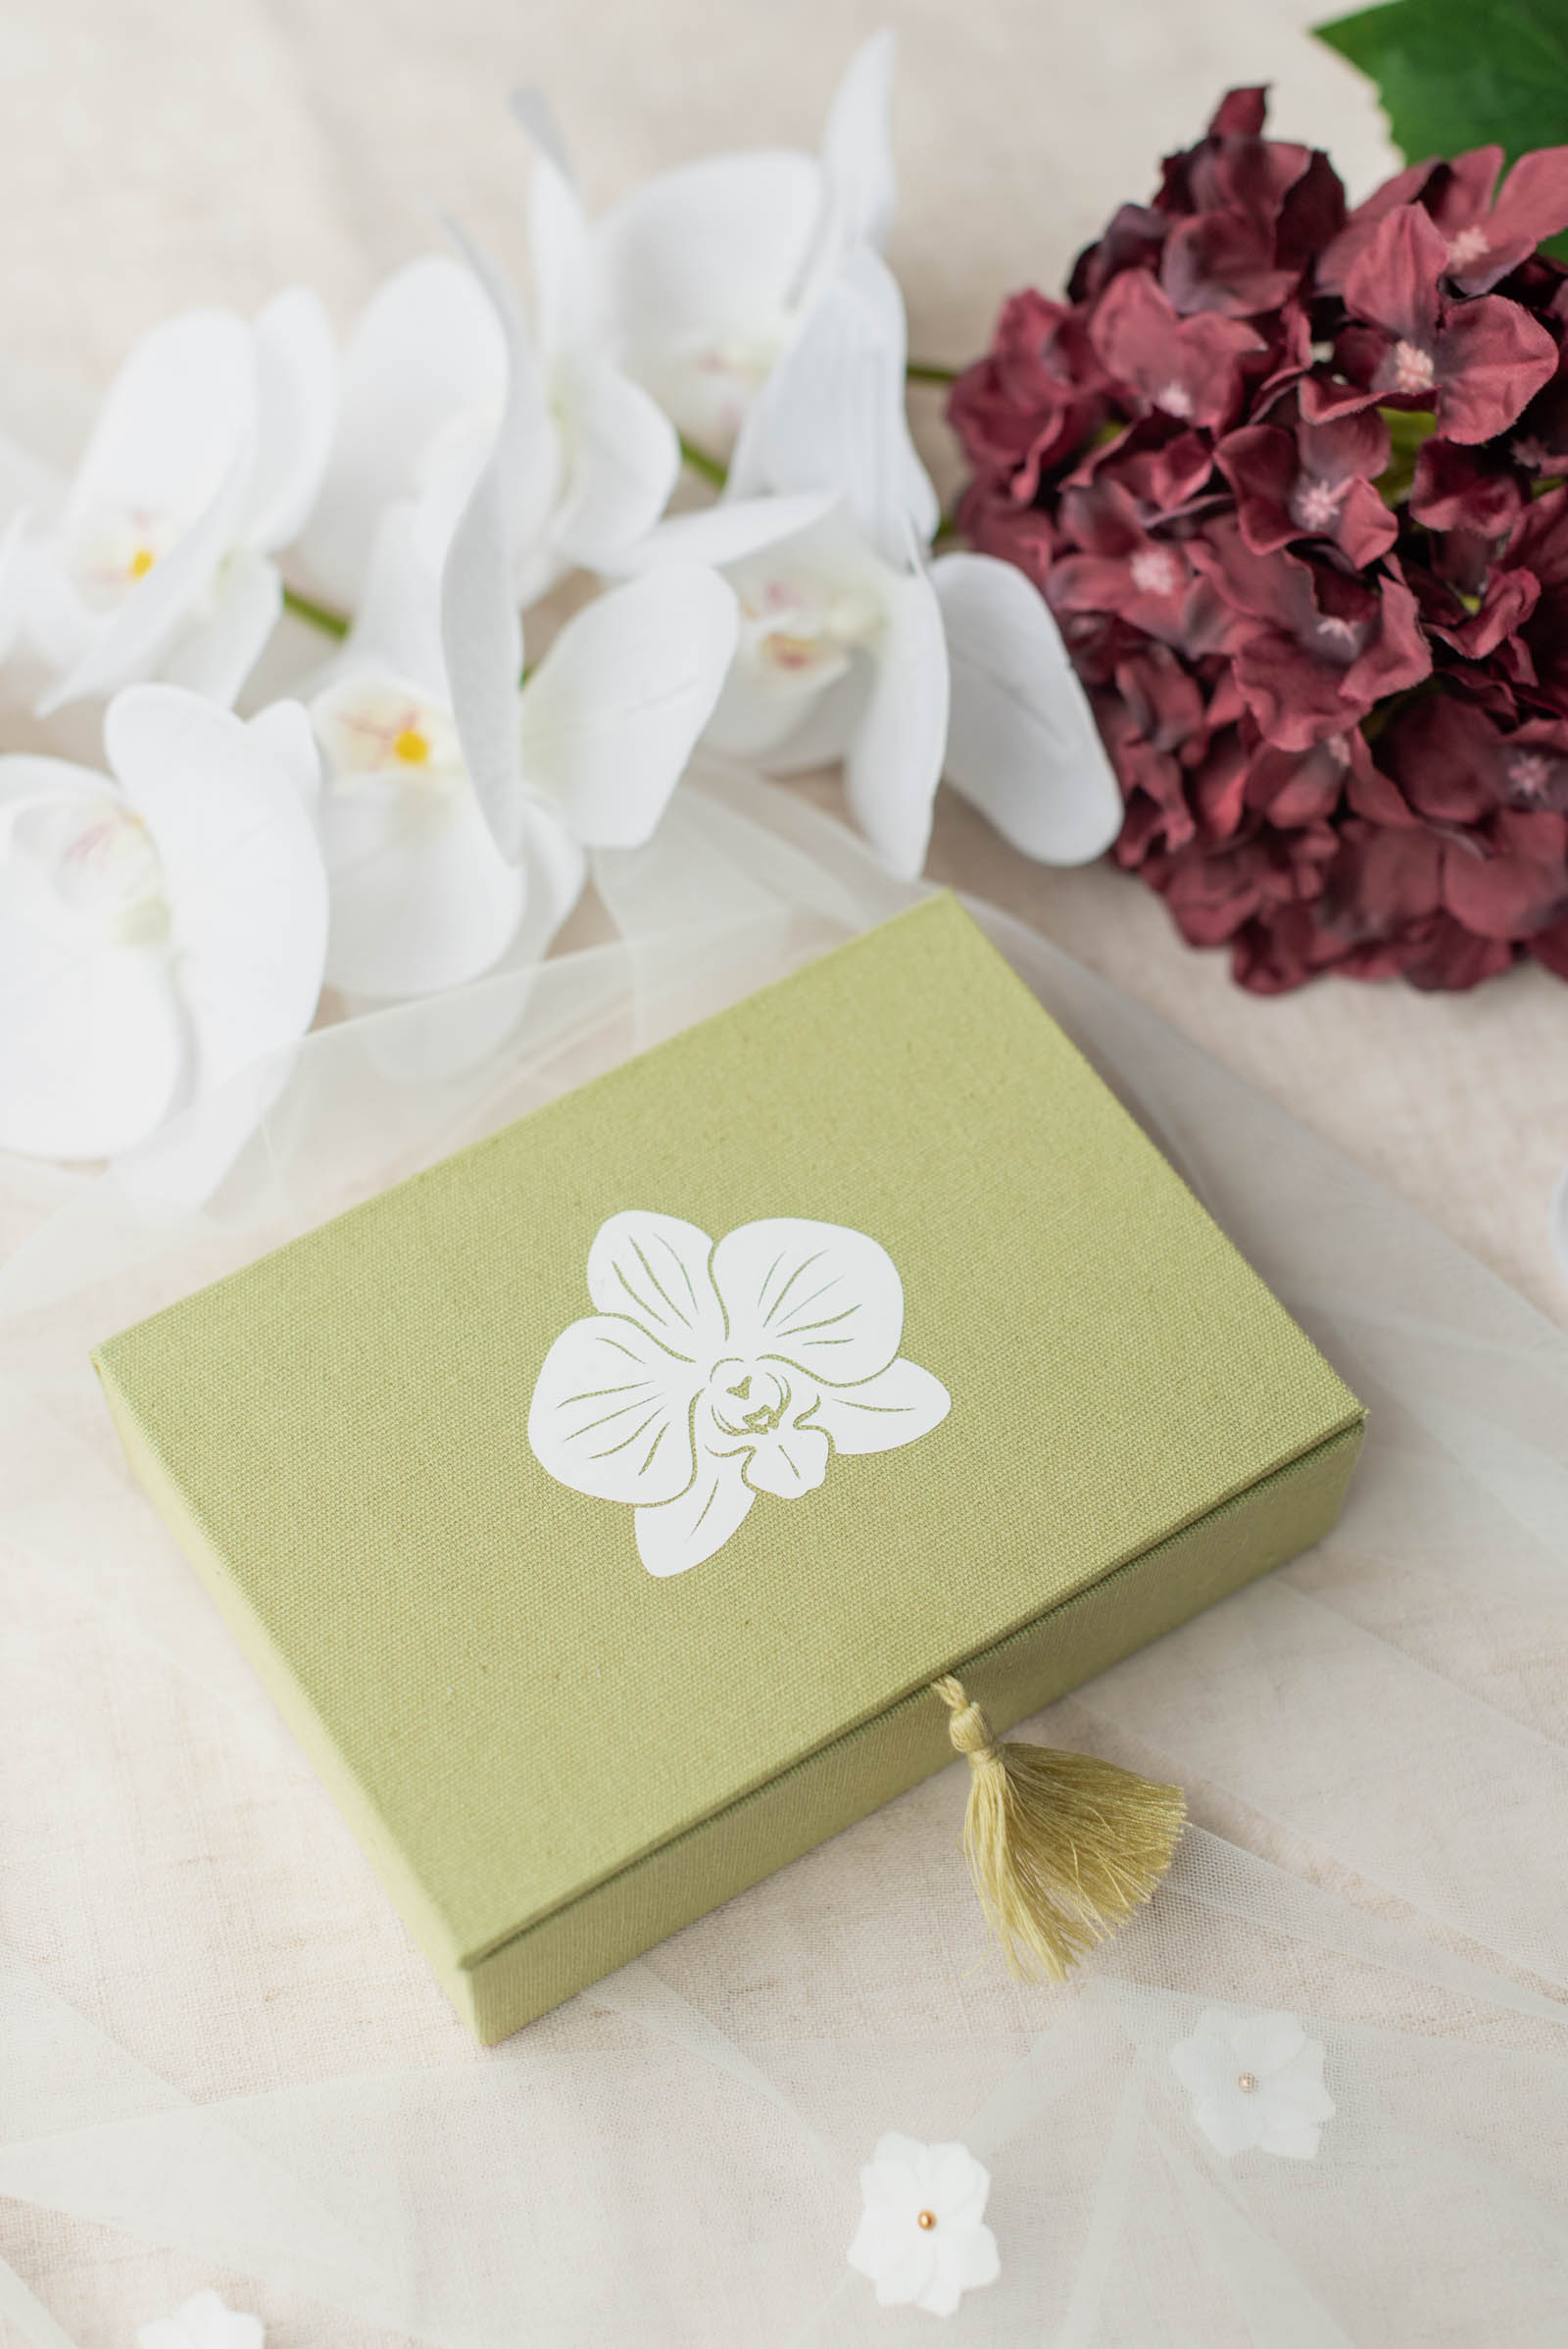
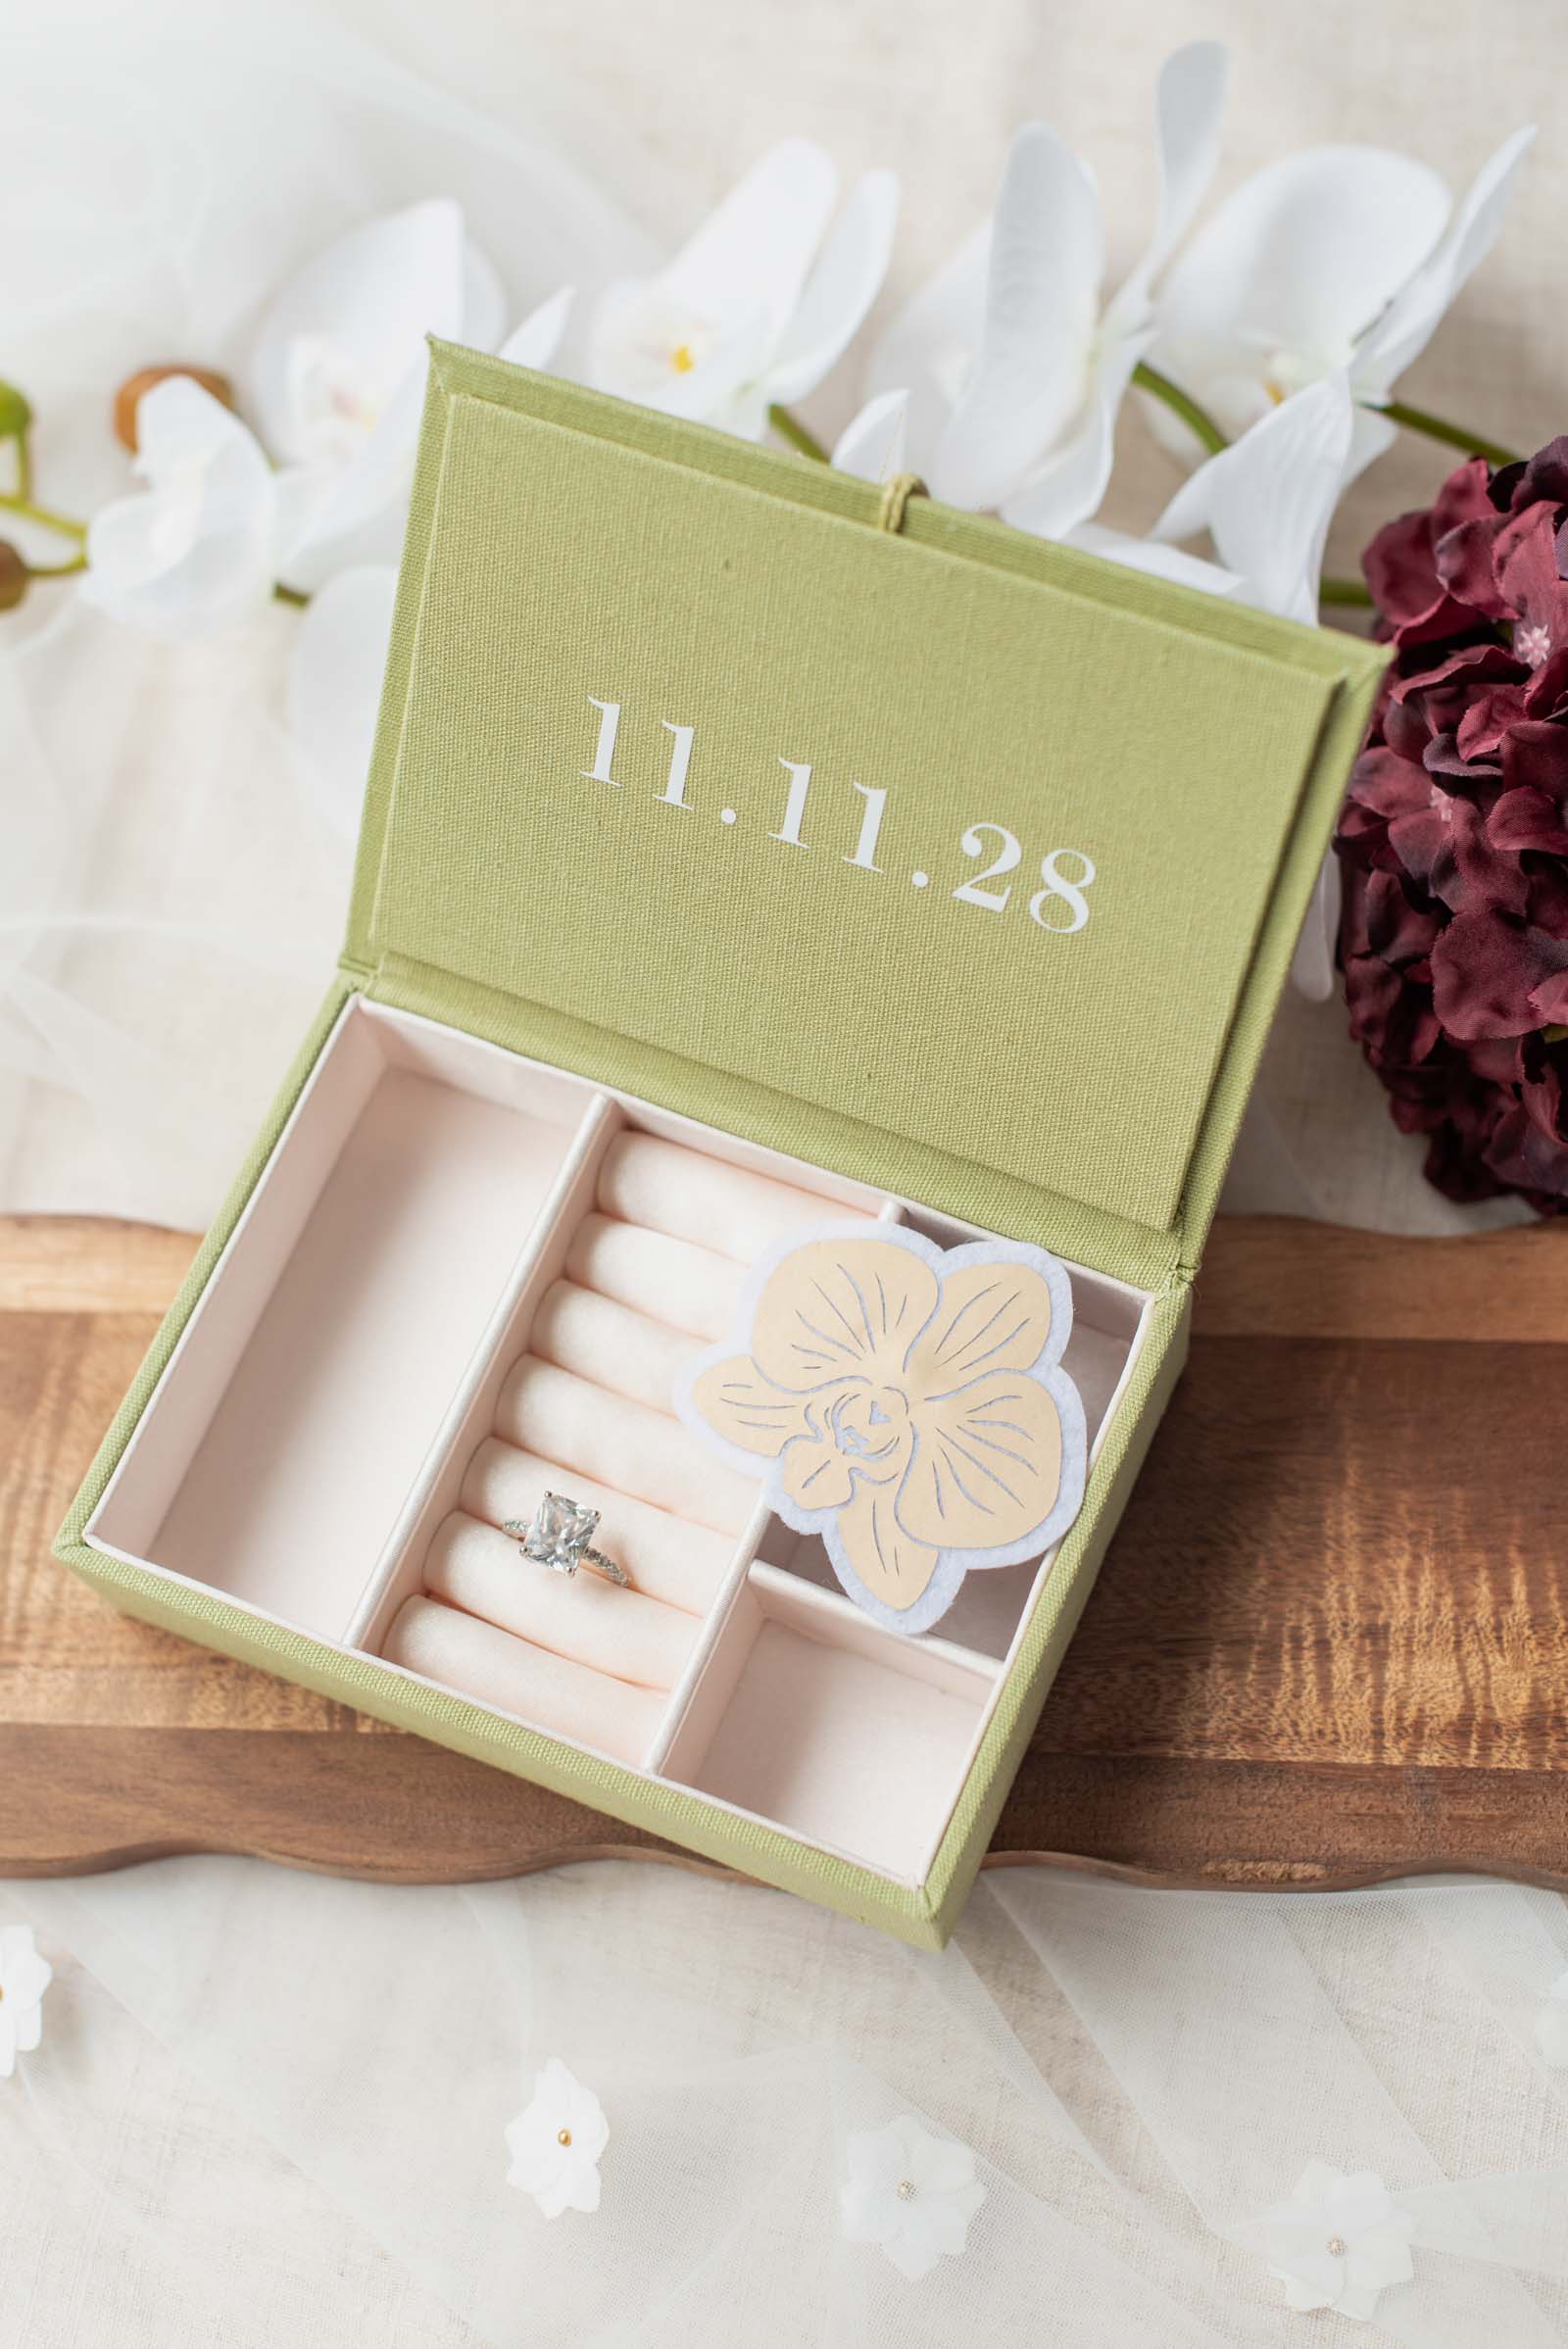
Wedding Day Memories Keepsake Box
Supplies Needed: Fabric-covered box, heat transfer vinyl, EasyPress Mini or household iron
Every couple needs a sweet time capsule for their special wedding day mementos, so transform a simple fabric-covered box and personalize it with your wedding date or wedding emblem with heat transfer vinyl (HTV). The minimalist orchid on the top lid ensures it looks like a piece of home decor rather than a temporary wedding prop.
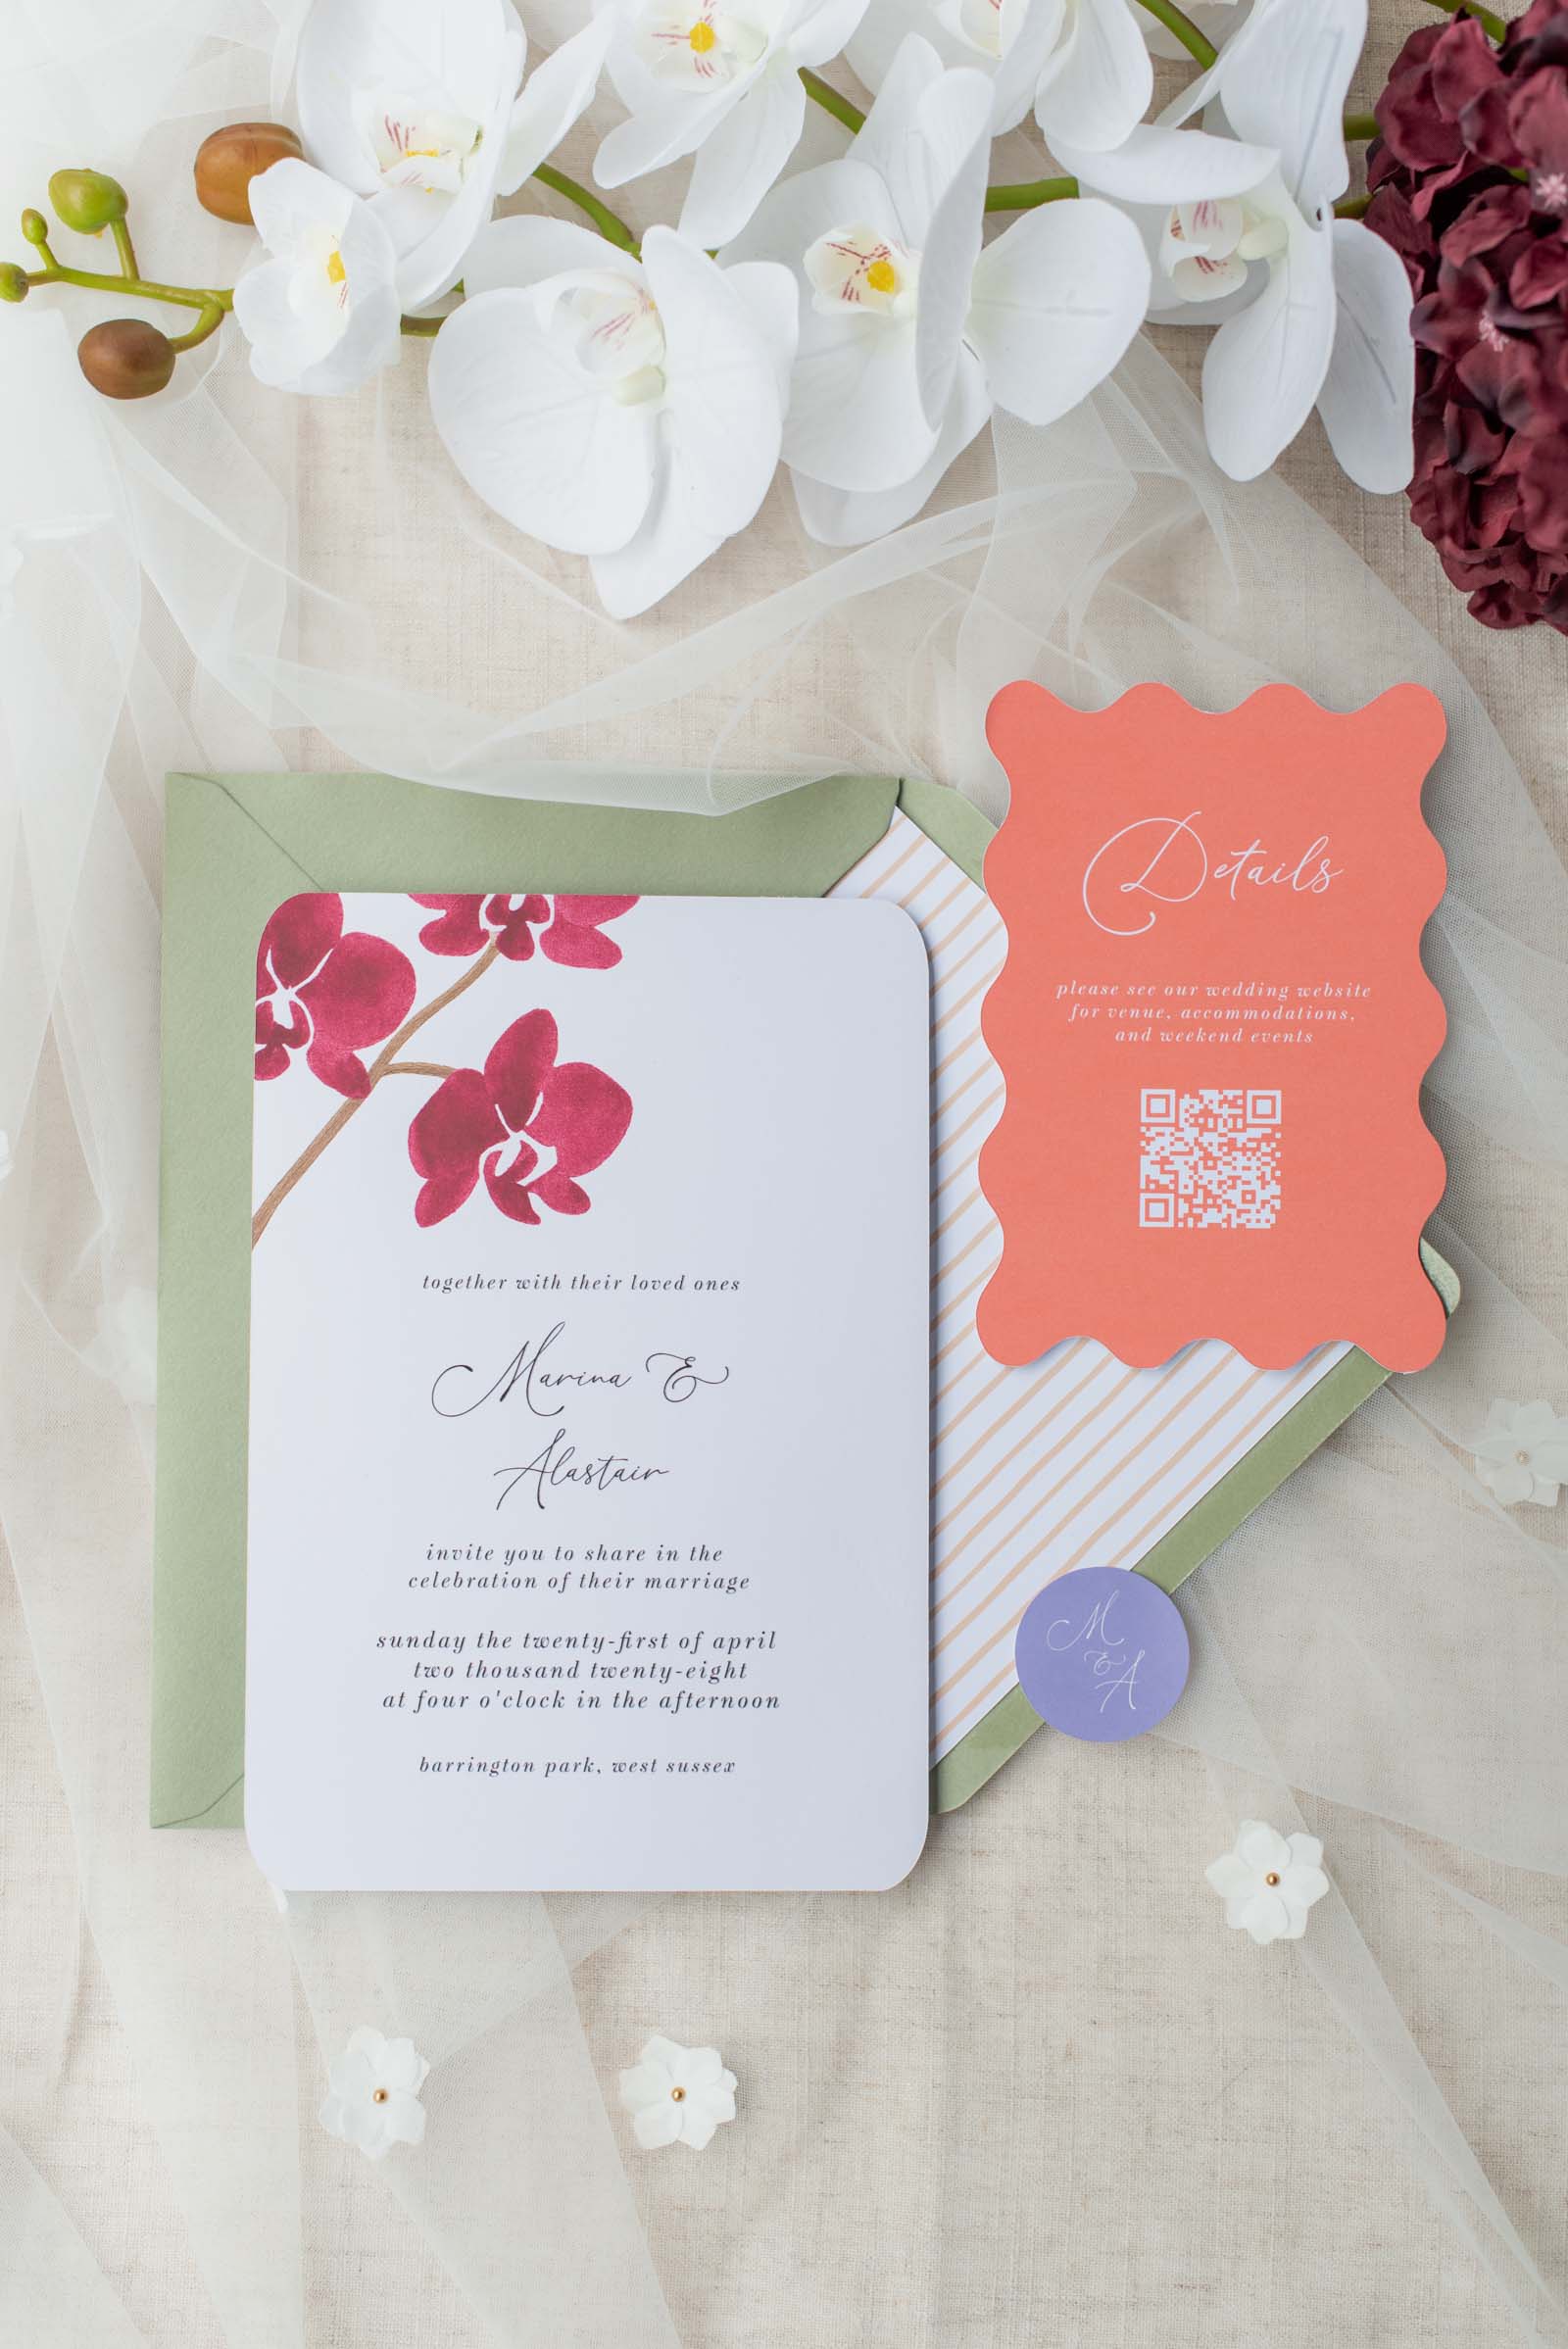
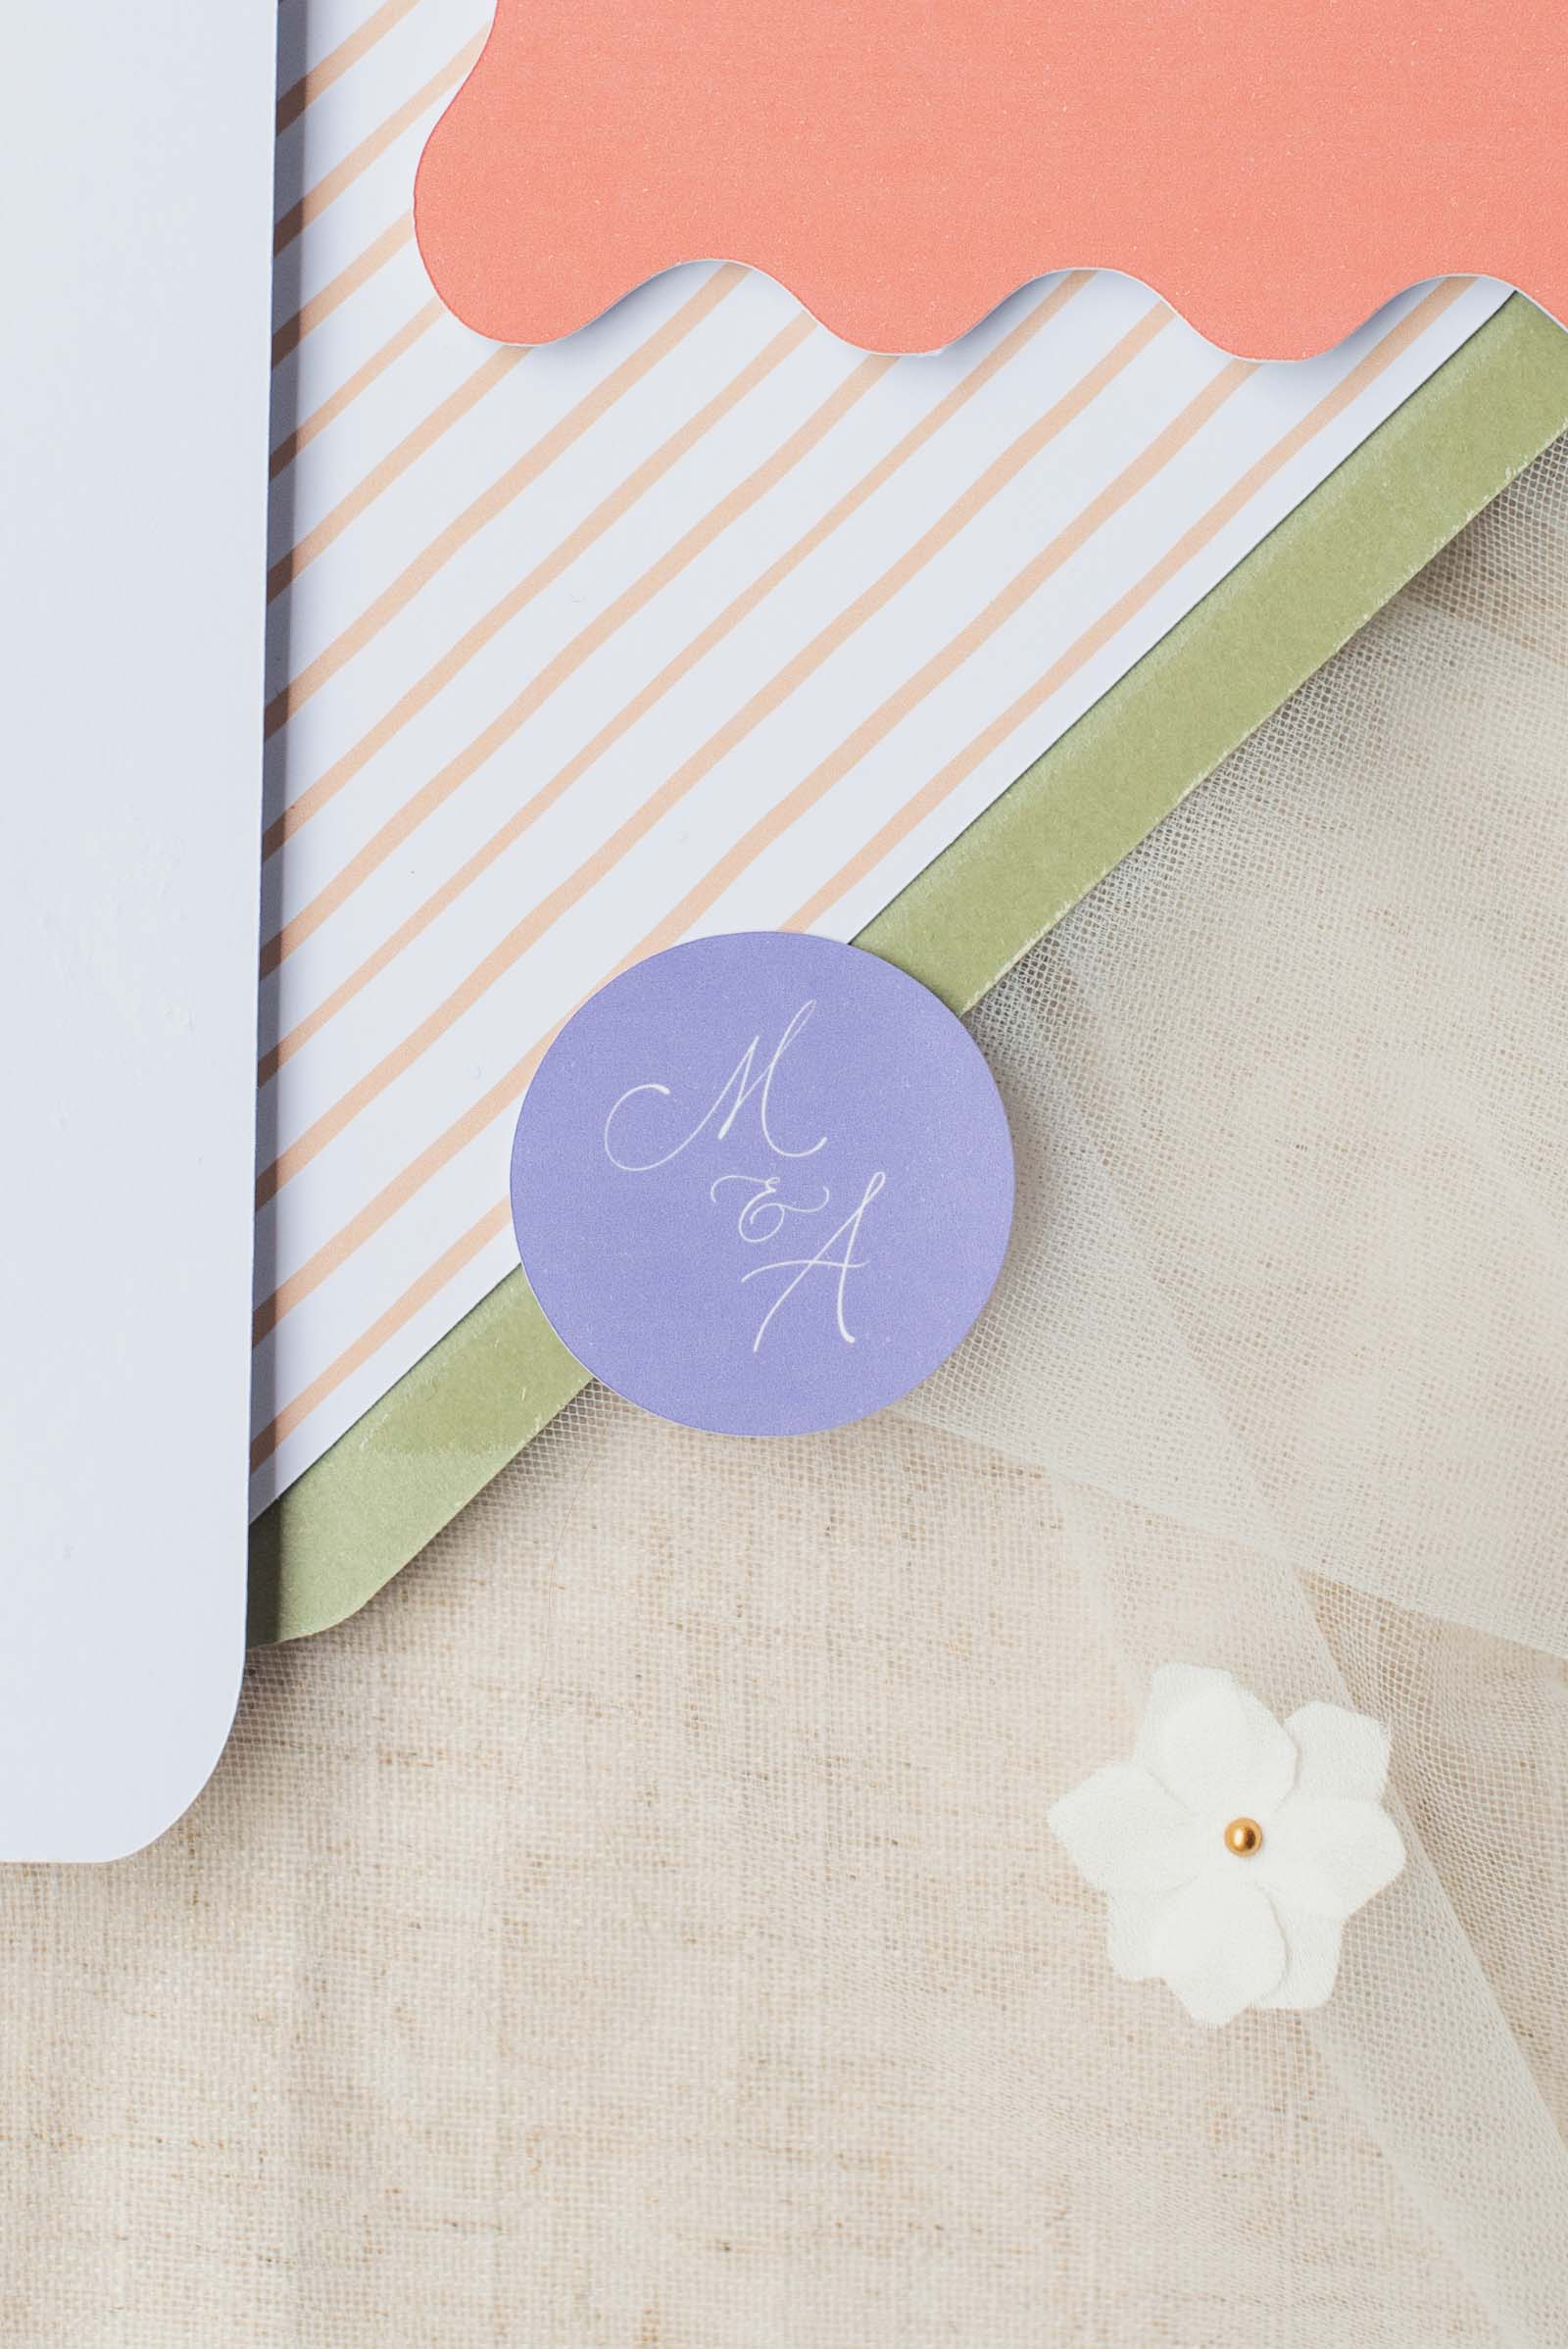
Invitation Suite with Custom Envelope Liner
Supplies Needed: Cardstock, inkjet printer
The easiest, not-secret to a high-end invite is the weight of the paper. When you have a fabulous heavy cardstock, you instantly elevate the everyday to wedding. By layering the color palette with the entire suite and adding in a pattern amongst the solid colors, you create a cohesive feel that sets the tone for a chic event as your guest opens the envelope.
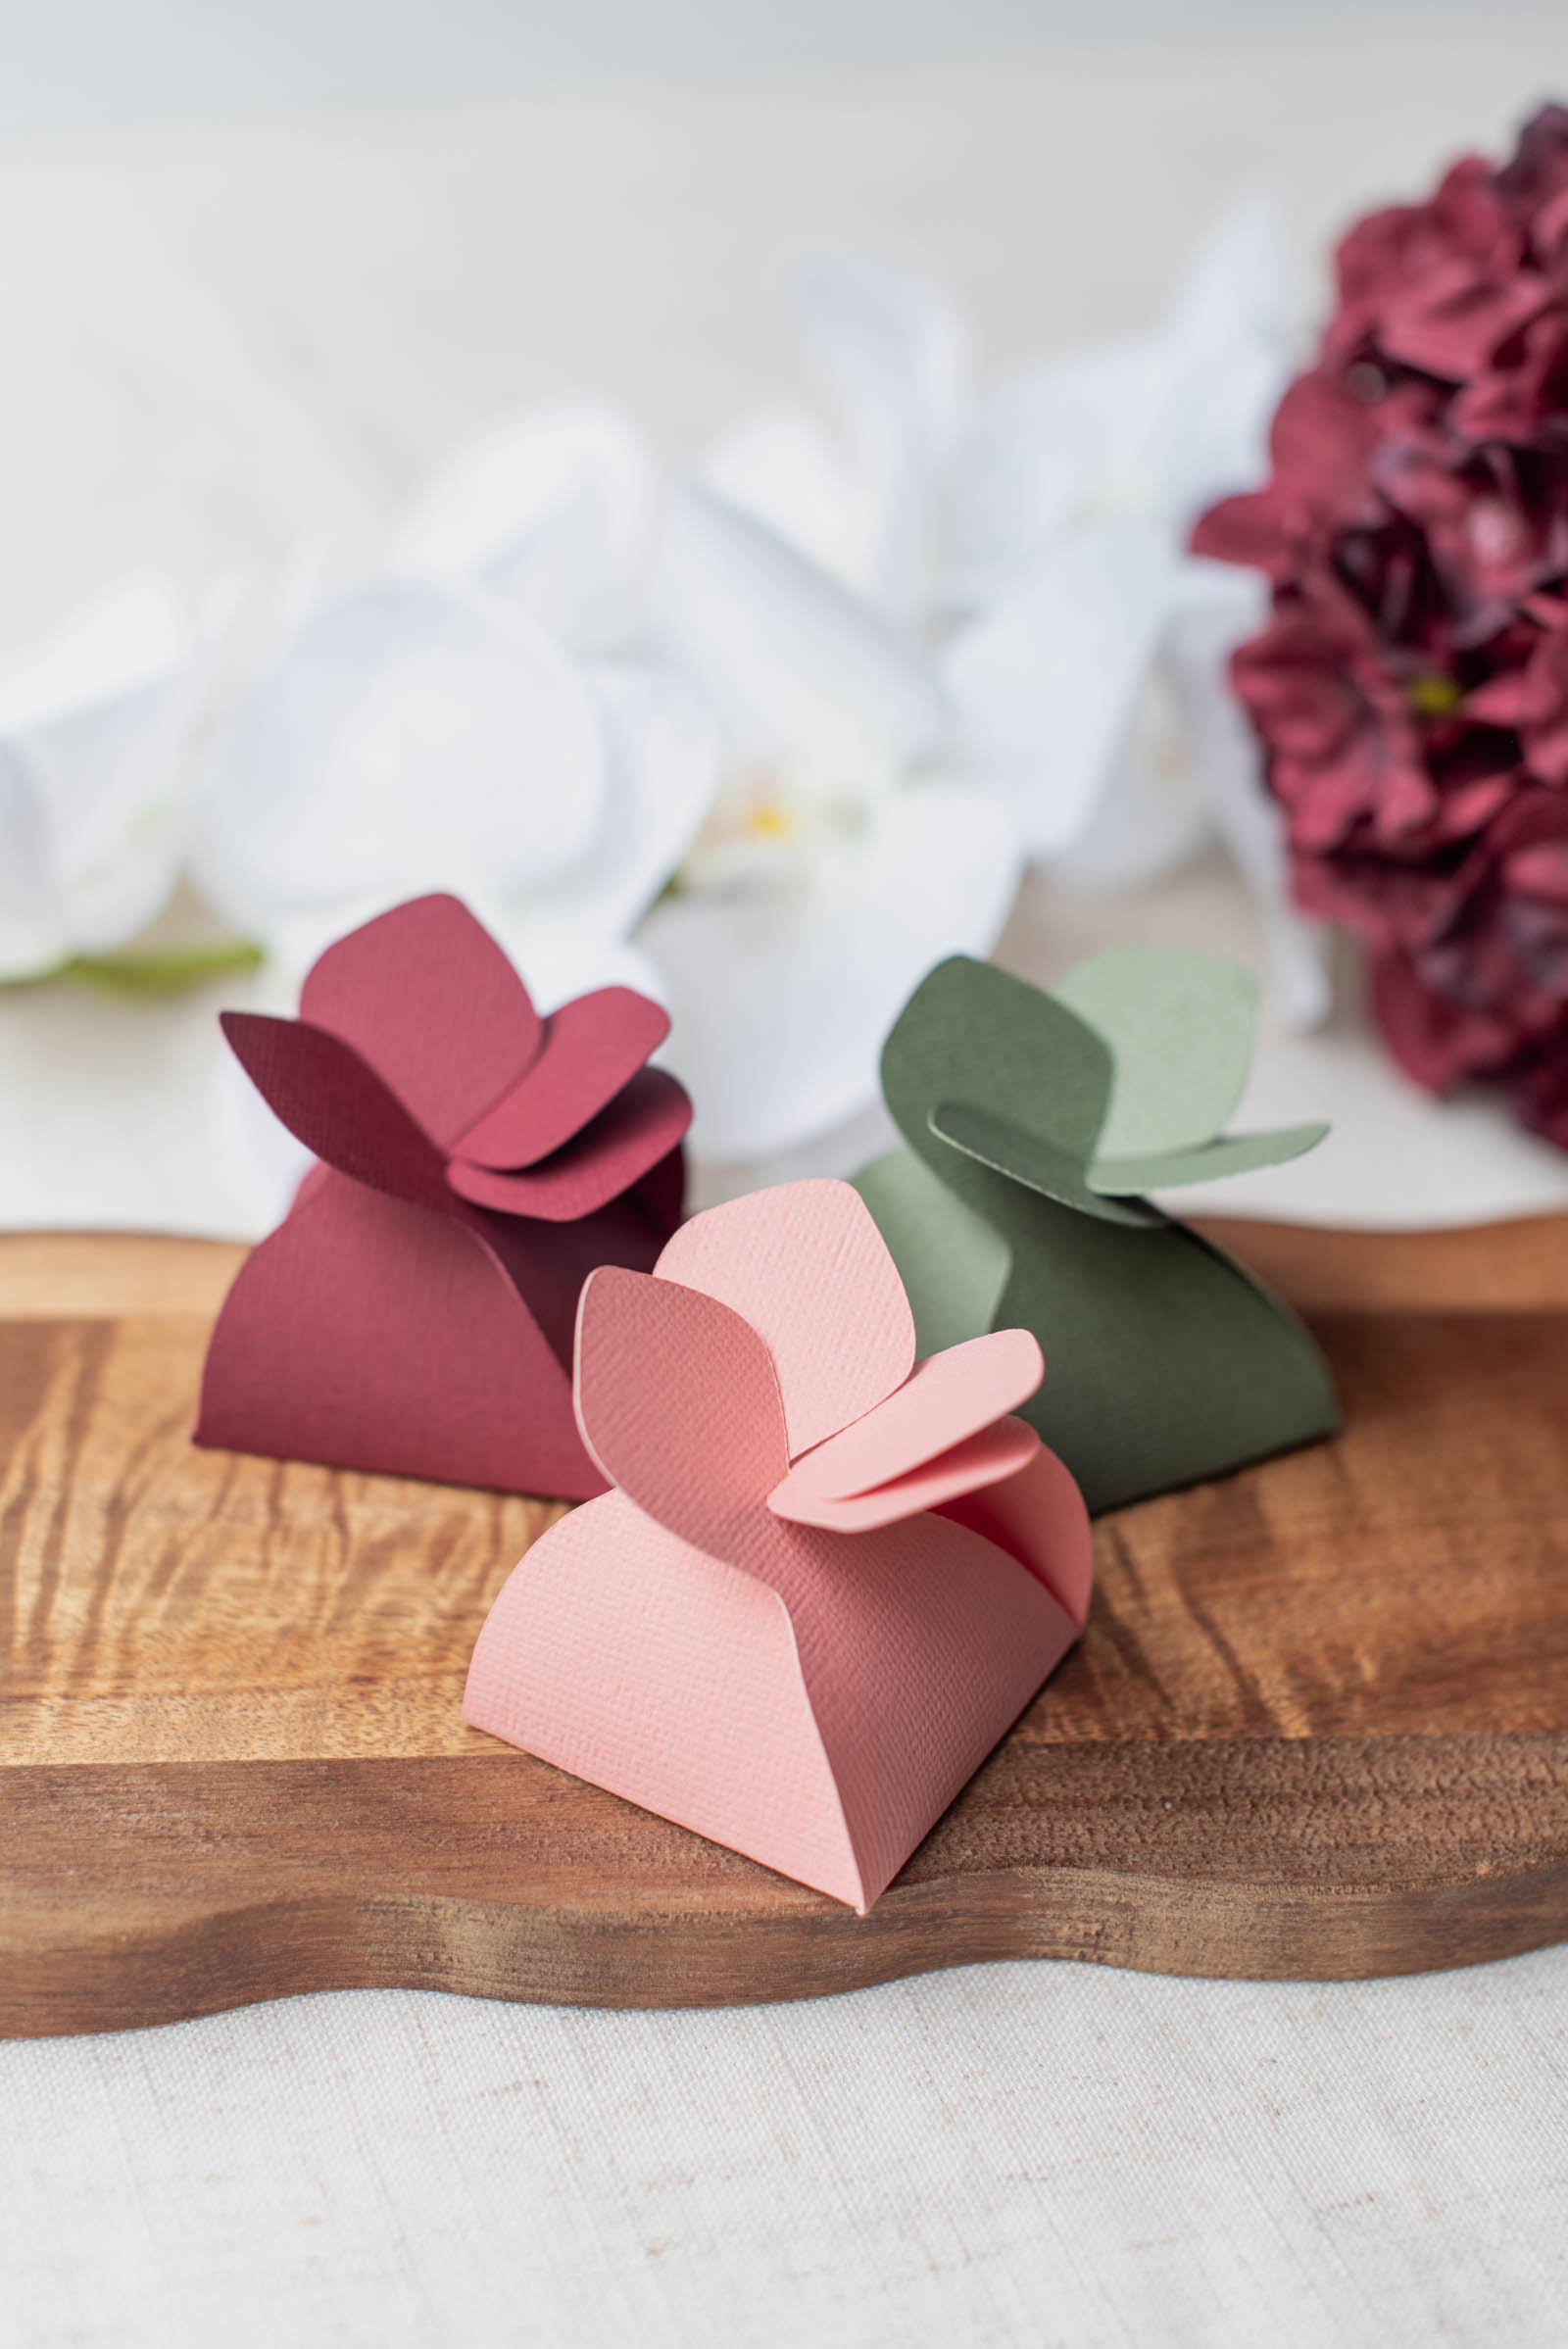
Petal Favor Box
Supplies Needed: Cardstock, scoring tool
Designed for little squares of chocolates to be placed at each guest's seat, these sweet favor boxes are so simple to make – no glue needed as it self-closes! Mimicking the curves of an orchid petal, it turns a simple piece of cardstock into a geometric work of art.
Want to make this one? Head over to Chelsea's Cricut Design Space profile to find the template for this project! You will need a Cricut Access subscription or be ready to one-off pay for the two elements used to design the box.
Part 2: The Ceremony & Fashion
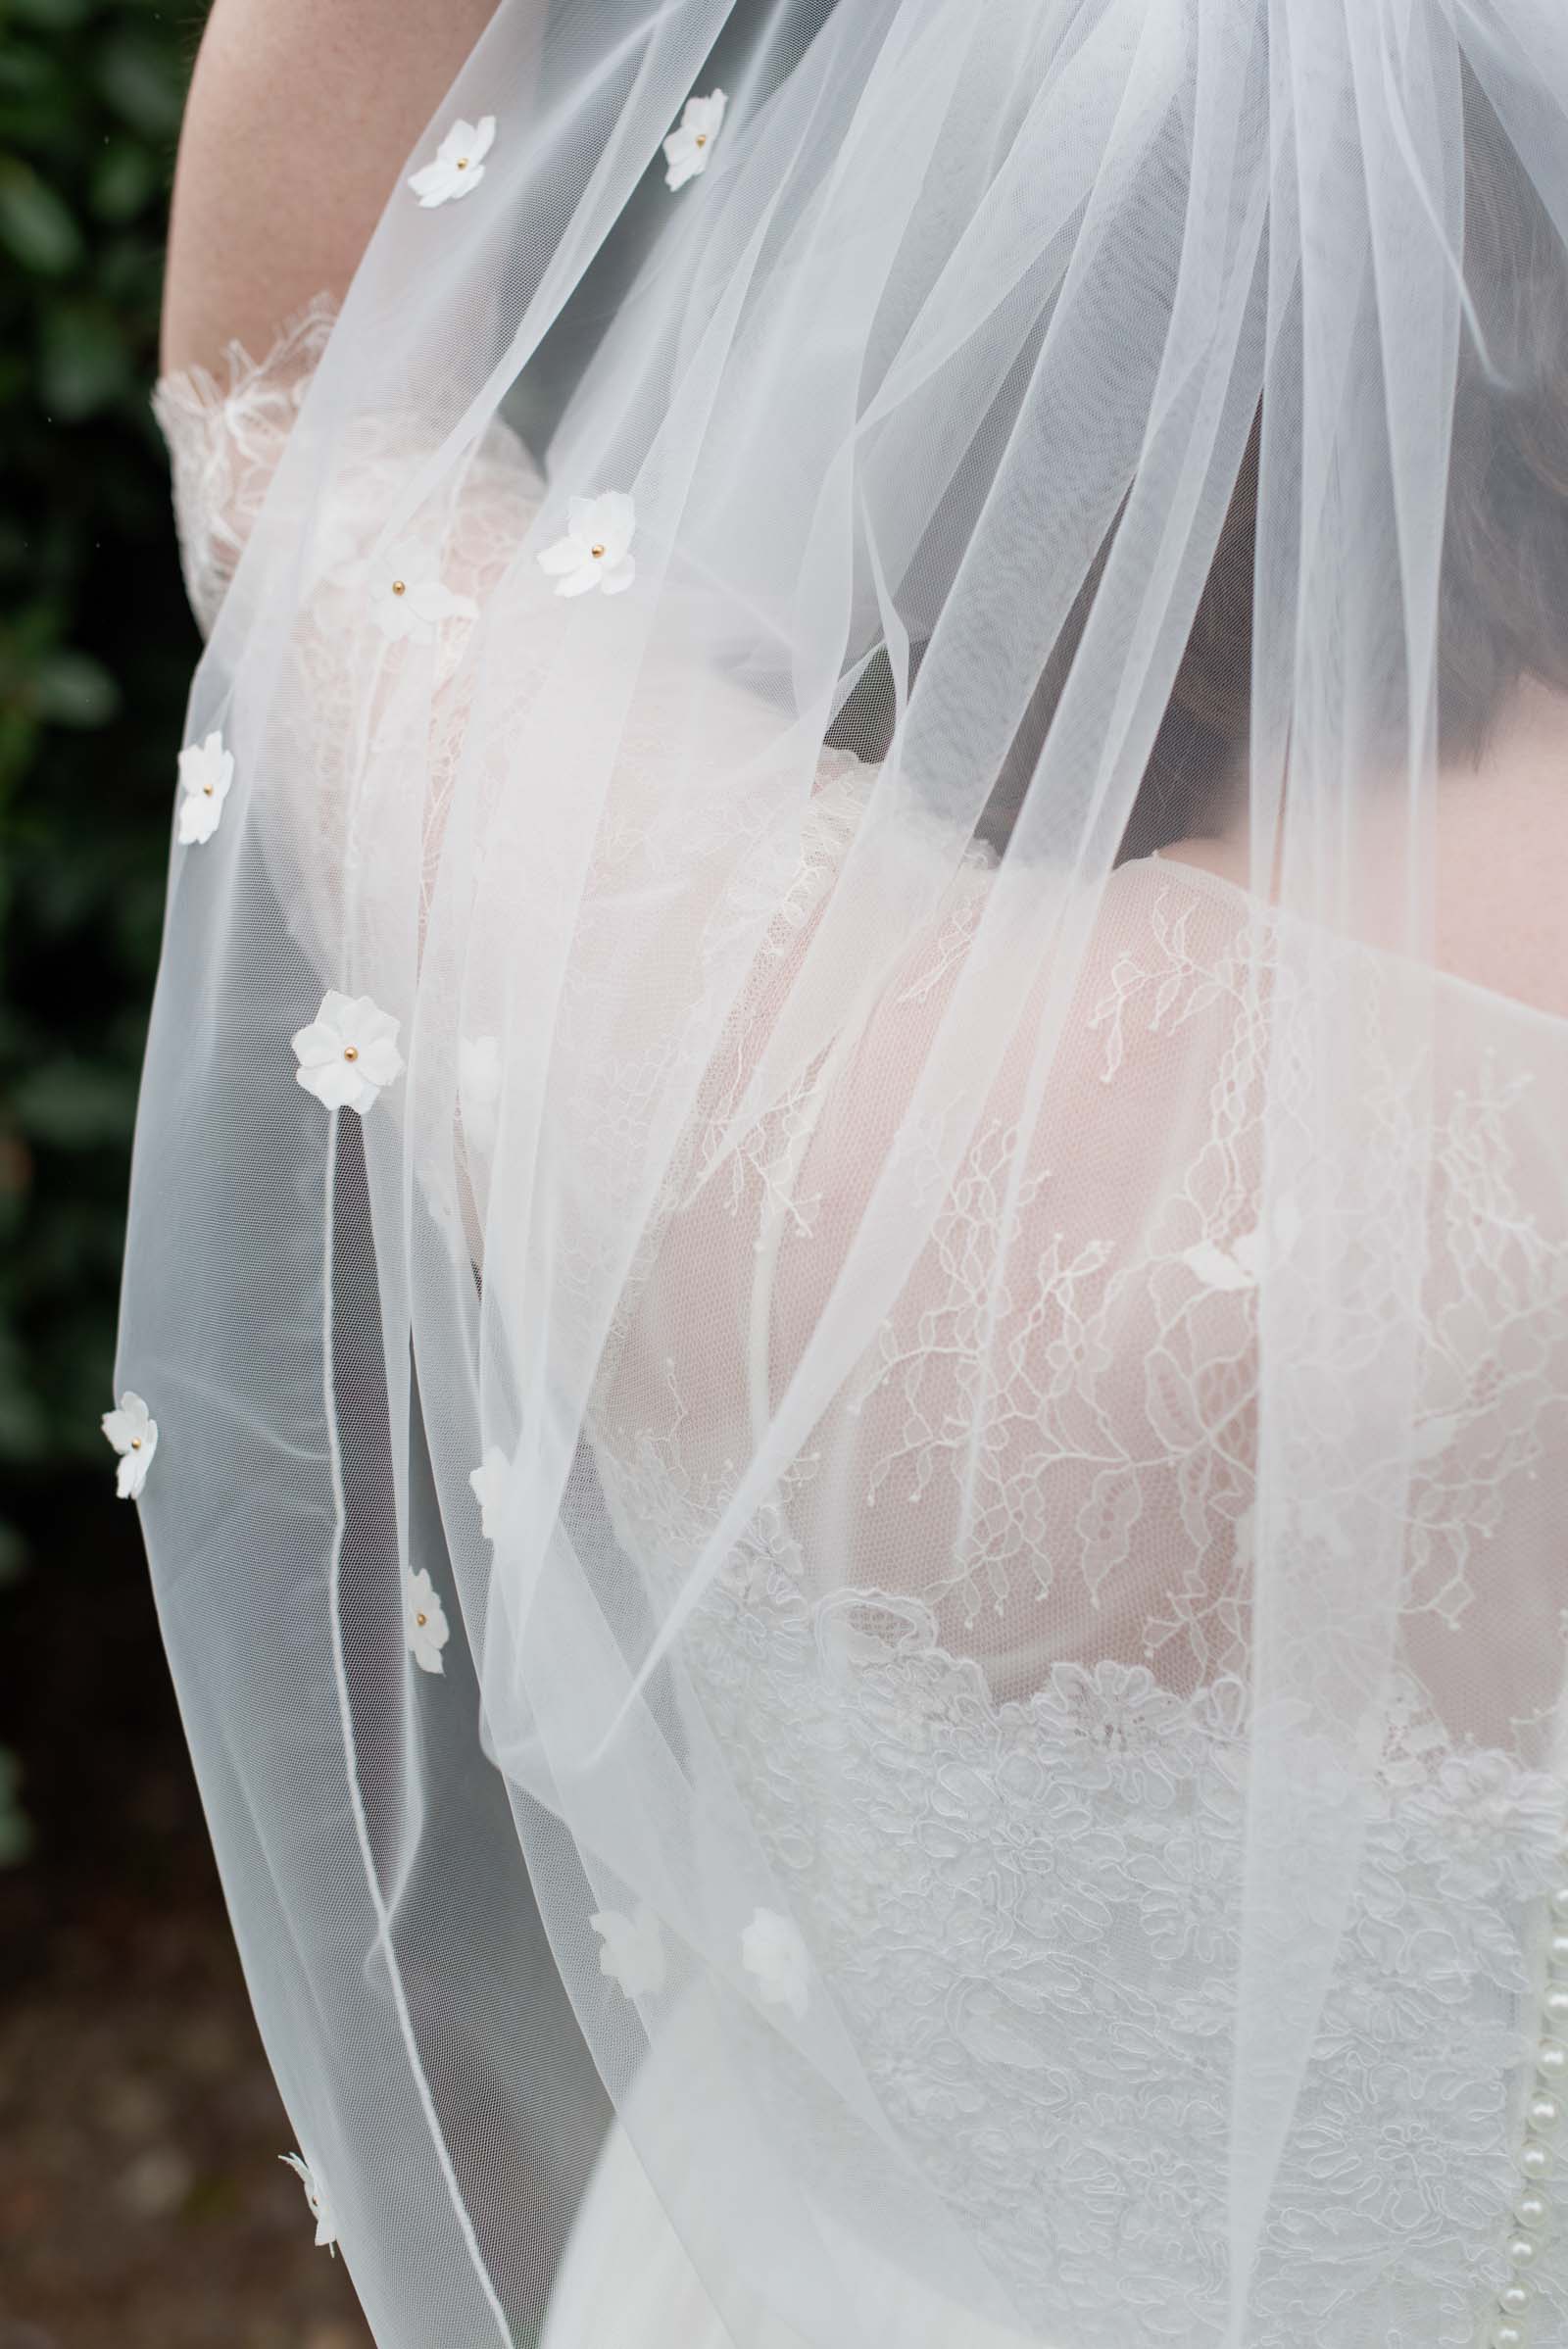
3D Petal Veil
Supplies Needed: Chiffon fabric, Cricut Maker + rotary blade, fabric glue, gold pearl flat back beads
Upgrade your wedding veil in a surprisingly beginner-friendly, no-sew way! By cutting dozens of delicate petals from a thrifted chiffon blouse (or any fabric of your choice), you can create a couture-level accessory that moves beautifully. With some fabric glue and the tiniest gold flat back beads, an inexpensive secondhand veil goes from standard to luxe.
Want to learn how to make this? Check out our DIY 3D floral veil tutorial!
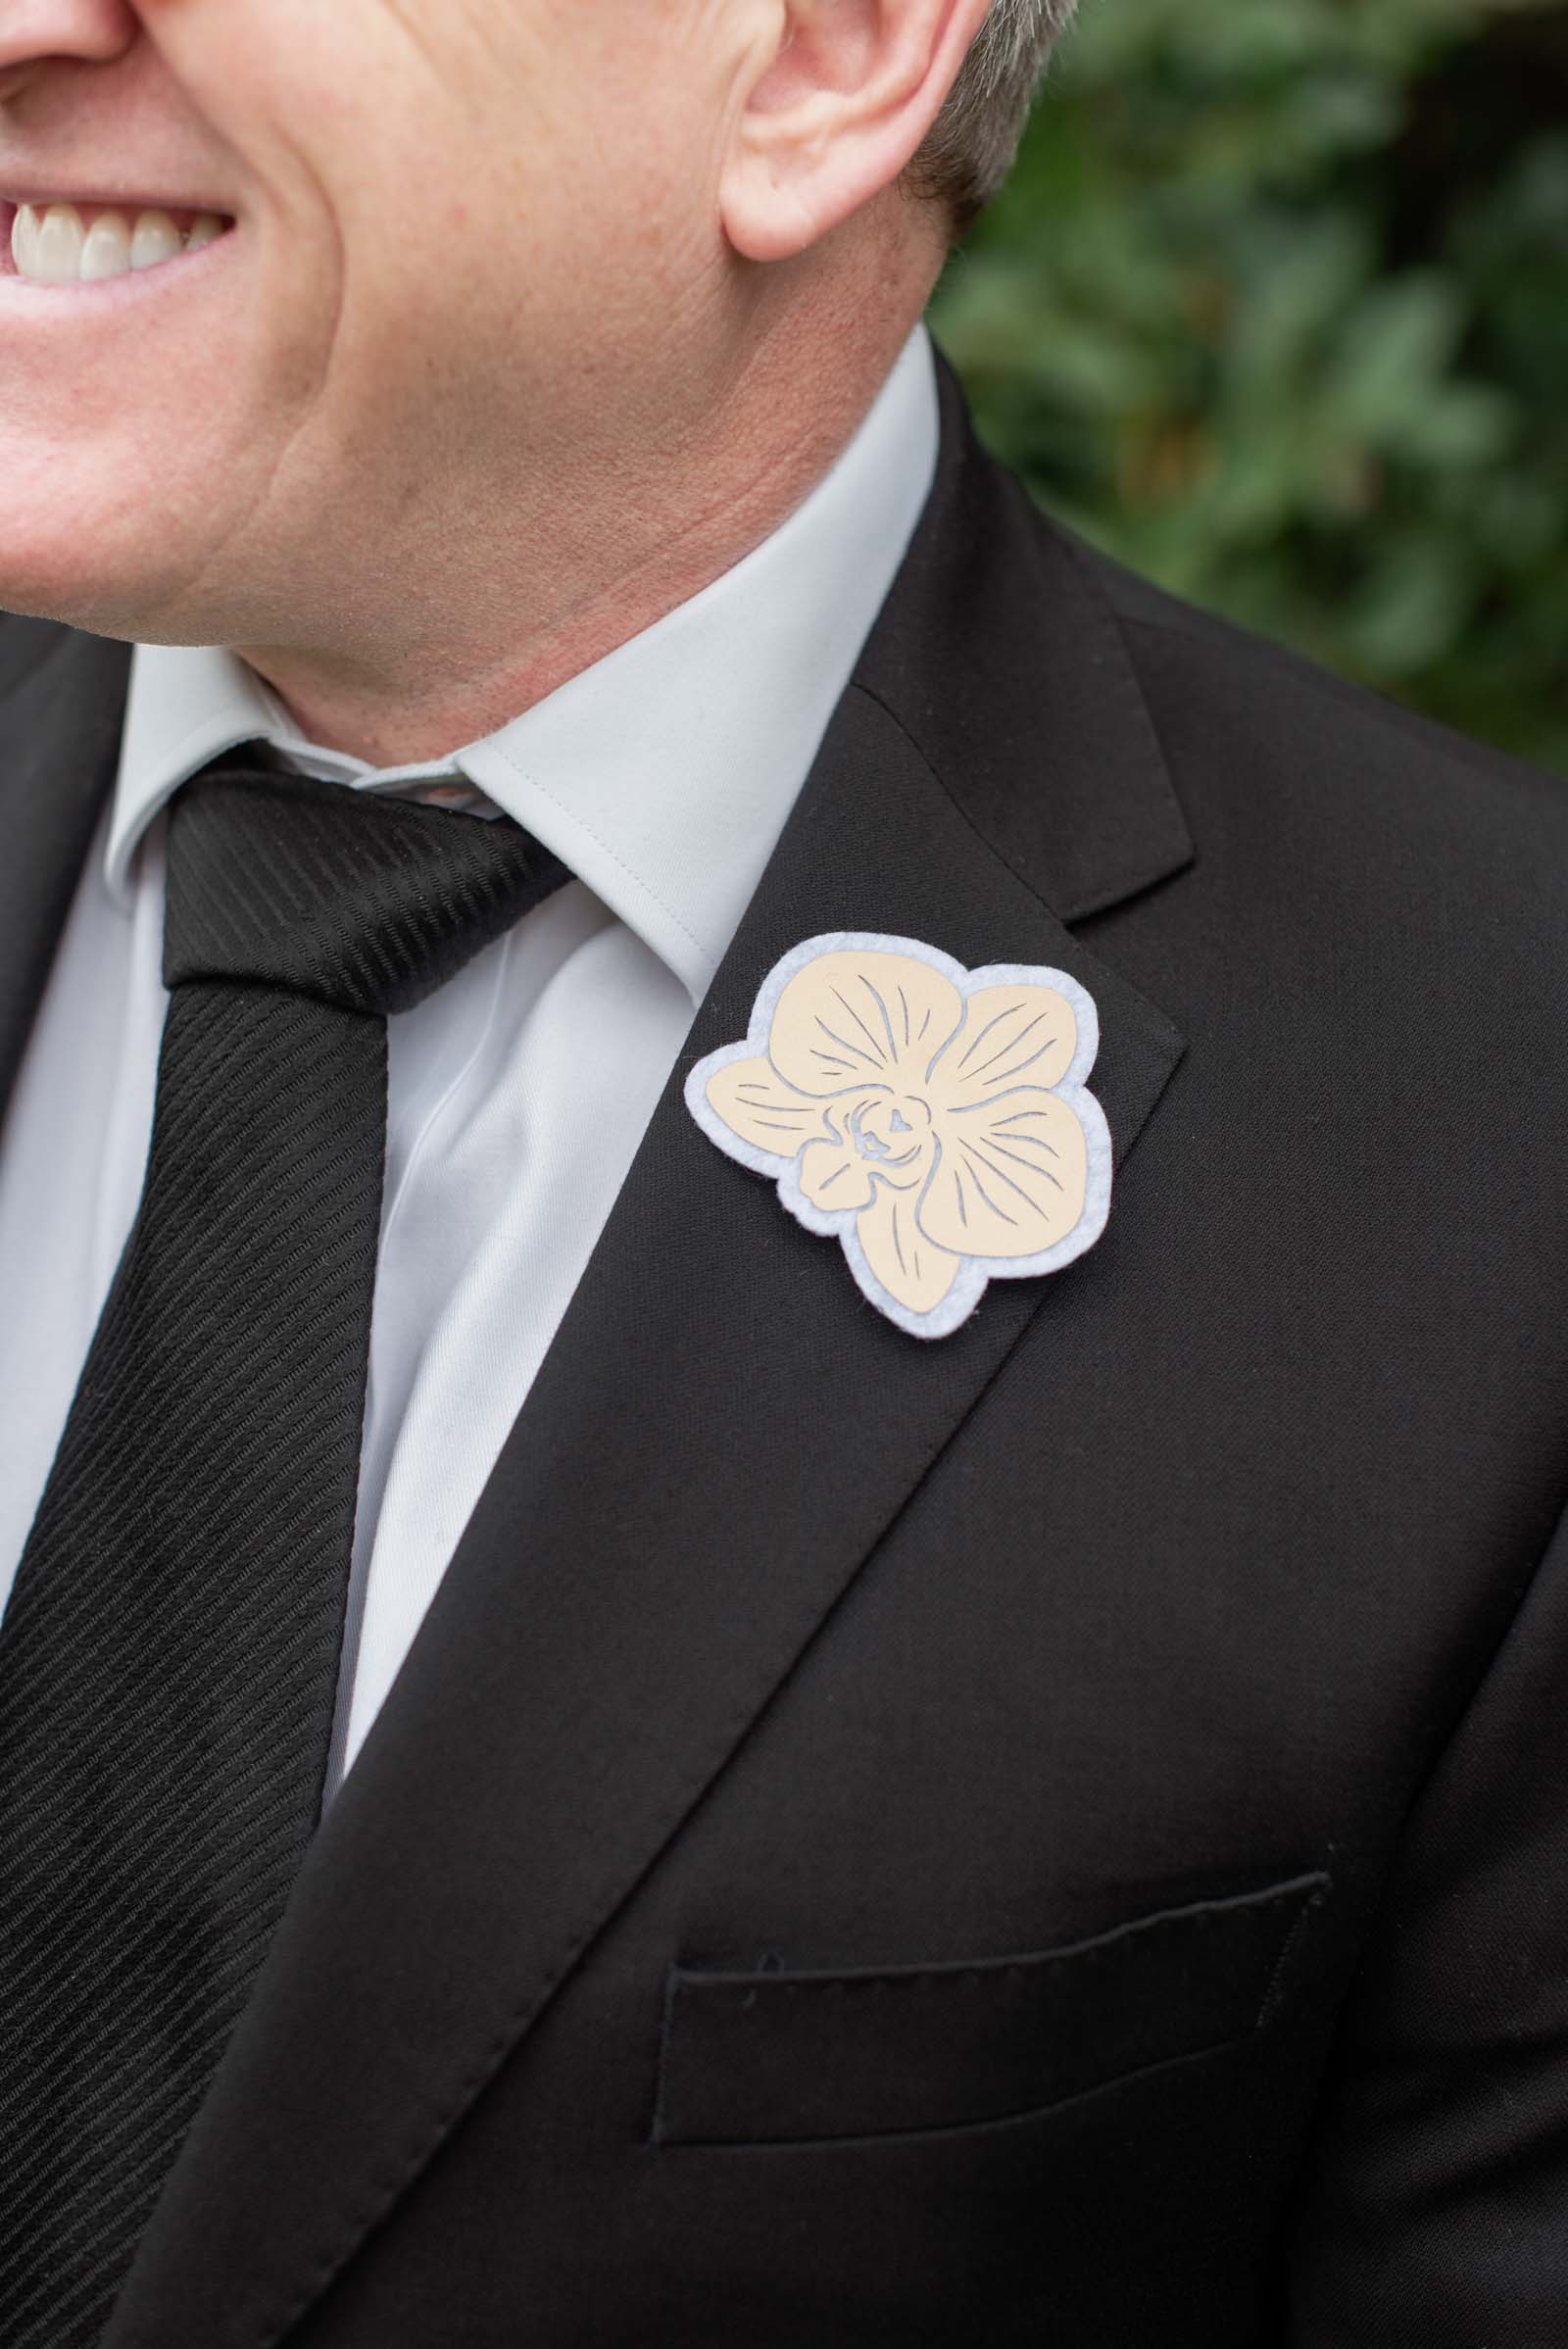
Felt Orchid Boutonniere
Supplies Needed: Stiffened felt, HTV, brooch pin back
Fresh flowers may wilt, but felt is forever! Use HTV to add the dimension of the orchid while the felt backdrop adds the stability so you can wear it. With a hot glue gun and a brooch backing pin, you've got yourself a playfully chic accessory to place wherever you'd like. This one won't get crushed under all of the wedding day hugs!
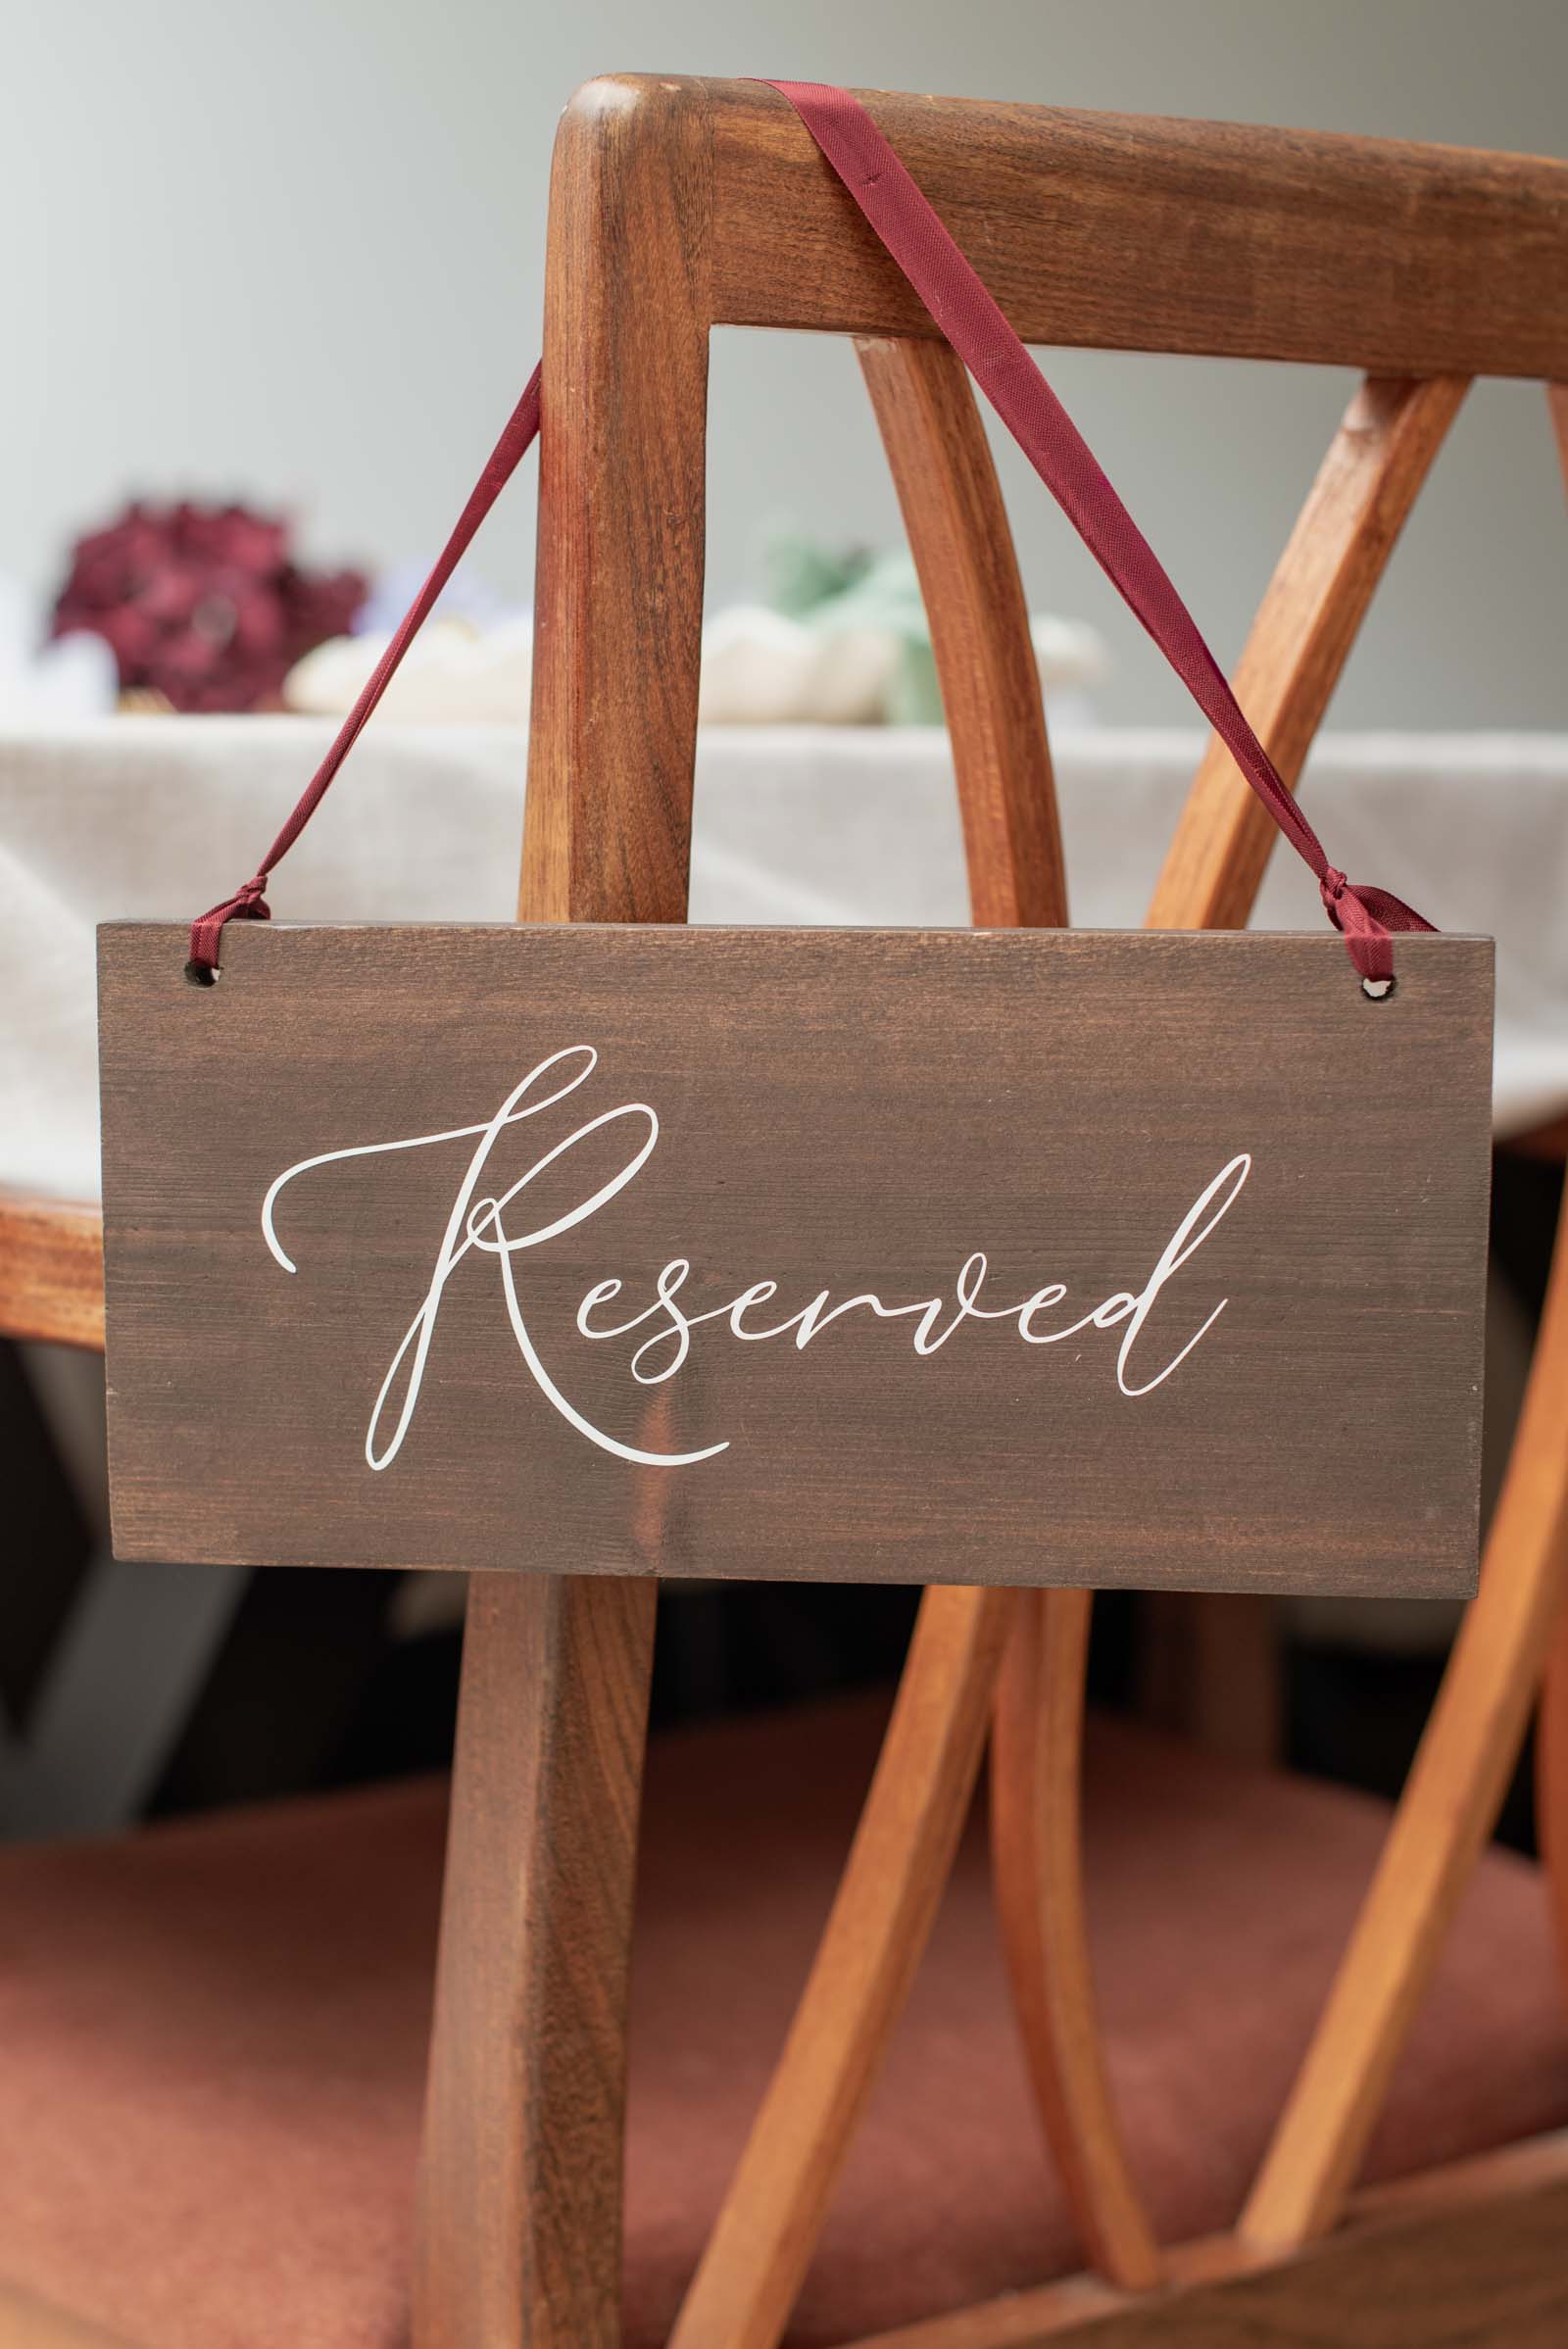
Reserved Hanging Chair Sign
Supplies Needed: Small cut wood plank, vinyl, transfer tape, ribbon
For a high-end look, keep your signage minimalist. A simple, elegant vinyl script on a dark walnut wood base ensures your "Reserved" seating is clear, and a hanging wedding sign frees up tabletop space for other wedding details.
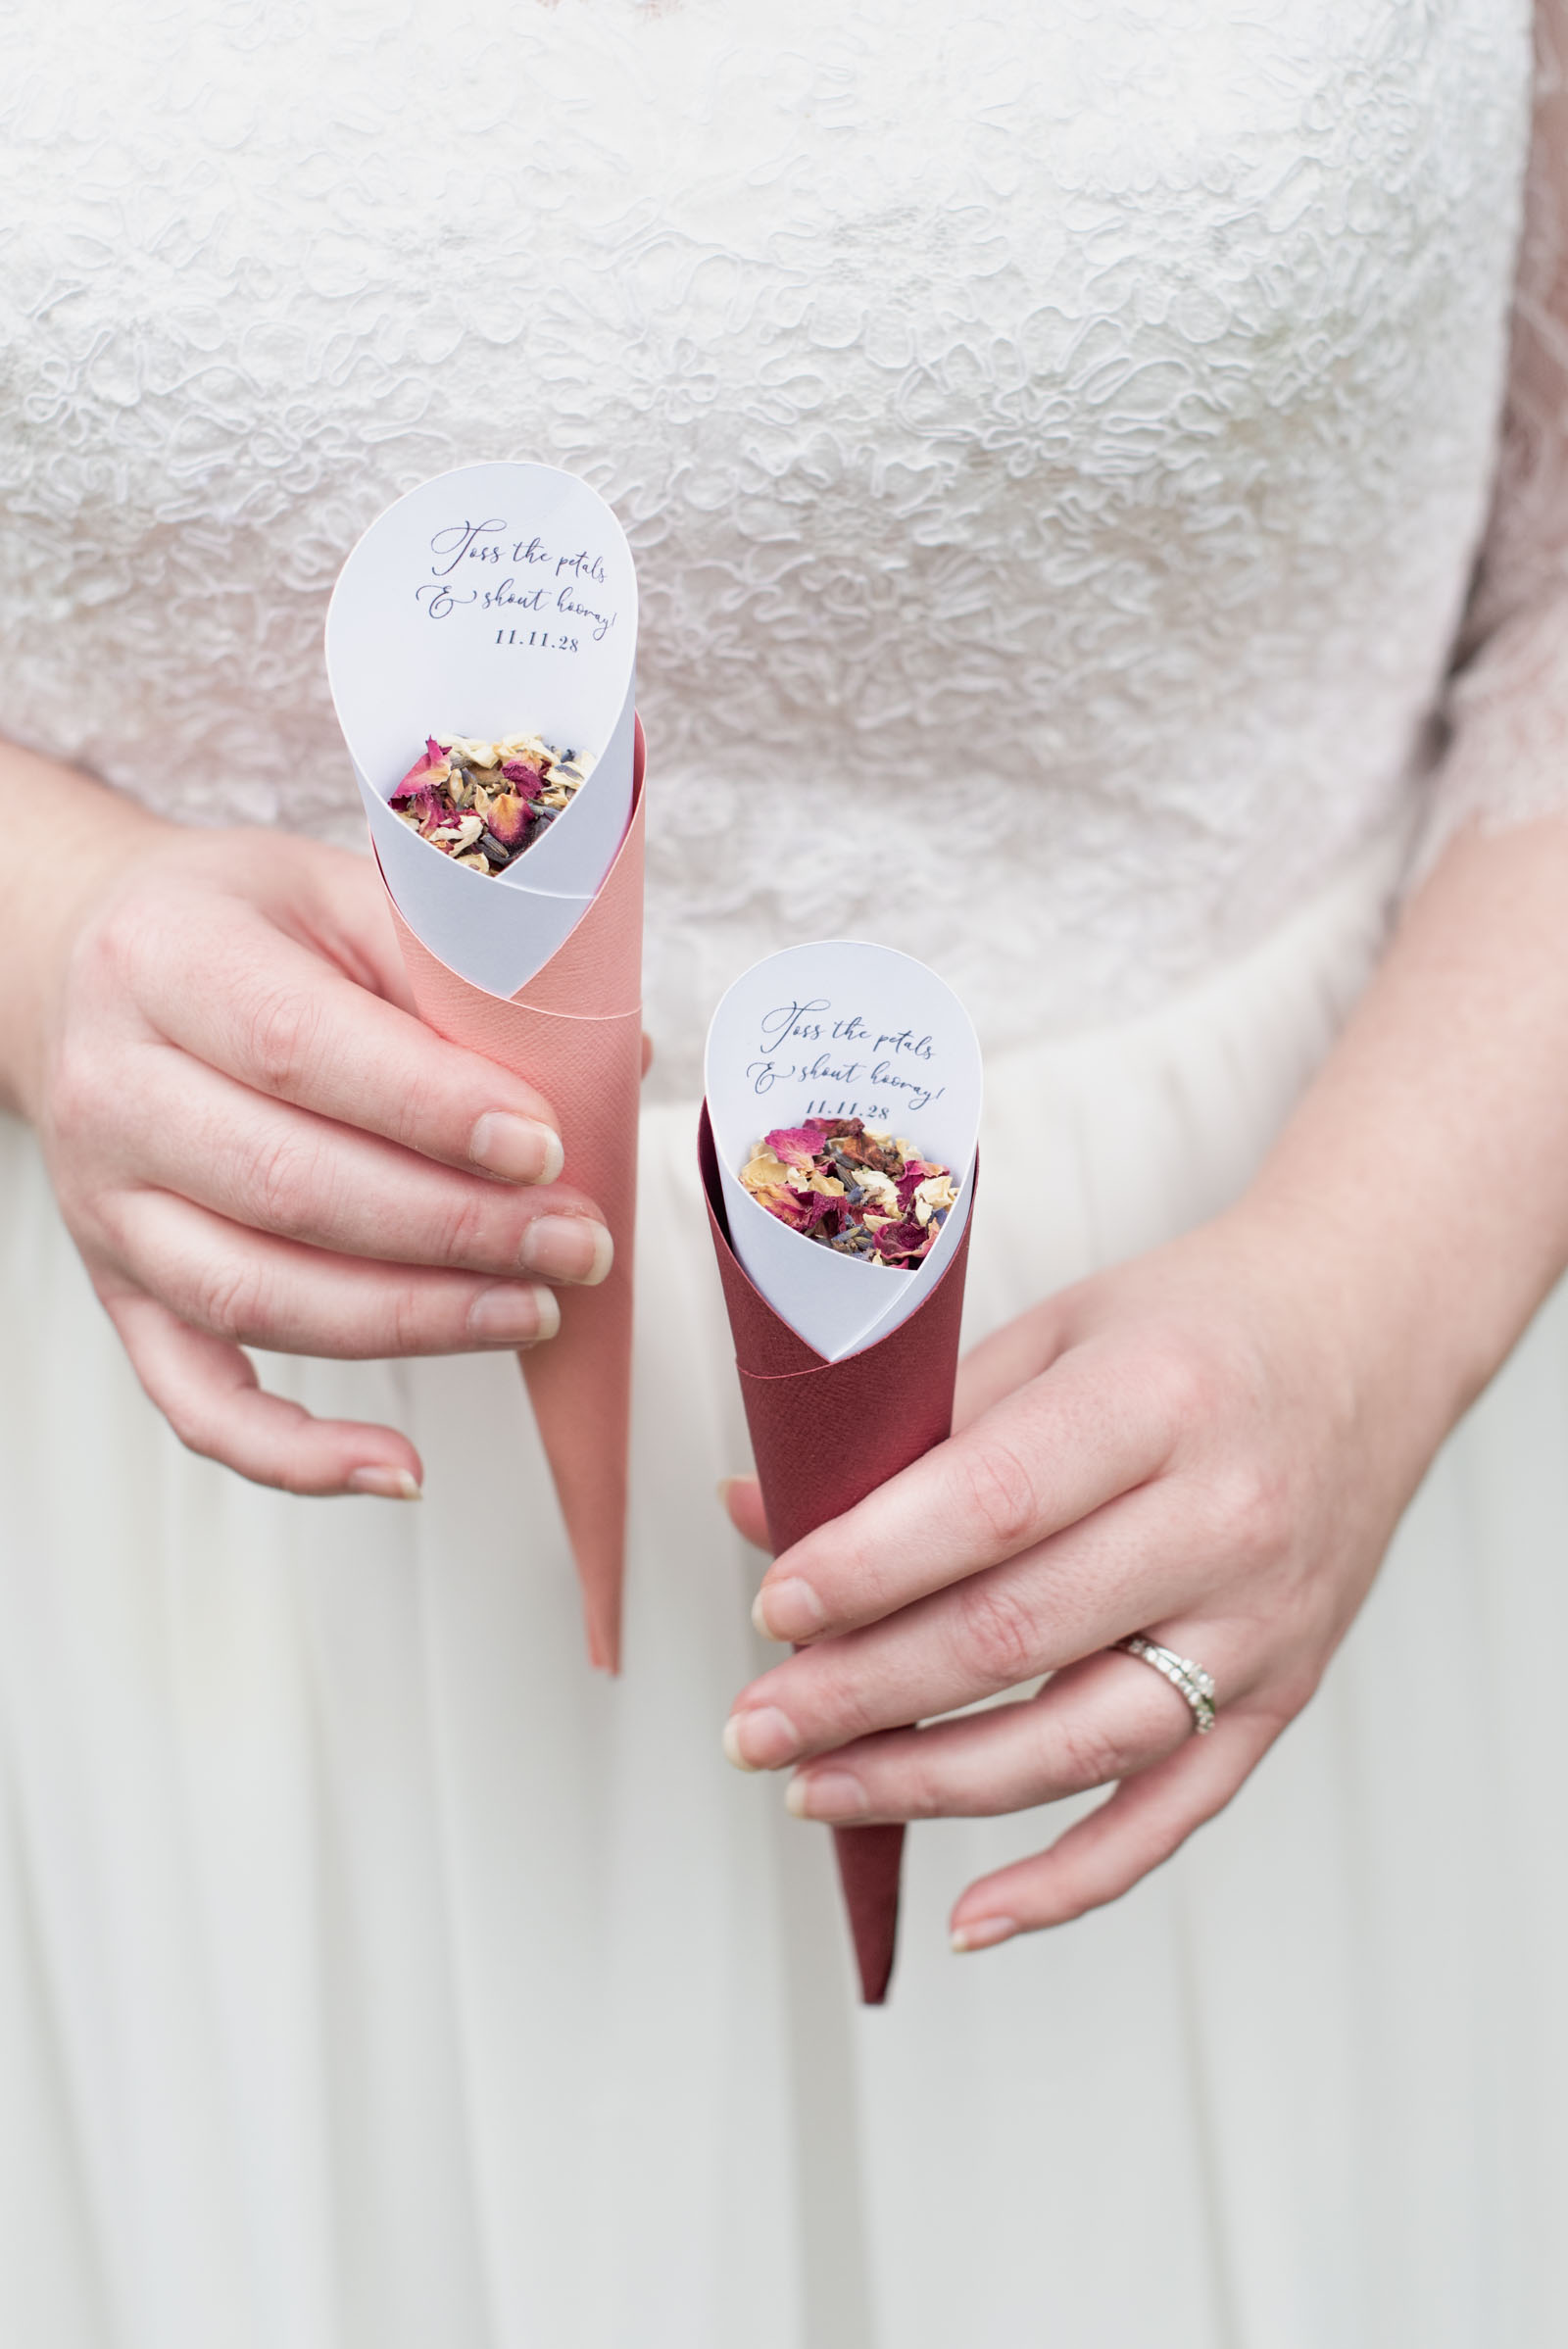
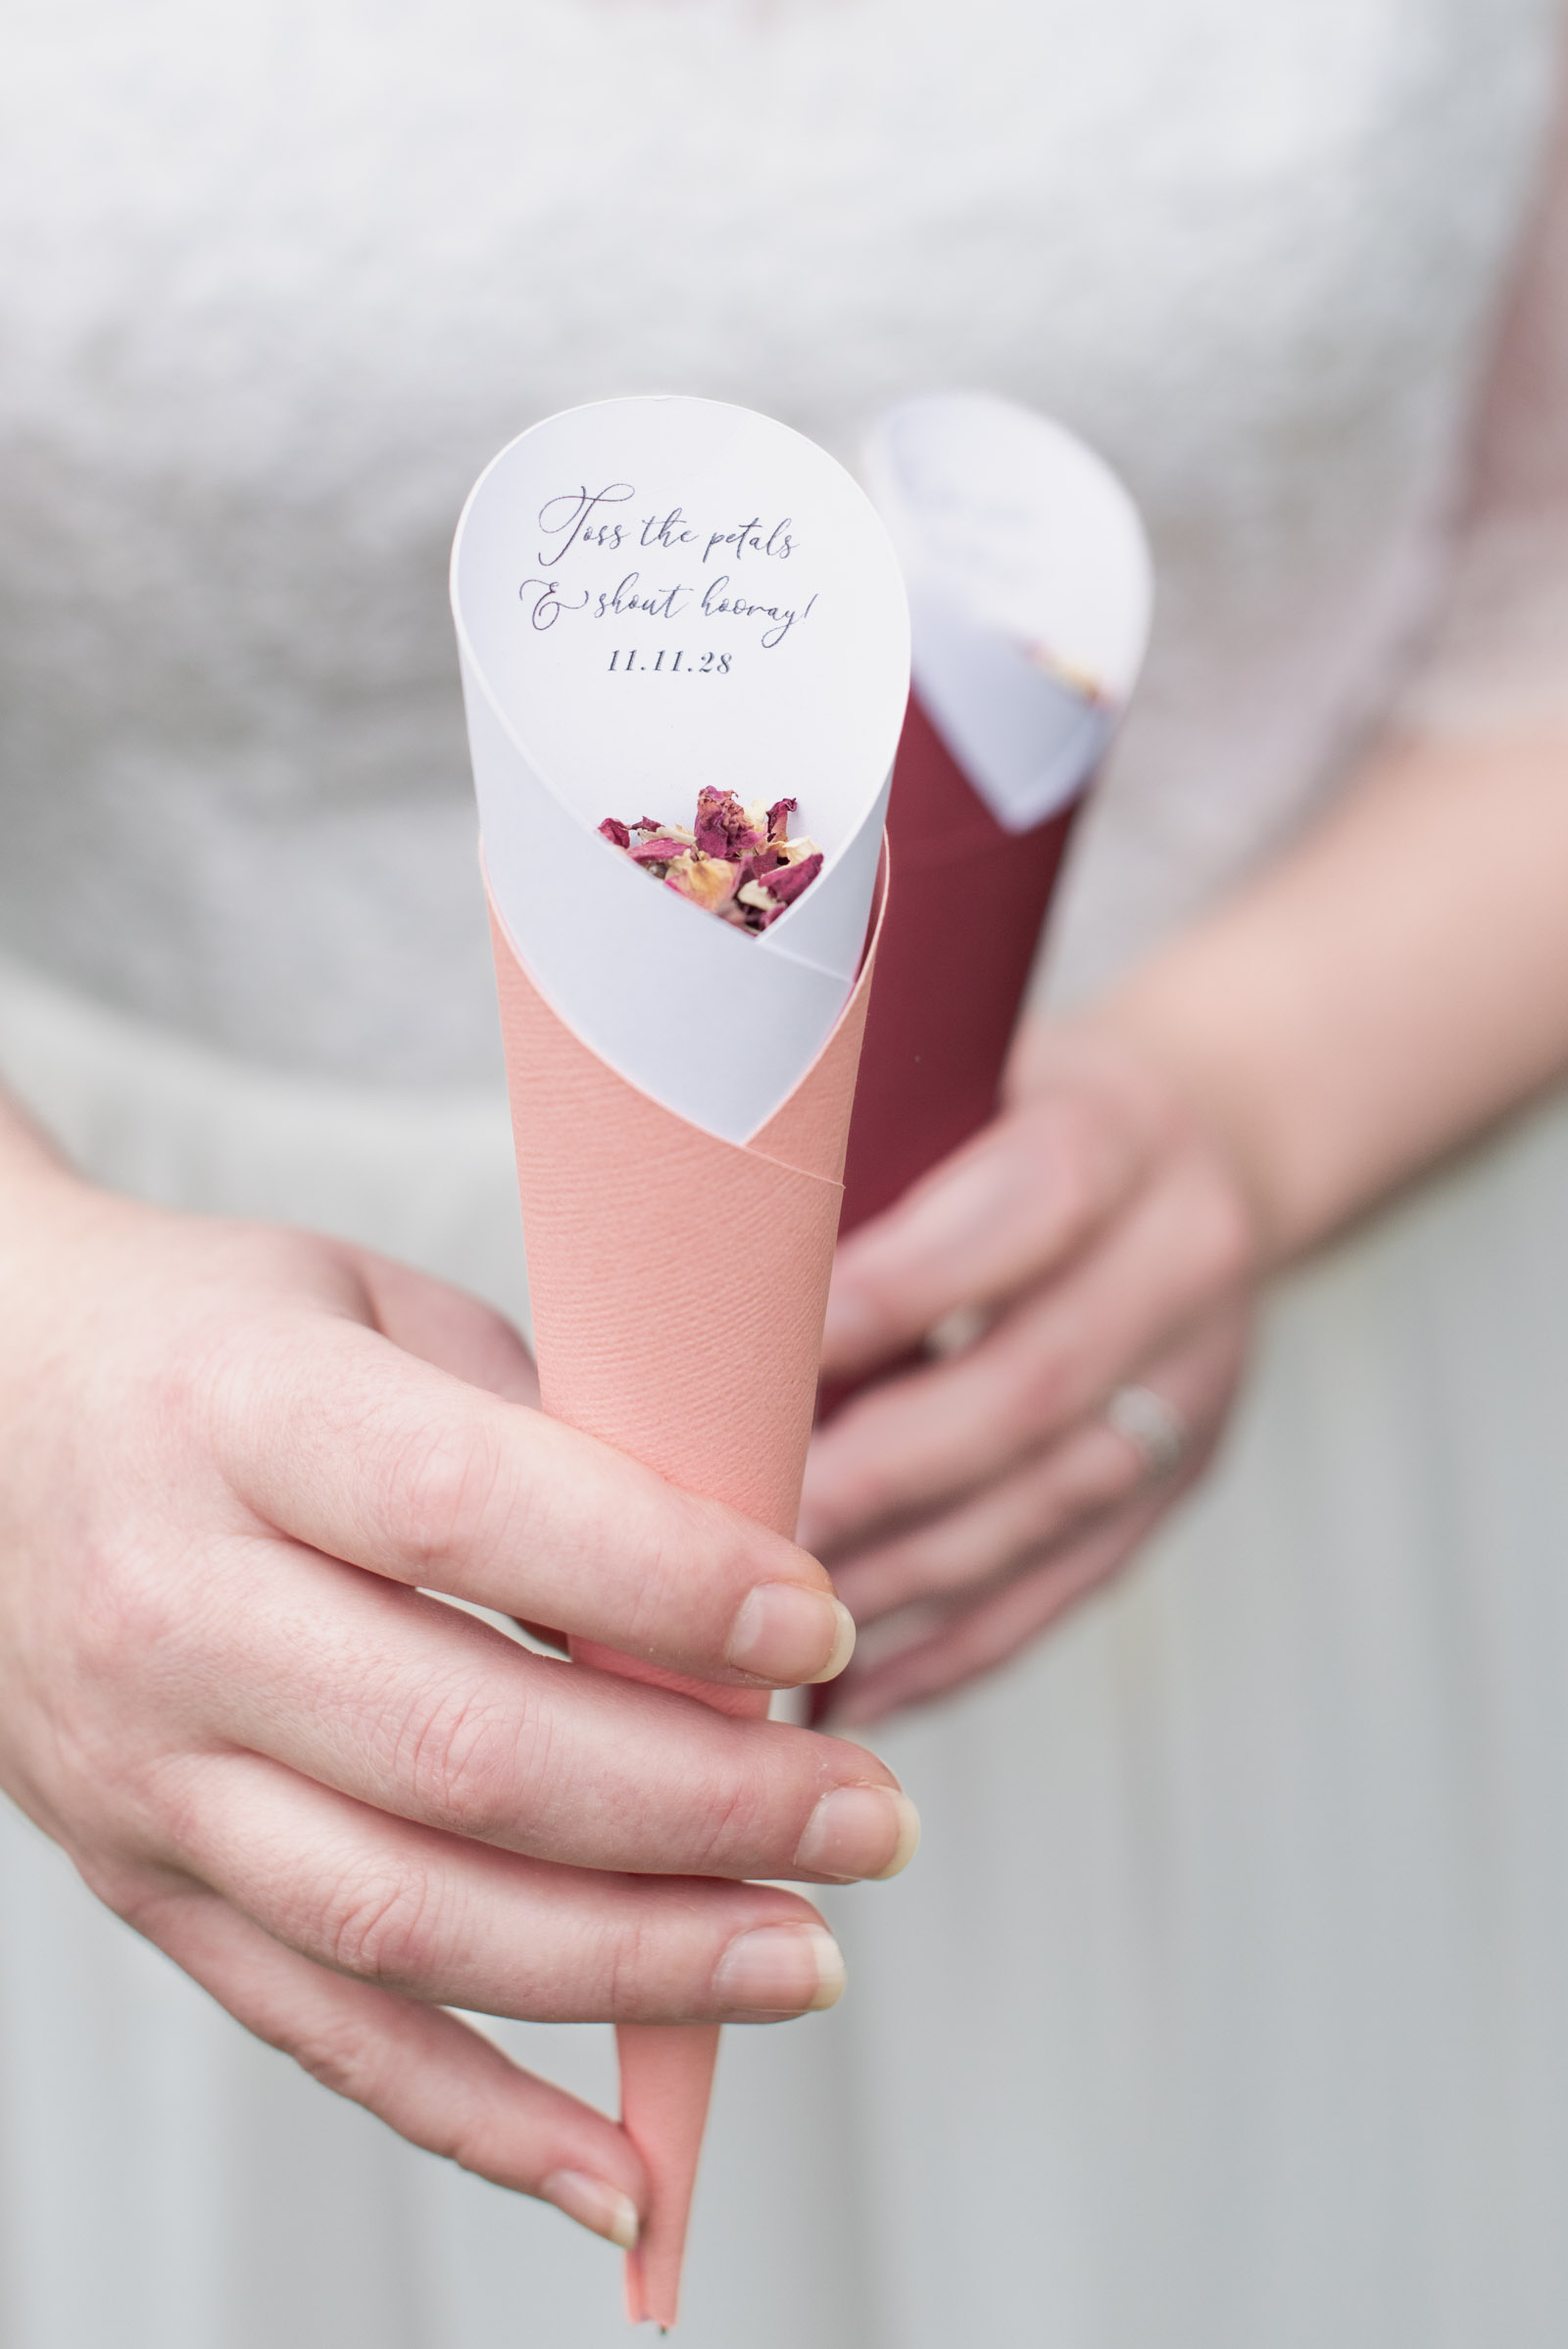
Ceremony Confetti Cones
Supplies Needed: Cardstock, inkjet printer
Using Cricut Design Space's Print Then Cut (PTC) feature allows you to add custom patterns or personalized text directly onto cardstock before cutting the cone shape. It’s that extra layer of wedding hyper-personalization that makes the ceremony feel bespoke!
Part 3: The Reception Decor
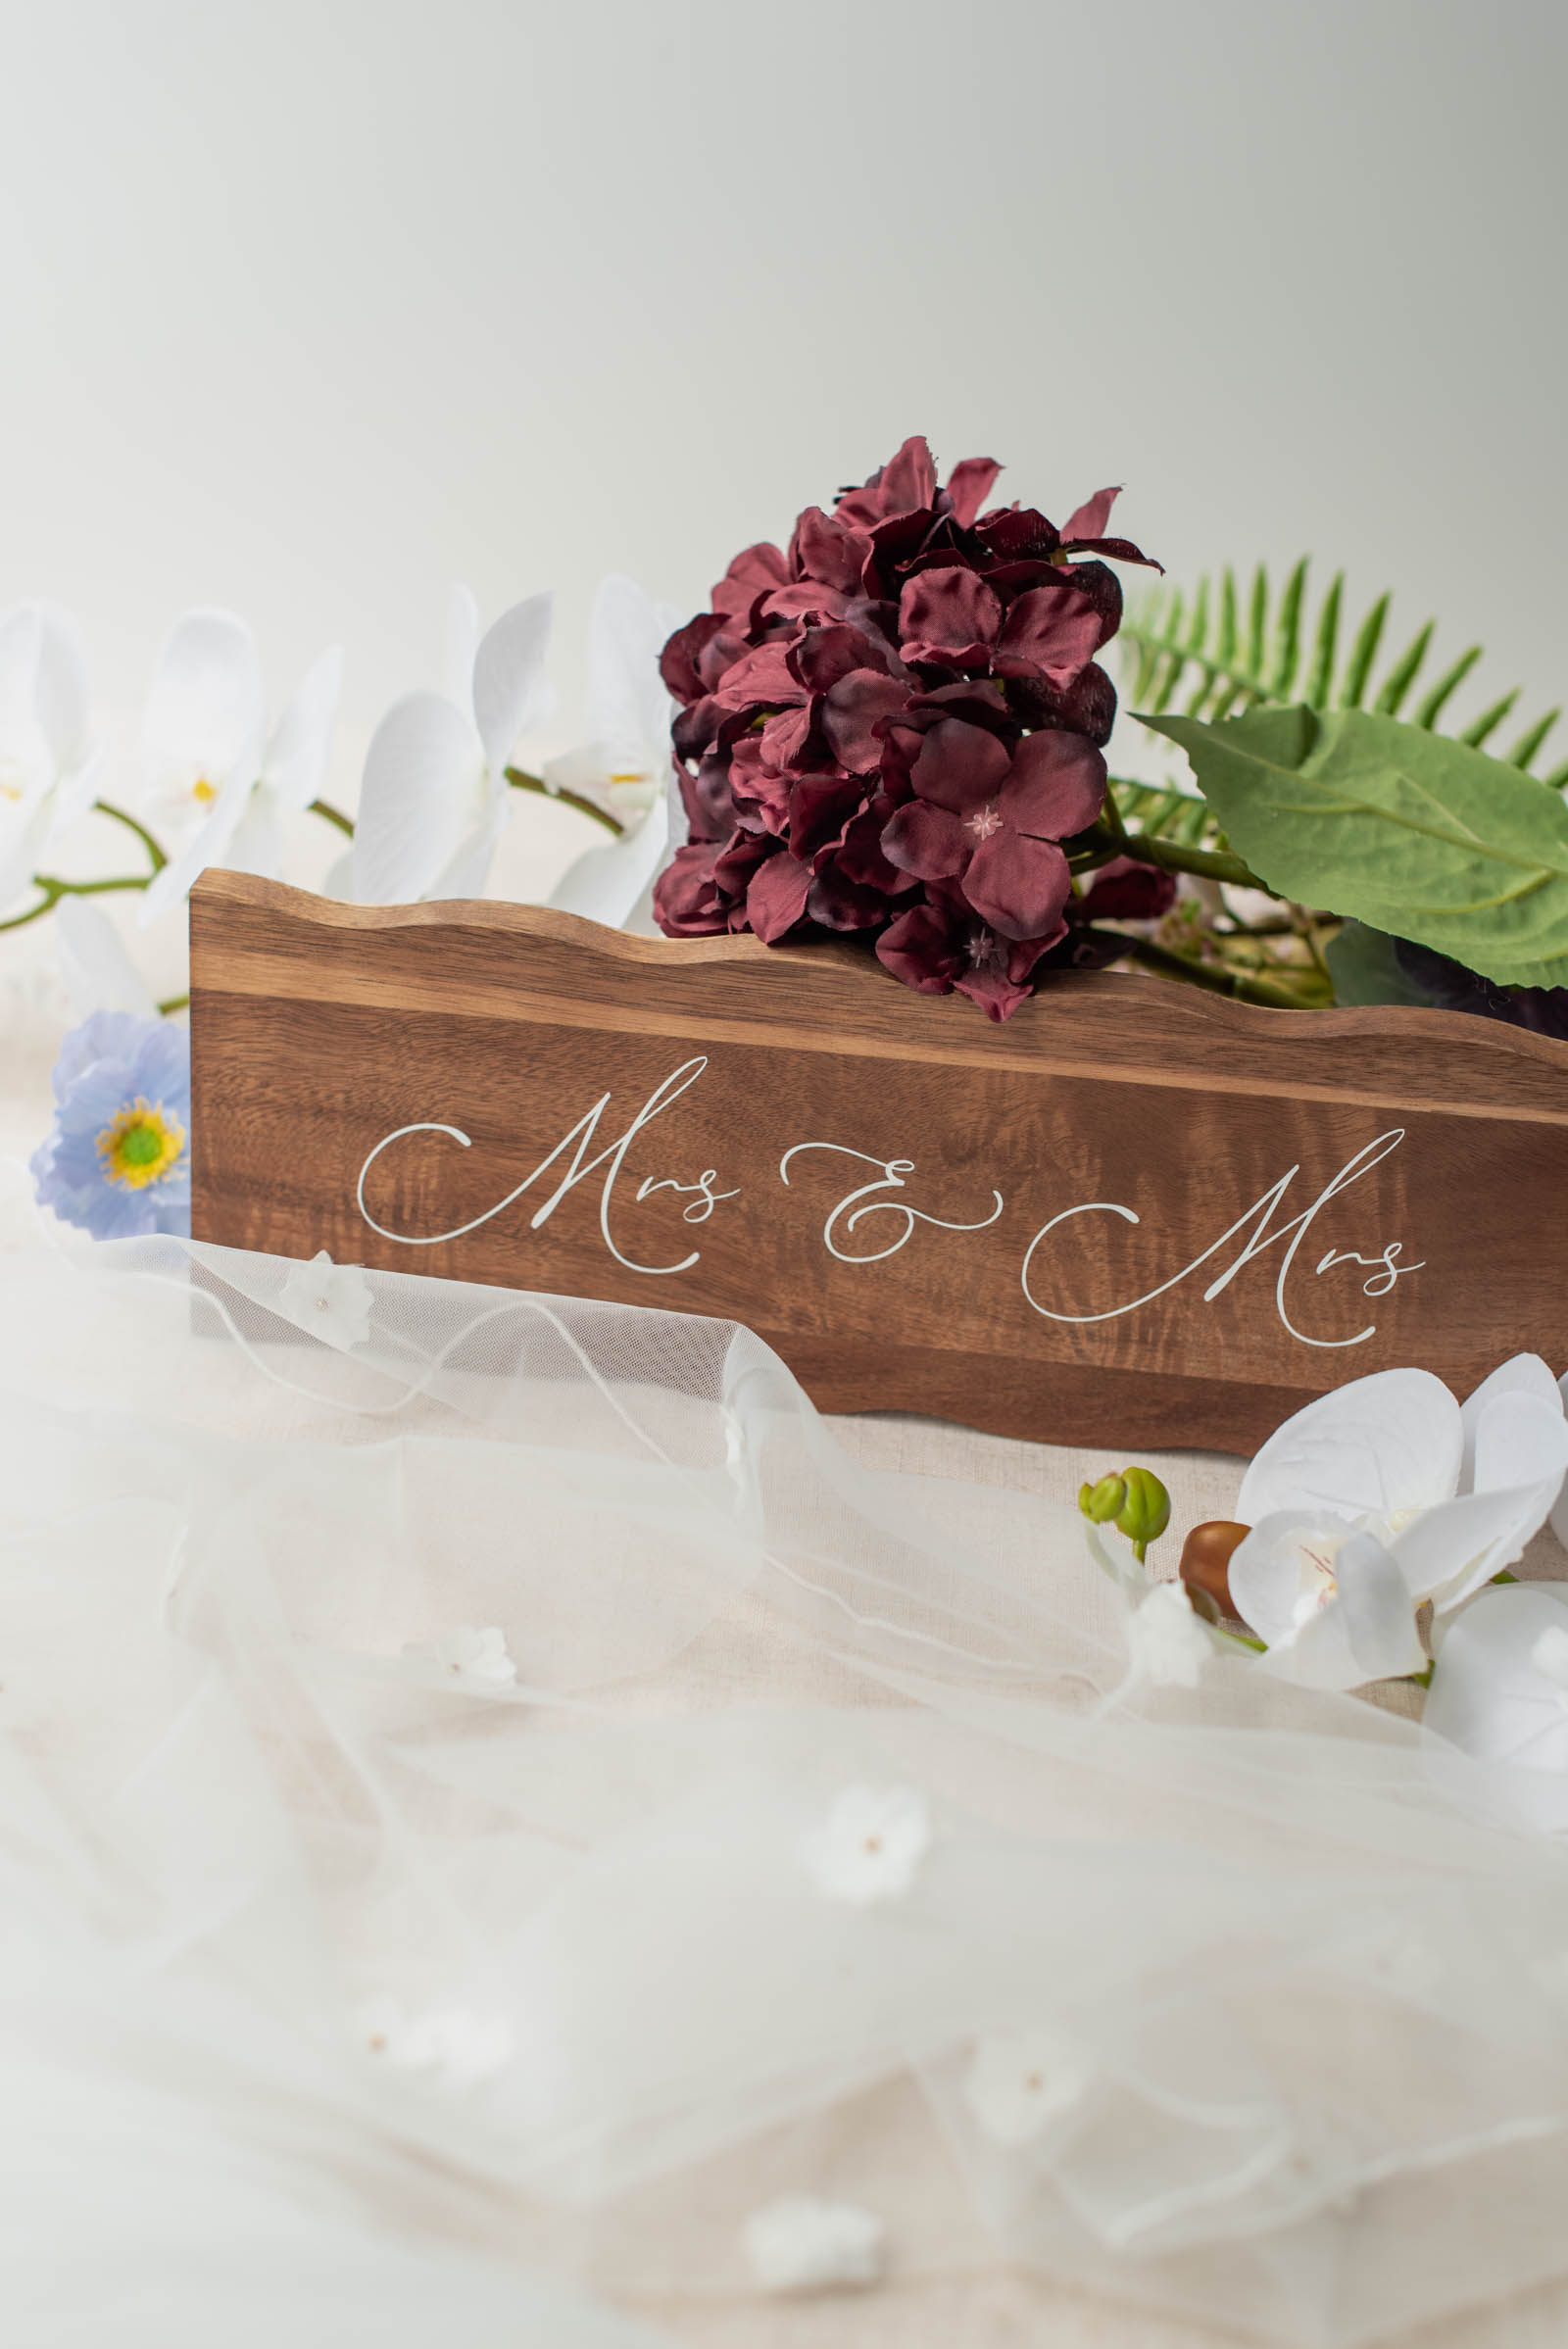
Wavy Wood Mrs & Mrs Table Sign
Supplies Needed: Wood cutting board, vinyl, transfer tape
The wavy shape decor trend is a huge nod to modern-retro chic, and we can't get enough of it! Using vinyl on a simple cutting board provides a clean, professional finish that’s much crisper than hand-painting, and you can reuse it after the big day if you choose. Just peel off your vinyl, wash, and enjoy for your next charcuterie!
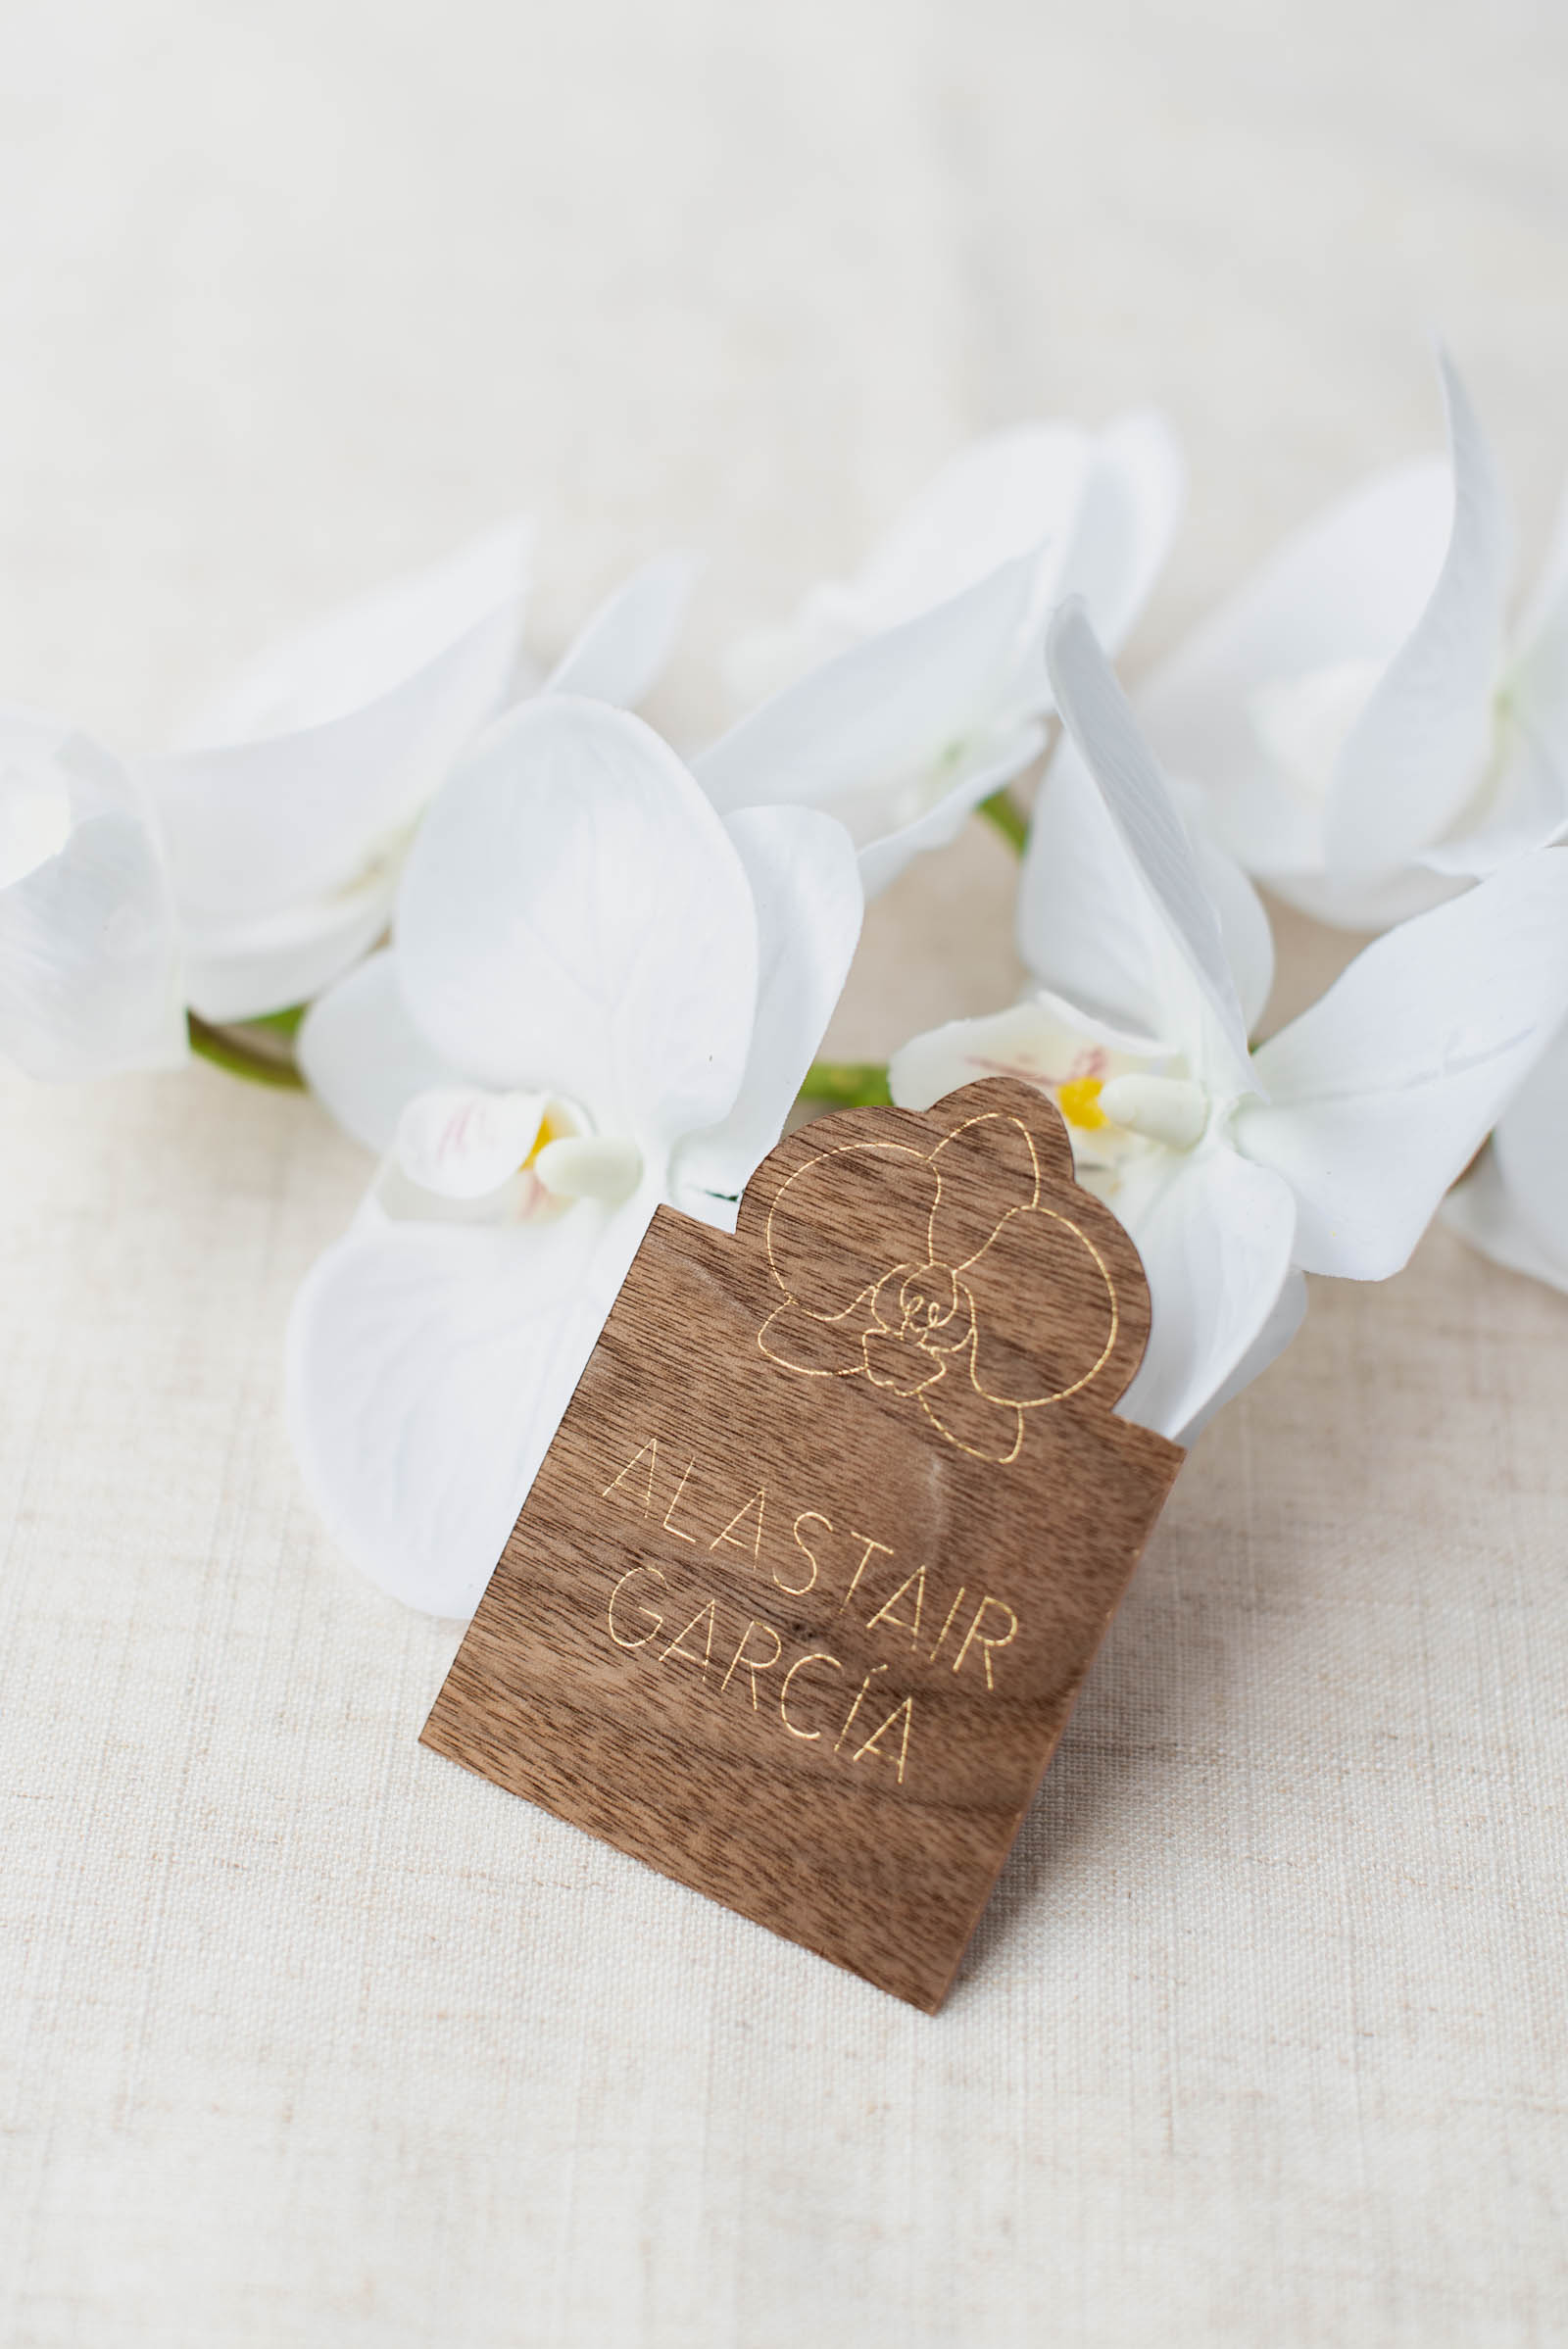
Wood Veneer Place Cards
Supplies Needed: Wood veneer, foil transfer kit + gold foil sheets
These are the ultimate place setting showstoppers. Because if you didn't have something metallic and shiny at your wedding, did you even get married!? The organic grain of the walnut wood veneer paired with a shimmering gold foil looks incredibly high-end and doubles as a luxury keepsake for your guests to take home.
Want to learn how to do foiling on wood veneer? This unique Cricut technique is taught and featured in the new Cricut Weddings book by Chelsea Barton. Super beginner-friendly with gorgeous results! This project is compatible with the Cricut machines that can cut with a deep point blade.
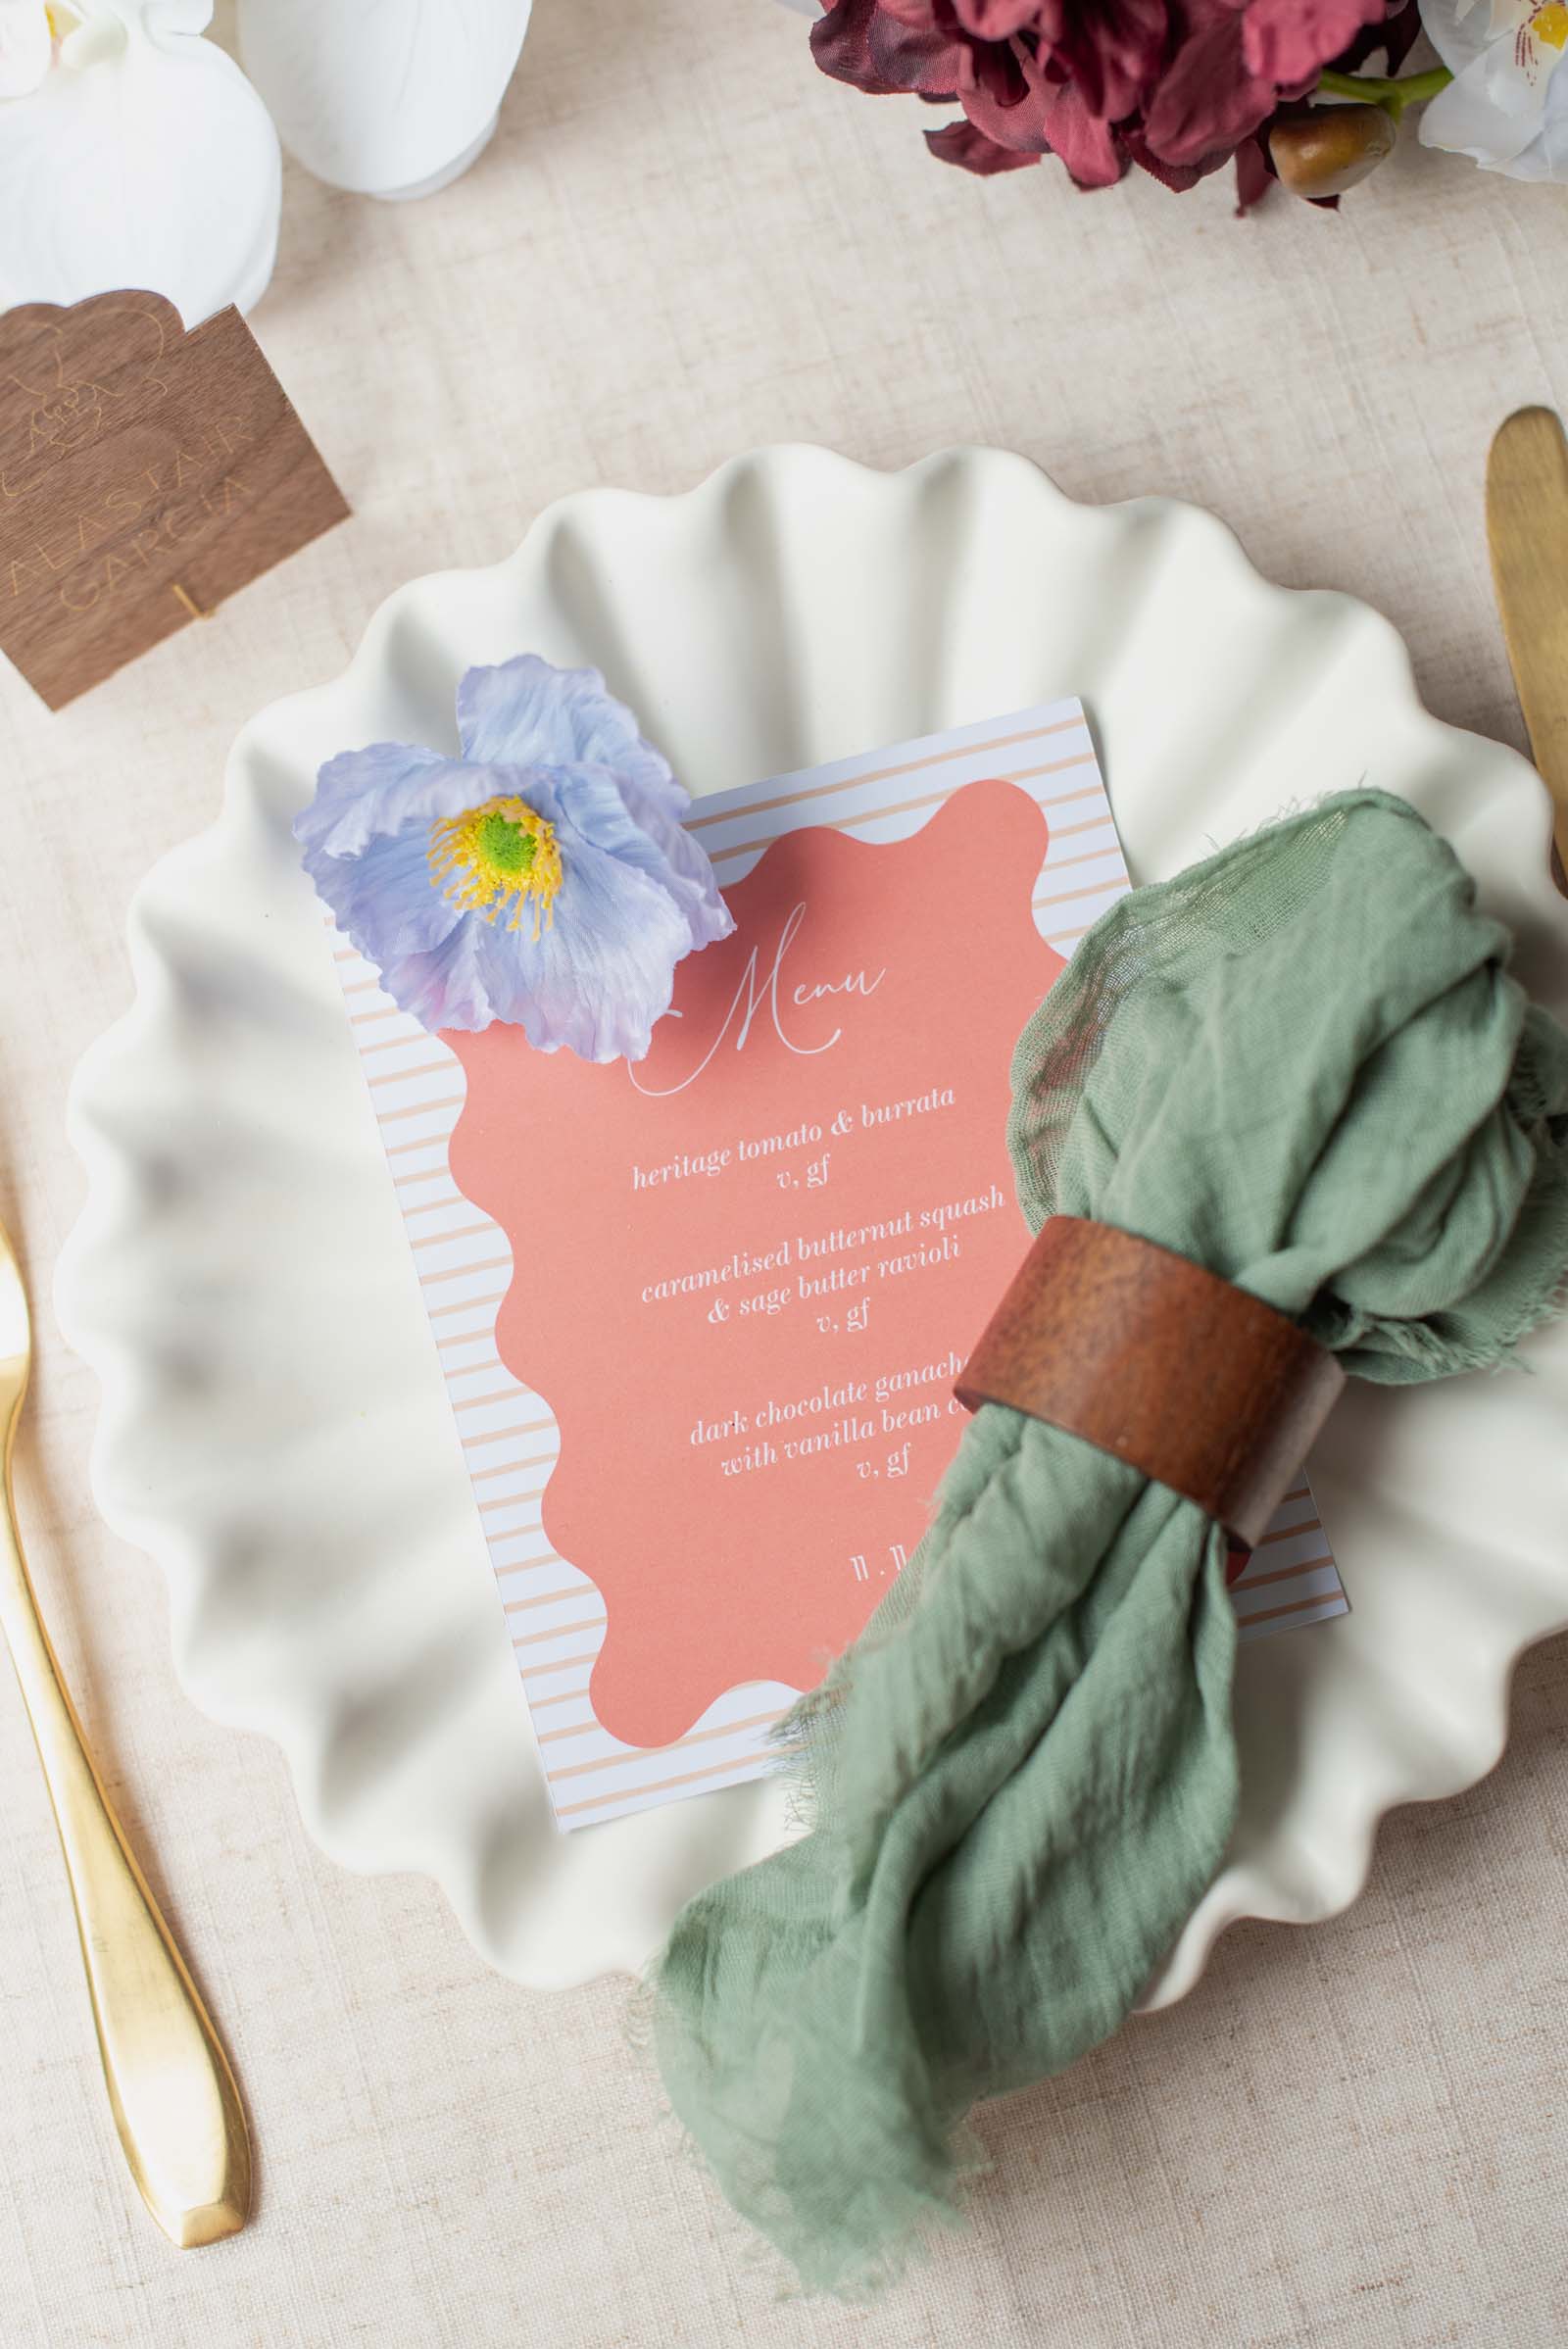
Printed Menu Cards
Supplies Needed: Cardstock, inkjet printer
Don't settle for basic printer paper! By using the PTC feature on thick cardstock and a design-led layout, you can achieve a professional, elegant look. This one is so customizable and mirrors the design elements used in the invitation suite as seen above.
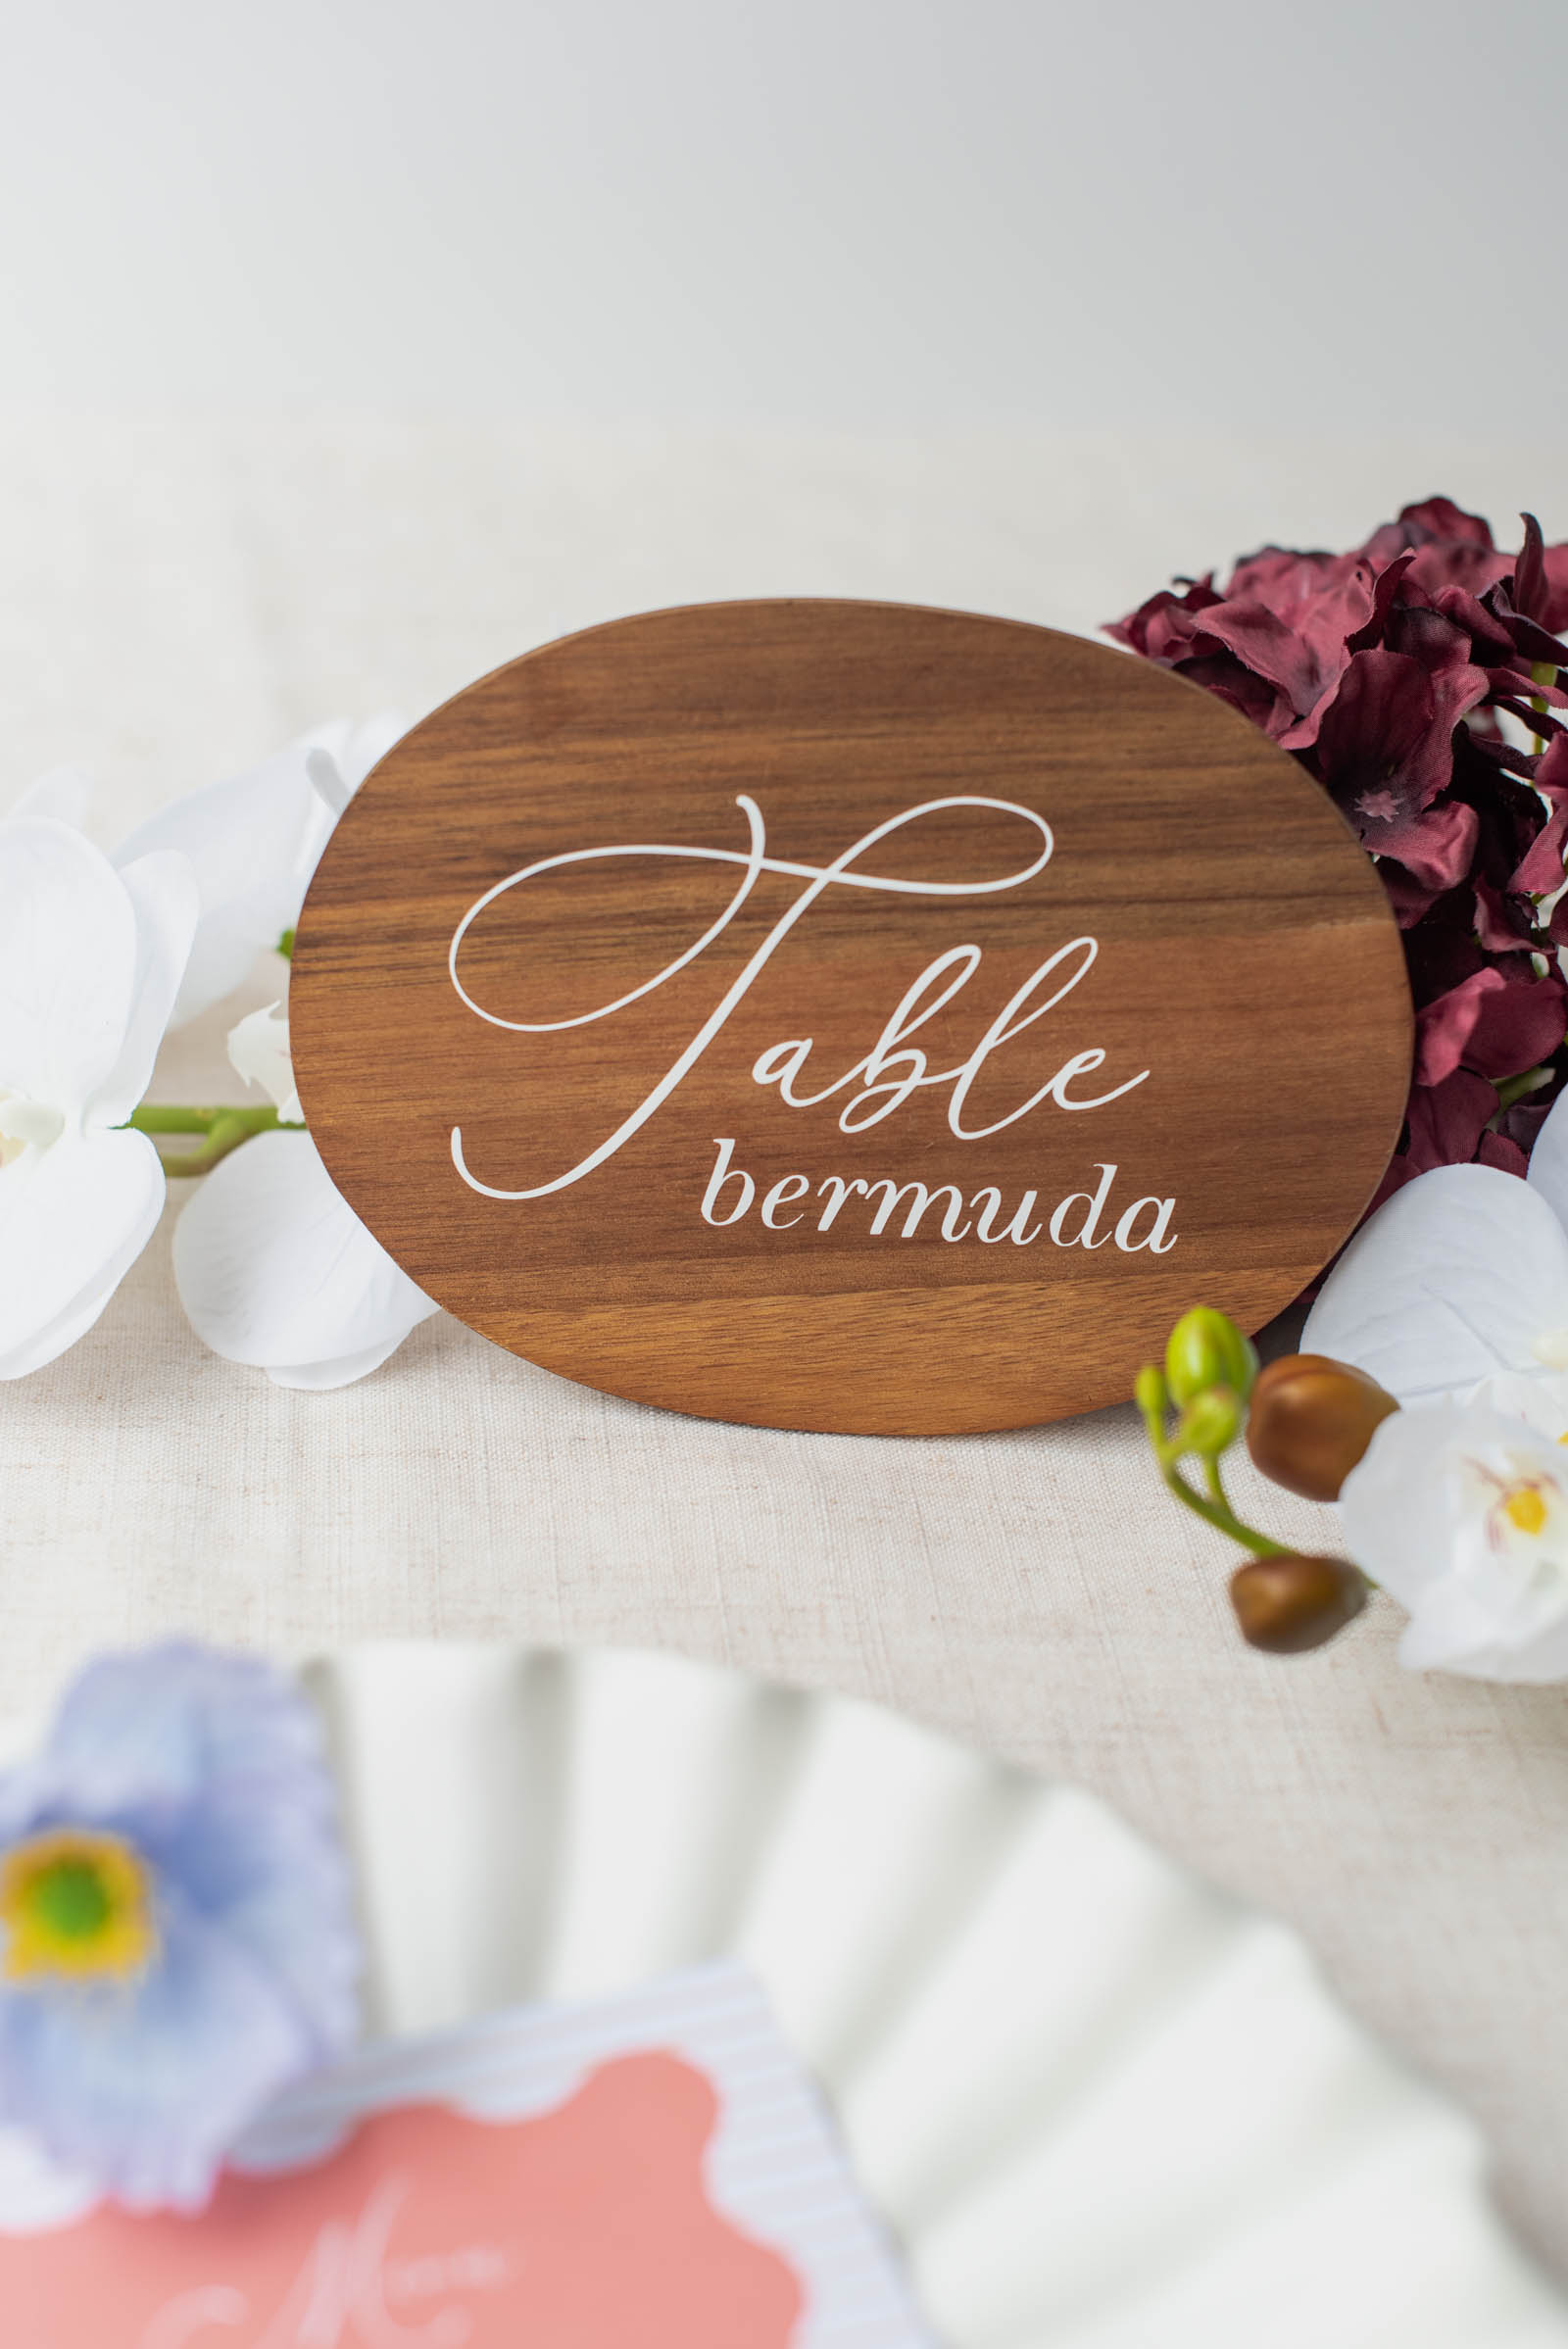
Destination-Themed Table Number Sign
Supplies Needed: Oval wood blank, vinyl, transfer tape
If you’re an adventurous couple, these table number signs are a must as it proves that a theme can be very simple and sophisticated while giving the personal touch to where you've visited together. Whether you use wood, acrylic, canvas, or paper, the inspiration translates across many different materials.
Part 4: Personal Touches & The Honeymoon
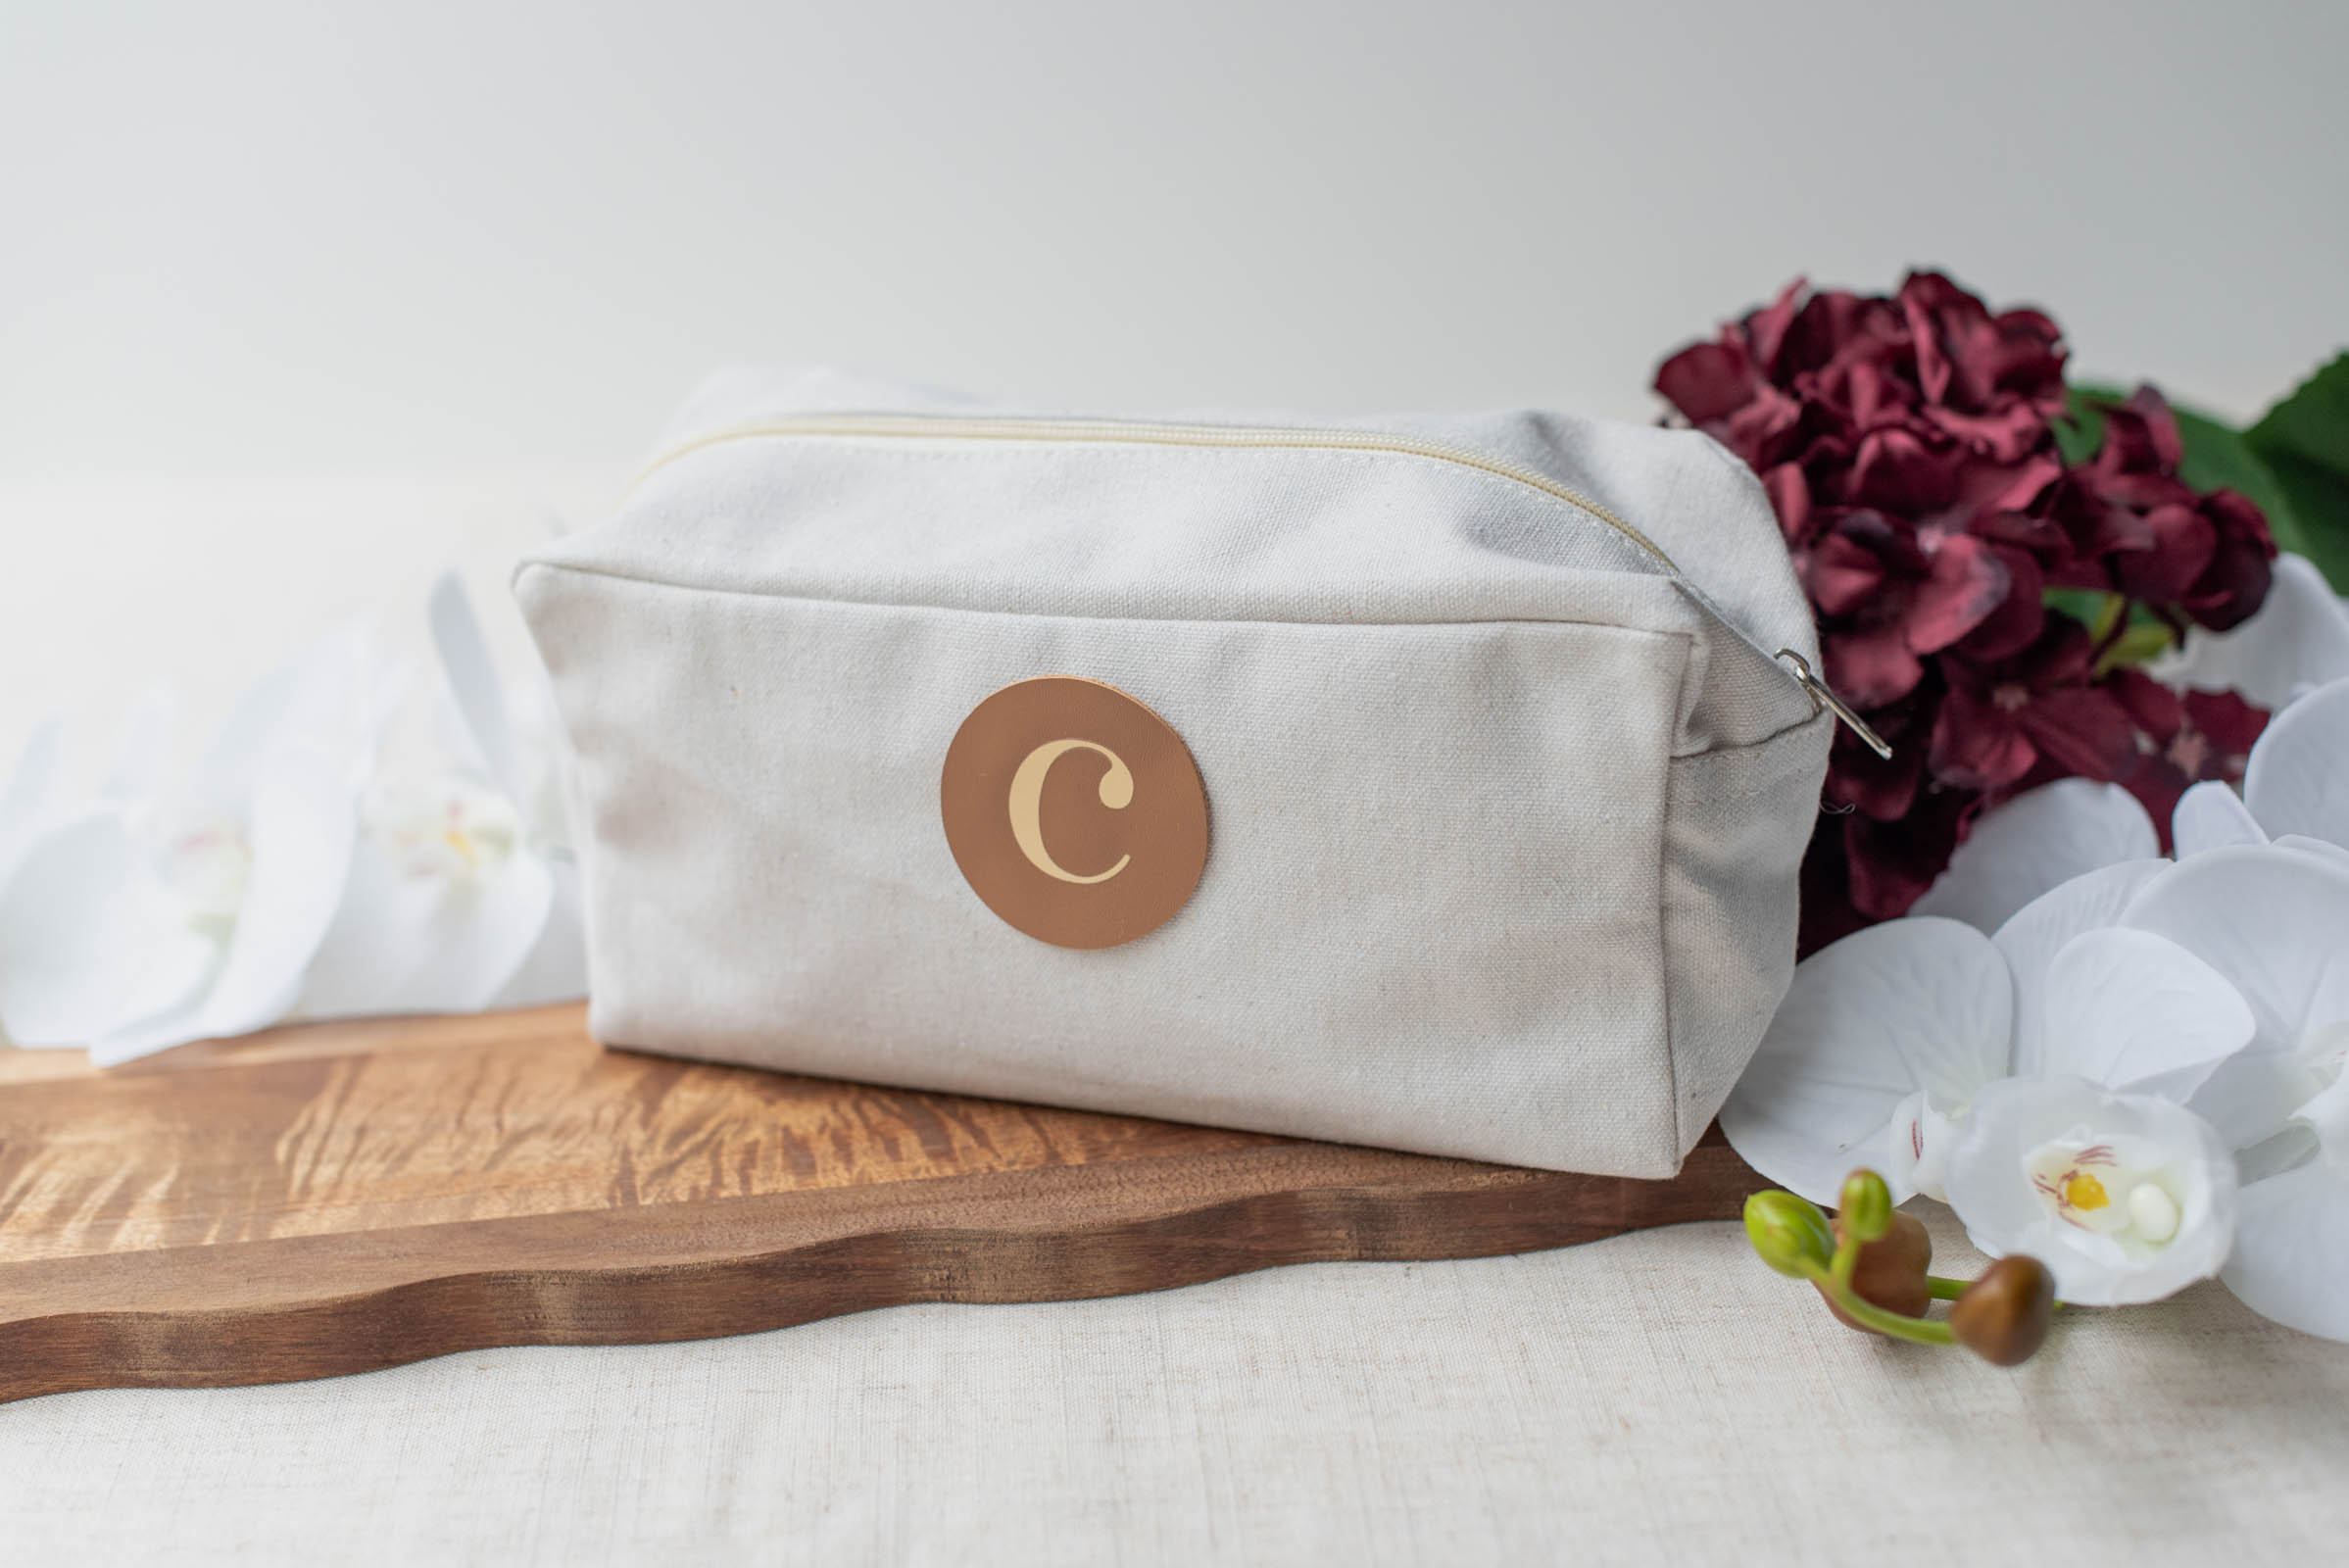
Monogram Honeymoon Travel Pouch
Supplies Needed: Blank zipper pouch bag, leather, HTV, hot glue gun
Leather (or vegan leather) is one of the best ways to elevate a Cricut wedding project as it's an unexpected material. Add a simple HTV monogram of your first or last name initial on a toiletries bag, and you have created a boutique make for you or a gift for happy couple that's perfect for the honeymoon.

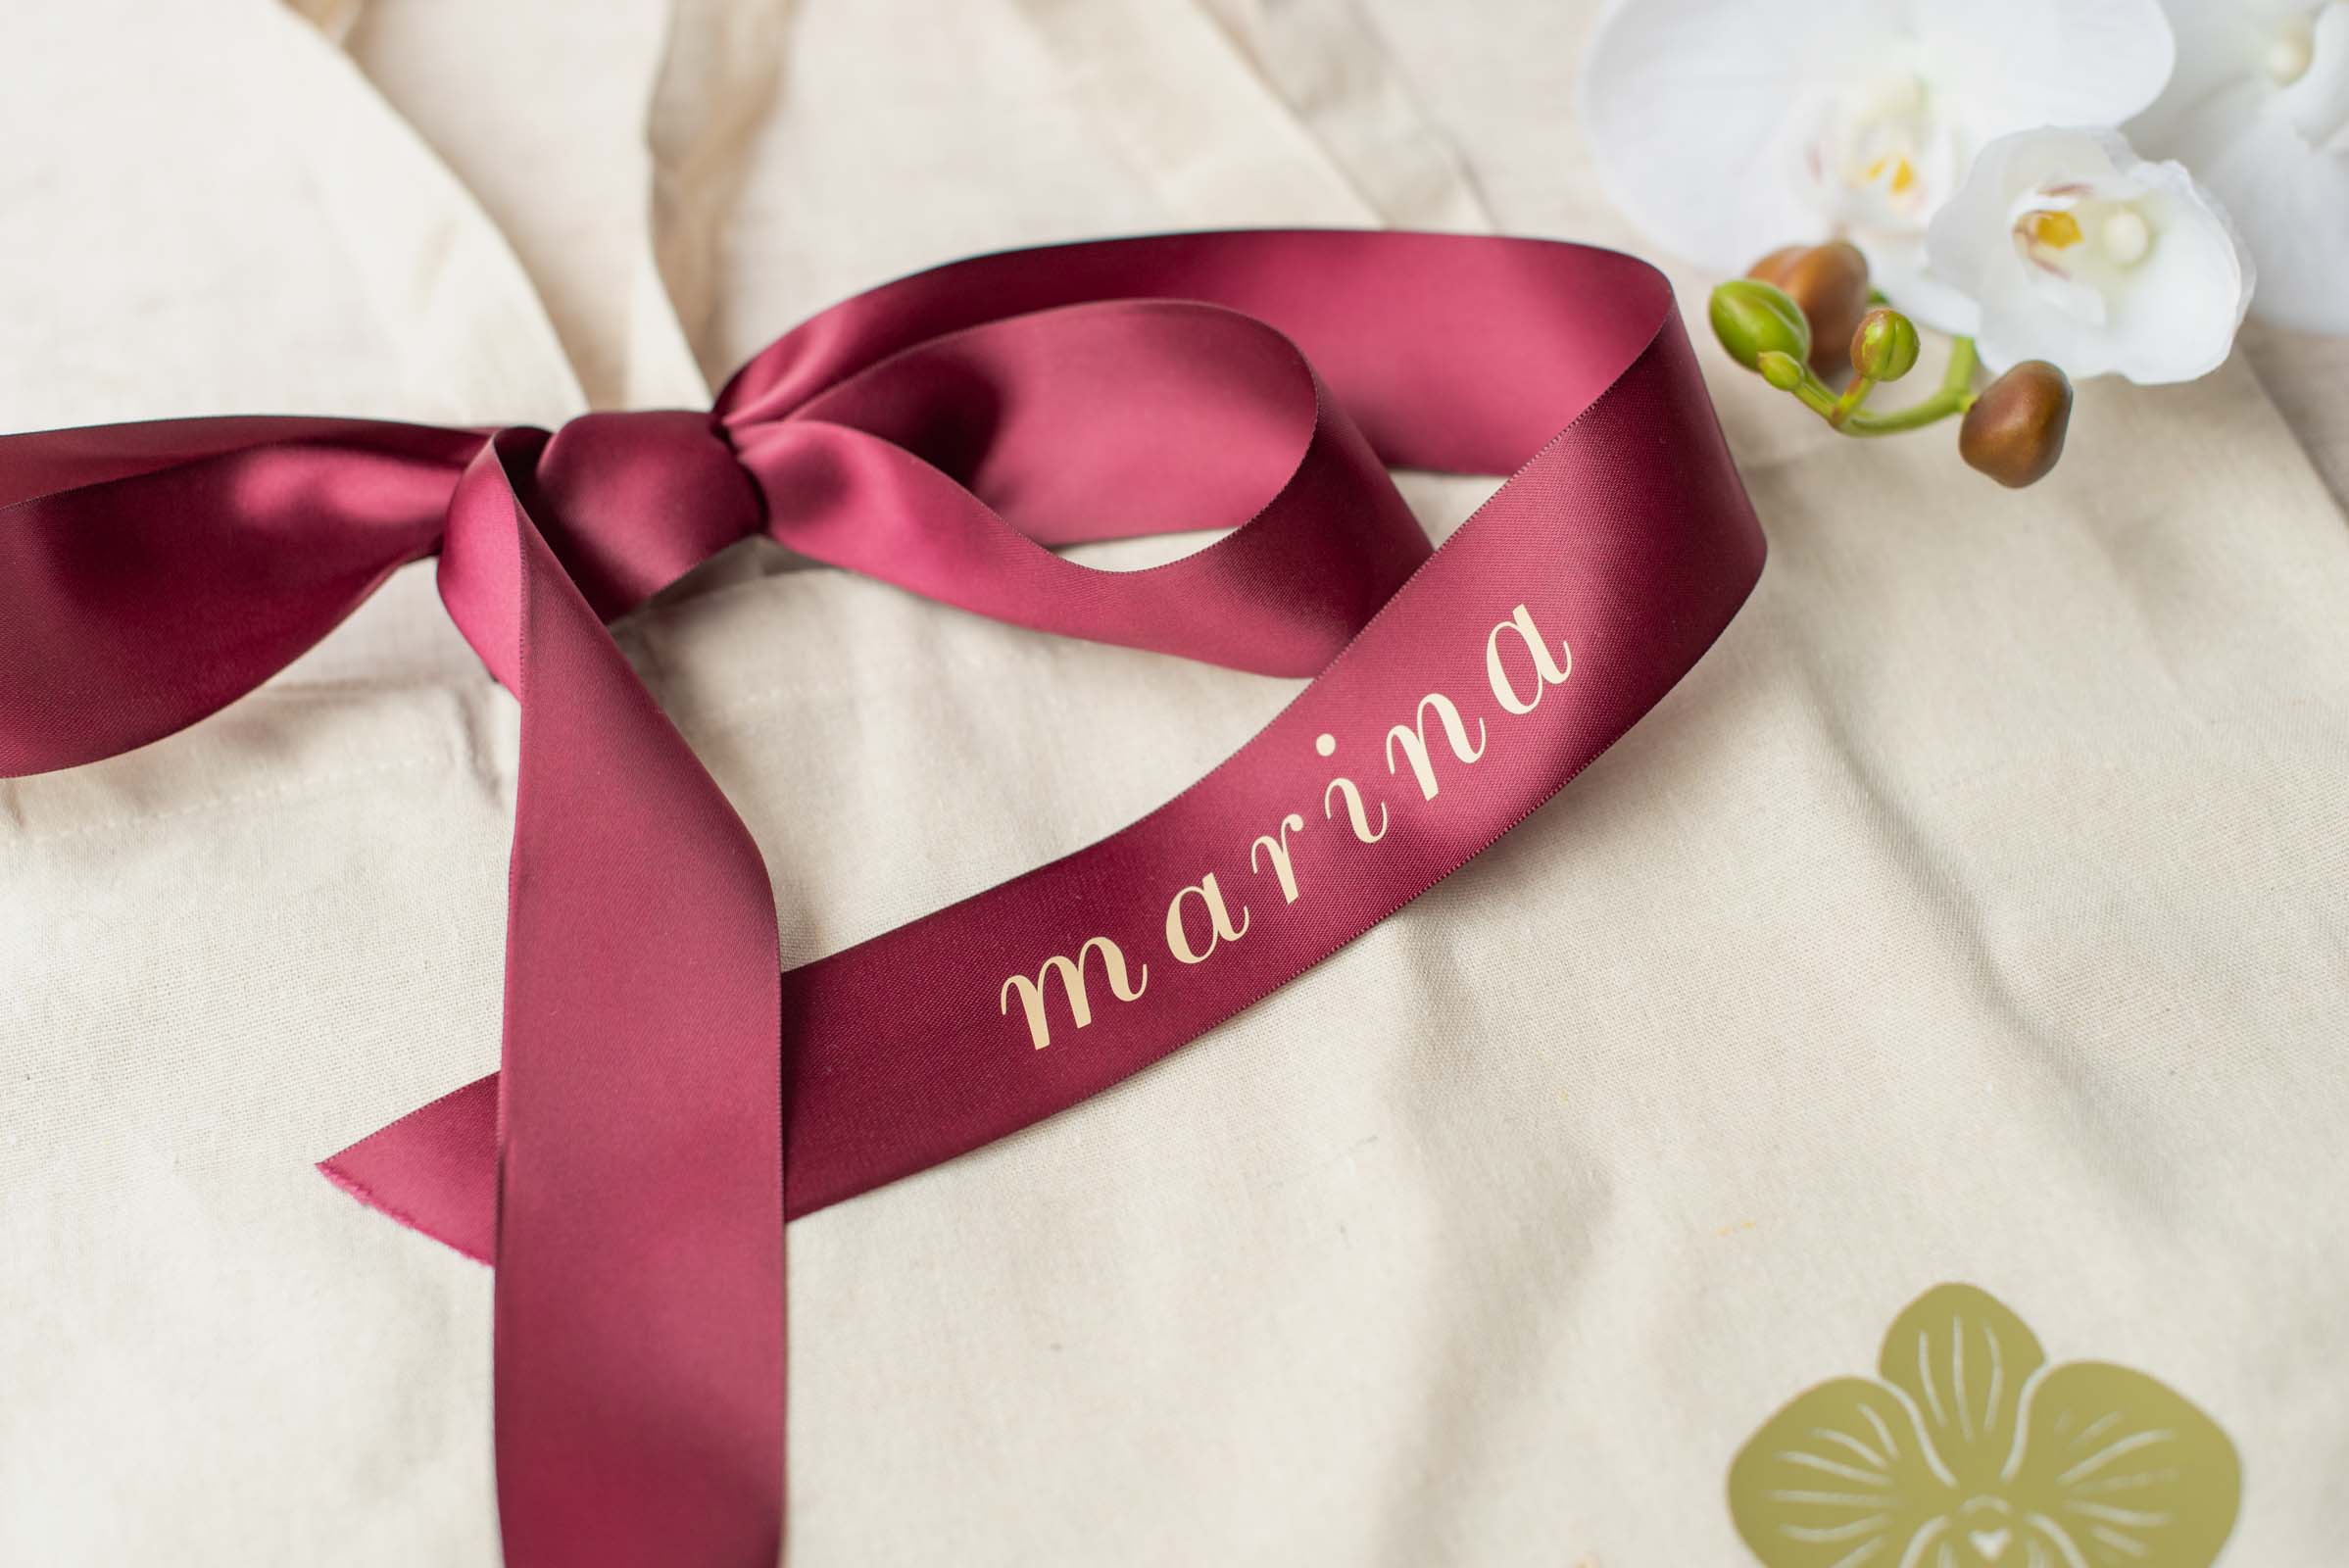
Tote Bag with Personalized Ribbon for the Bride
Supplies Needed: Canvas tote bag, HTV, ribbon, EasyPress Mini or household iron
Put a (double satin) ribbon on it! Making personalized ribbon details for weddings are very popular and beginner-friendly, so for any bride-to-be looking for a stylish bag to carry around for her bach party or hen do, this orchid-themed design tells us that love is always in bloom.
Monogram Stickers
Supplies Needed: Sticker paper, inkjet printer
Stickers: the ultimate design detail that holds your wedding branding together. From sealing favor bags to personalizing the envelopes of your thank you notes, a custom monogram makes everything feel official and oh so chic.
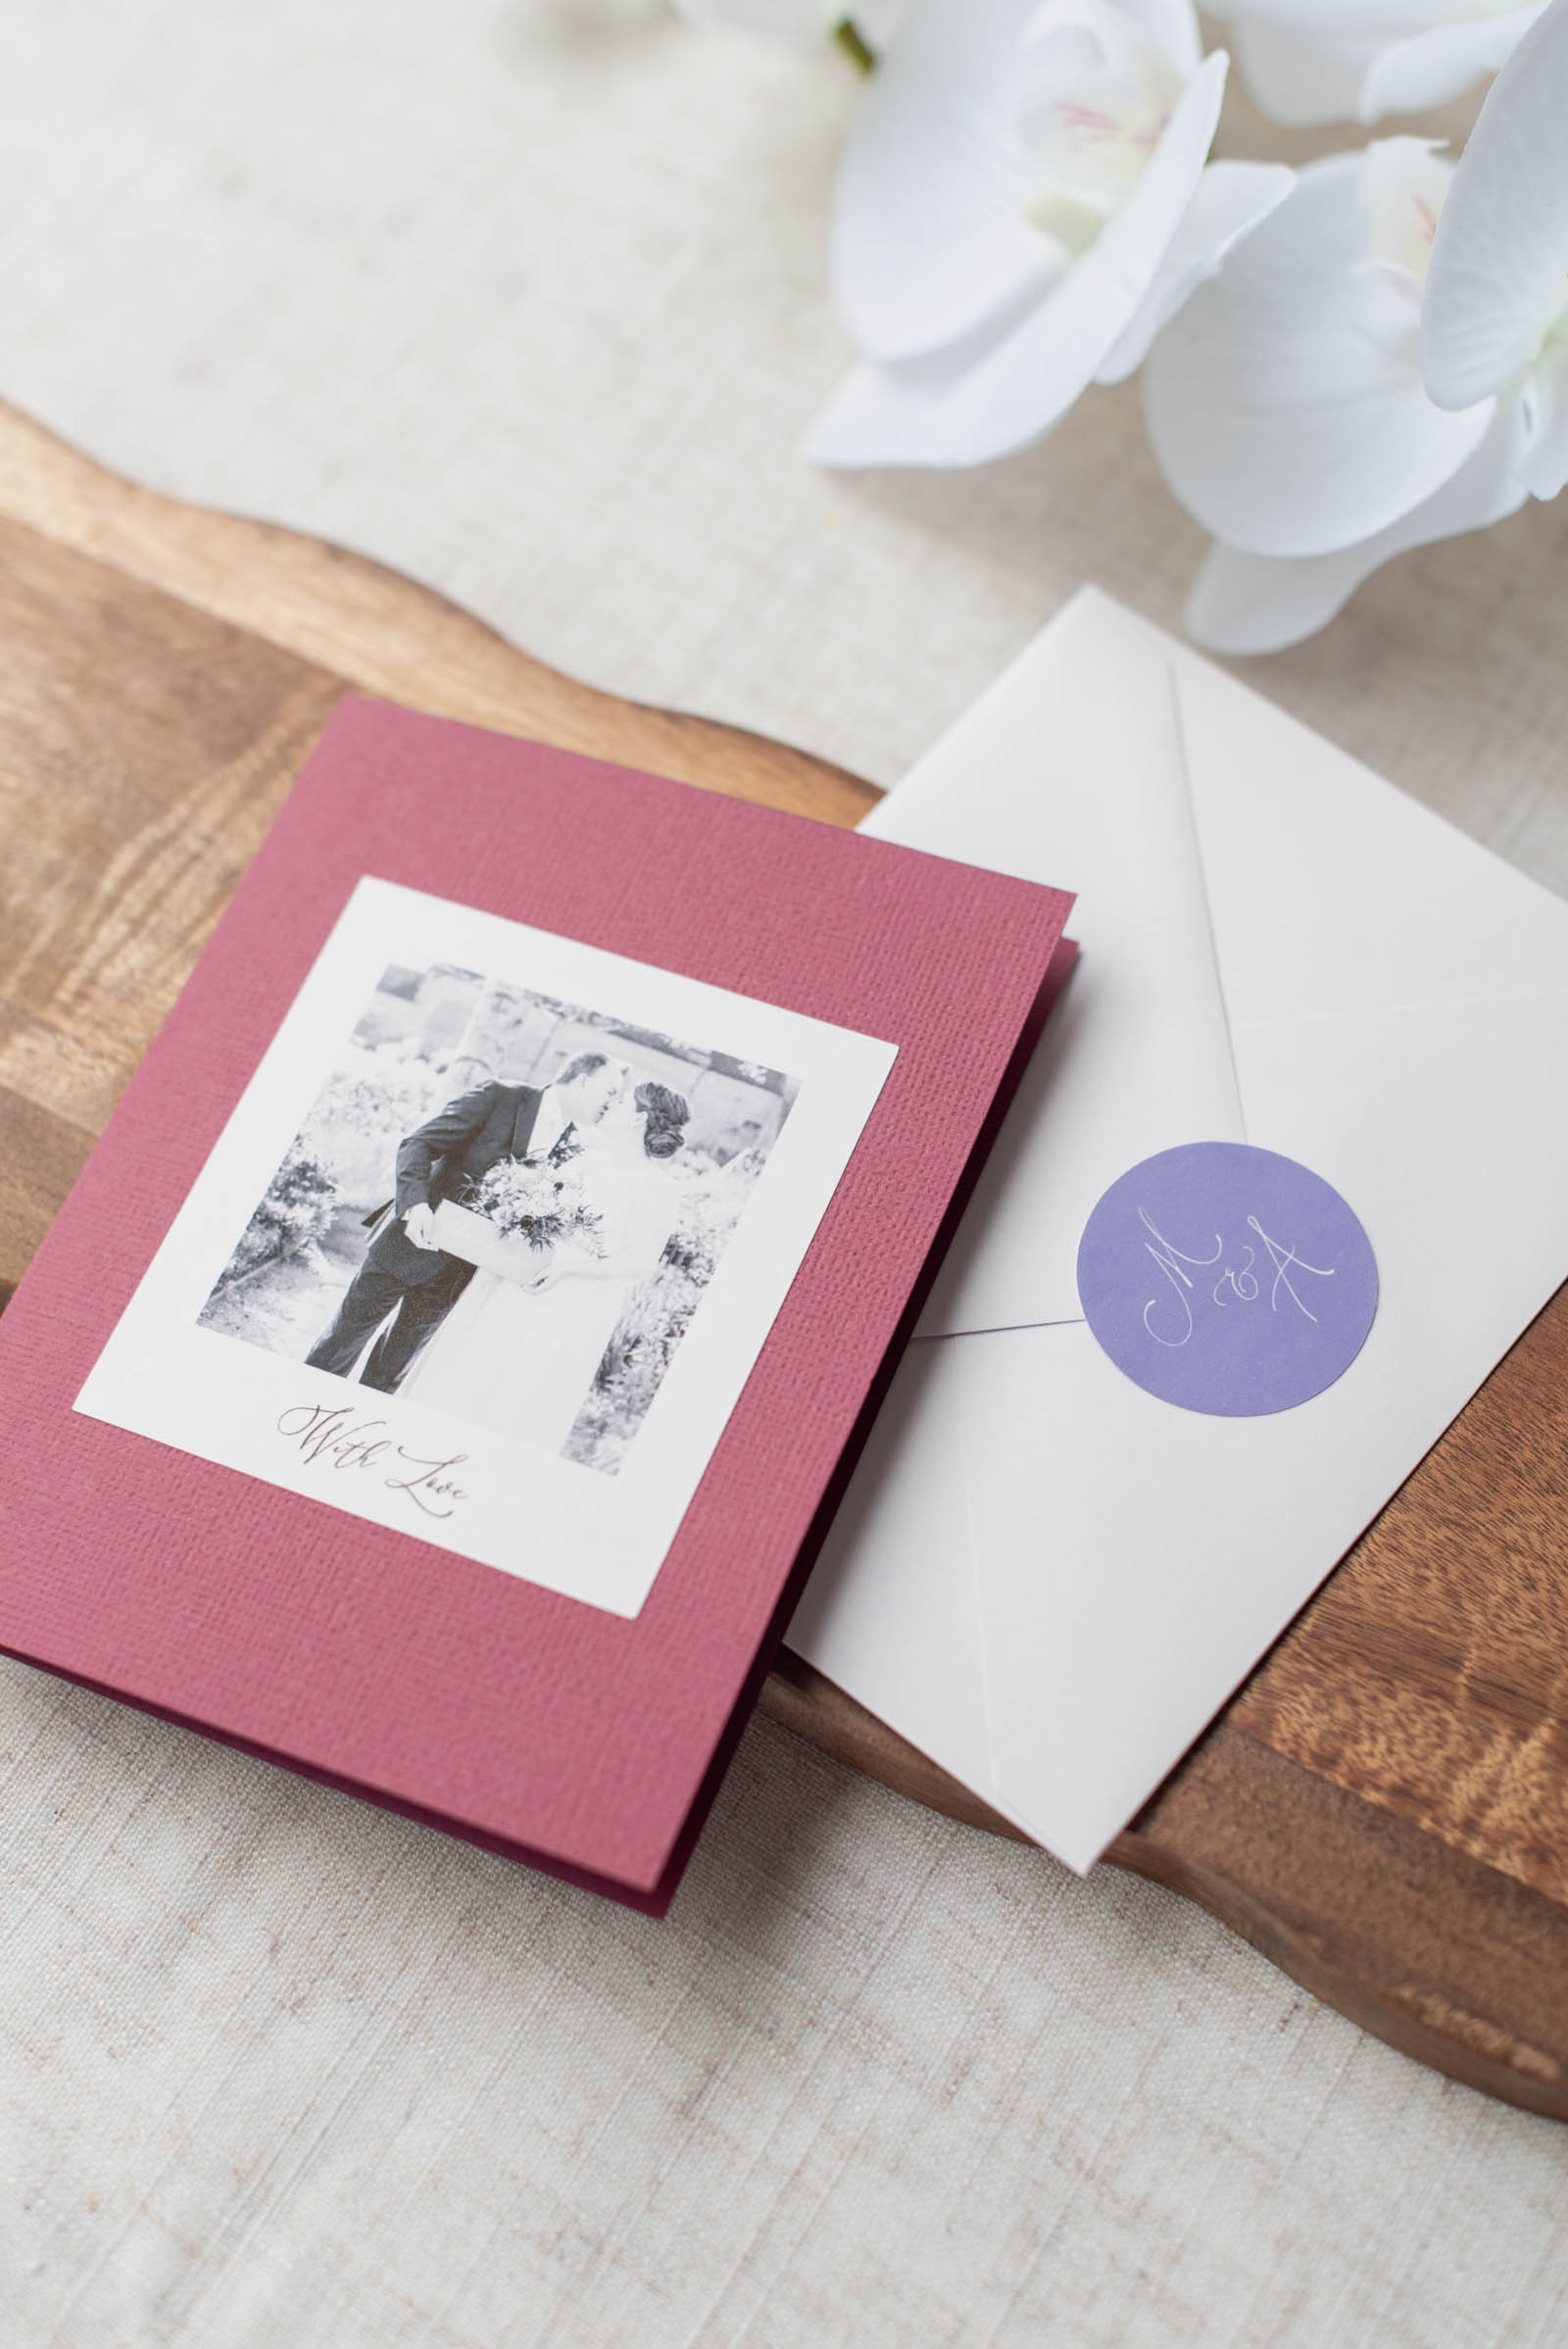
Photo Thank You Card
Supplies Needed: Cardstock, sticker paper
A high-end DIY wedding doesn't end at the reception! Use a photo from your wedding day to say thank you to all of your loved ones by uploading it into Design Space and printing off on sticker paper. It's a beautiful, easy design idea to share your gratitude in a very personal way.
Cricut Wedding DIY: Frequently Asked Questions for a High-End Look
1. Is it cheaper to DIY your wedding with a Cricut?
One of the most searched questions in 2026 is whether DIYing actually saves money. This is very subjective depending on your guest count, skill set, types of materials used, and where you're getting married. The secret to a high-end look that actually stays on your personal budget is choosing high-impact, low-volume projects. Instead of trying to DIY 200 intricate layered favor boxes (which can lead to craft fatigue and high material costs), focus your budget on some elegant basics and a few luxury materials like wood veneer or leather for items your guests will actually touch and keep, like place cards or luggage tags.2. Which Cricut machine is best for professional wedding decor?
While the Cricut Explore models are the all-rounder favorites for wedding DIY, if you want the high-end textures seen in this post (like the chiffon fabric), you may find the powerhouse that is the Cricut Maker models is what you want. The ability to use the rotary blade for the chiffon petals on our 3D veil and the knife blade for thicker wood and leather elements (not seen in this article) is what usually convinces couples to choose the Maker.But for a more in-depth guide on machines, check out our Which Cricut Machine is Best for Wedding DIY guide.
3. How do I avoid the "DIY look"?
We love every style here at Tidewater and Tulle, and "DIY look" is quite subjective. But if you want to keep your projects looking more artsy than crafty, the secret isn't the machine! It's the color and texture palette you choose. Follow the 70/30 rule often used in interior design and fashion: 70% are basics and 30% are elevated or specialty materials. For your colors, 70% is the dominant color theme and 30% is the contrasting color.Using a consistent motif (like our orchid), monogram, or wedding logo across different textures also creates a cohesive design for your wedding that looks like it was curated by a high-end event planner.
3 Secrets to a High-End Cricut Wedding
Before you fire up your Cricut, keep these three rules of thumb in mind to ensure your handmade details look like they came from a luxury boutique.✦ The Orchid Branding Strategy: Think of your motif as a logo, not a theme. You don’t need an orchid on every single item; instead, use it as a consistent visual anchor on your invitations, your place cards, and your boutonniere to tie the visual story together.
✦ Color Matching Across Mediums: High-end design lives in the details, and we wedding people know how important color is to couples and weddings! Ensure your lilac vinyl is a match to your lilac cardstock. When your colors are perfectly synced across different materials, the entire collection of projects looks custom-made rather than pieced together.
✦ Invest in the Touch Points: Prioritize your DIY time on the items guests will actually handle. A wood veneer place card or a petal favor box provides a tactile experience that leaves a lasting impression of quality.
NEW TO CRICUT? If you're new to crafting and getting married, get the ultimate guide Cricut Weddings by leading wedding DIY expert Chelsea Barton where you'll learn how to make all of the above projects and more. Available worldwide wherever books are sold. Find out more on the book's dedicated website: www.cricutweddings.com
More Cricut Wedding Ideas to Inspire
• 15 Ideas for Using a Cricut Machine to Personalize Your Wedding• 20 More Ideas on How to Use Cricut to Personalize Your Wedding
• 20 Even More Wedding Ideas To Make With Your Cricut
Editor's Note: Specially curated by us, the above product links may be partner-connected and purchasing through these links means we get a small commission from those brands that helps support this website. You can find our full affiliate disclosure policy here on Tidewater and Tulle.

