
Backyard, beach, and all outdoor weddings are surrounded by the backdrop of beautiful Mother Nature, and that backdrop makes for the perfect canvas to set the scene for your nuptials. One of the easiest ways to elevate your "I do" moment is to design a visual anchor for your ceremony location with a DIY wedding arch that reflects your personal style. Whether you're going for rustic romance, modern minimalism, or vintage whimsy, there's an arch design out there that's both beautiful and beginner-friendly.
And today, we're sharing six easy DIY wedding arch ideas that are perfect for backyard celebrations. With visuals to inspire, materials you can find locally or online, and links to helpful build plans (hello, Etsy gems!), you'll be able to bring your vision to life without needing to be a professional carpenter.
It goes without saying that you'll want to consider grabbing a buddy to assist later on as arches are notoriously large and can be heavy, but you can absolutely do the planning yourself right now. So grab your measuring tape, some scratch paper, and let's inspire your next DIY project: creating a gorgeous ceremony space that feels 100% you.

Frequently Asked Questions About DIY Wedding Arches
The top questions we see being asked in wedding community groups and being searched on Google all are very practical. So if you're looking for a quick FAQs list about the basics, we got you!
Q: How hard is it to build your own wedding arch?
A: It depends on the style you choose. Basic wood beam or copper pipe arches are very beginner-friendly, while more elaborate geometric or upcycled designs with different materials may require intermediate skills like using welding tools or miter saws. All of the ideas we're sharing in this roundup are beginner-friendly though.
Q: How big is a wedding arch?
A: They come in all shapes and sizes, so the main consideration for figuring out the size of your arch is that it is taller than the couple, and the couple and officiant can usually fit "inside" of it. Because of this, wedding arches are anywhere between 7-10 feet tall and 5-8 wide depending on style of arch and function. Be sure to check your venue restrictions (if any), and check the build plans of your chosen arch to make sure the math works out!
Q: What materials are easiest for DIY wedding arches?
A: Wood beams, copper pipes, upcycled doors, or pre-built arbors are accessible and easy to work with, and it's why we love them for beginners!
Q: What should I know about decorating the arch with florals?
A: Usually for DIY anything and for those without professional florist experience, we recommend renting silk flowers for your arches. You won't have to worry about wilting blooms before the ceremony happens, and everything can be pre-arranged and attached before the big day. You'll want to use zip ties to secure arrangements (and drapery) to your arch.

Simple Wood Beam Arch
Skill Level: Beginner
Style: All styles such as classic, rustic, and modern
Typical Materials Used: Lumber (wood), brackets, wood screws, wood stain/paint of choice
Typical Tools Needed: Hand or circular saw, miter box, measuring tape, electric drill
Why We Love It: This is the ultimate blank canvas — sturdy, affordable, and adaptable to nearly any wedding style. Whether you're going rustic, modern, or boho, it pairs beautifully with floral arrangements, drapery, and/or personalized signage. We especially love the look of asymmetrical blooms, a macramé backdrop, or flowing chiffon fabric in one of your wedding colors to make it uniquely yours!
BUY BEGINNER-FRIENDLY BUILDING PLANS
• 2x4 Wedding Gate Arch by Zing Woodworks
• Backyard Arbor Plans by HBLDesignStore
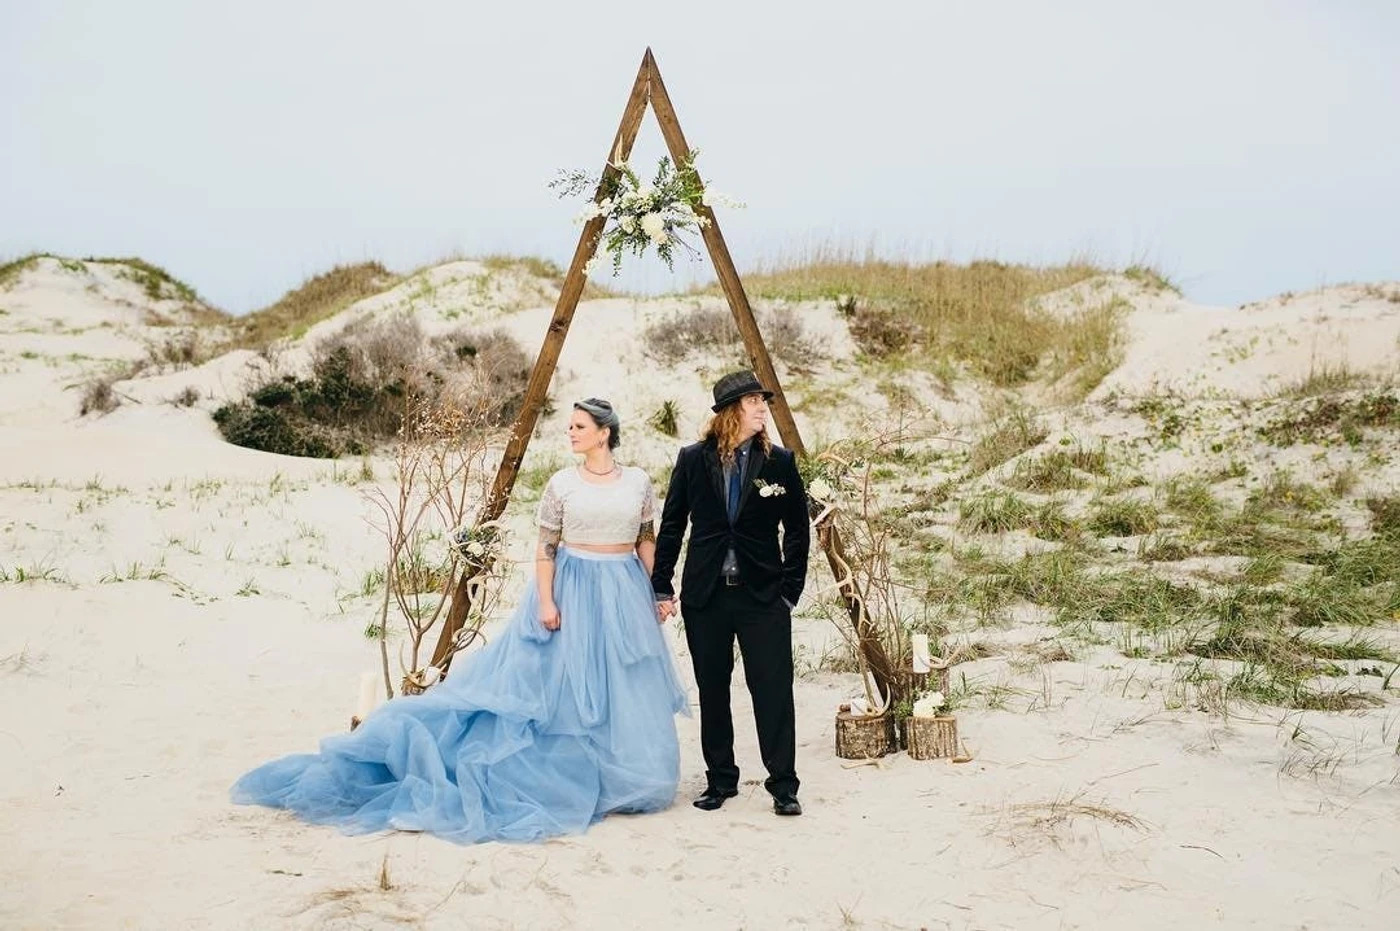
Wooden Triangle Arch (A‑Frame)
Skill Level: Beginner
Style: Boho, modern, minimalist, beach
Typical Materials Used: Lumber (wood), wood screws, hinges, wood stain/paint of choice
Typical Tools Needed: Hand or circular saw, miter box, measuring tape, electric drill
Why We Love It: The angular minimalist silhouette is eye-catching and works beautifully with minimal or wild floral designs, and we particularly love it for soft open spaces like beaches. This triangle design is easy-to-assemble and is sometimes built as a collapsible design with hinges so you can store or transport it easily. For styling, we recommend greenery and/or florals on the peak or bottom corners. Depending on your theme, you can also pair with pampas grass, wood stumps, thin drapery, thin branches, or lanterns to soften the angles.
BUY BEGINNER-FRIENDLY BUILDING PLANS
• Triangle Arch PDF Plans by Build Blueprint
• Triangle Arch Building Plans by DIY Wedding Market
• Double Triangle Arch Building Plans by DIY Plans Crafts

Upcycled Door Frame Arch
Skill Level: Beginner
Style: Vintage, rustic
Typical Materials Used: Salvaged doors, screws, hinges or brackets, sandpaper (if needed), additional lumber for frame/stand
Typical Tools Needed: Hand or circular saw, miter box, measuring tape, electric drill
Why We Love It: Anything upcycled is not only budget-conscious, but also sustainable as pre-loved doors are easy to thrift or source at antique shops. Depending on your theme (which could be on point for a cottagecore themed wedding), chalkboard signage can pair well with it as guests enter your ceremony space. You can also paint the doors to match your wedding palette or hang a floral wreath or custom signage (hello, Cricut wedding sign!) in the center.
BUY BEGINNER-FRIENDLY BUILDING PLANS
• Double Door Wedding Arbor Frame by Do It Yourself Planner

Copper Pipe Arch
Skill Level: Beginner
Style: Minimalist, modern, industrial, beach
Typical Materials Used: Copper piping, copper fittings, base weights (like tent stakes)
Typical Tools Needed: Pipe cutter, measuring tape, permanent marker
Why We Love It: This type of sleek and chic arch is lightweight, easy to transport, and uses the least amount of tools compared to wood arches — making it a great beginner's DIY project for those couples who might be short on time. Copper pipes are also affordable and widely available. For styling, we think one-sided greenery or florals with a few base décor elements or translucent drape fabric balances out the angles with that oh-so-wedding softness.
LEARN HOW TO ASSEMBLE
• Copper Wedding Arbor by Growing Joy

Draped Arbor Arch (or Wedding Trellis)
Skill Level: Beginner
Style: Classic, garden
Typical Materials Used: Pre-made wooden arbor (or lumber/wood for handmade), wood screws, wood stain/paint of choice
Typical Tools Needed: For handmade, hand or circular saw, miter box, measuring tape, electric drill. For pre-made, electric drill.
Why We Love It: The classic arbor can come in easily sourced, pre-cut kits which is ideal for busy or last-minute DIY couples. This style of arbor can be found at garden centers or home improvement stores, and they are gorgeous painted, draped, or even left natural. And if you do have the time and want to build from scratch, the plans below help you do that.
BUY BEGINNER-FRIENDLY BUILDING PLANS
• Wedding Trellis Build Plans by Warren Decor
• Wedding Arbor PDF Build Plans by Happy Little Bear
• Gable Arbor Building Plans by Do It Yourself Planner

Geometric Arch (Hexagon, Diamond, or Circle)
Skill Level: Beginner-Intermediate
Style: Modern
Typical Materials Used: Lumber (wood), wood screws, wood stain/paint of choice
Typical Tools Needed: Hand or circular saw, miter box, measuring tape, electric drill
Why We Love It: With a lot of different shapes to choose from, the geometric arch is a win for adding visual drama, and it's great for bold couples looking for a different type of arch. For styling, the design speaks for itself, so it looks great as is or with color-blocked florals, wild greenery, or vibrant fabric for a modern touch.
BUY BEGINNER-FRIENDLY BUILDING PLANS
• Geometric Diamond Wedding Arch Woodworking Plans by GOATRO
• Heptagon Wedding Arch Plans by Happy Little Bear
• Gothic Geometric Coffin-Shaped Wedding Arch by Do It Yourself Planner
• Circle Wedding Arch by DIY Wedding Market
• Simple Hexagon Wedding Arch by Ready Set Build It

Tips for a Stable and Safe Arch Setup
A beautiful arch is only as strong as its foundation, especially if you're outdoors where wind and uneven ground can be unpredictable! And when you're adding top-heavy floral arrangements, this becomes even more important. Here are a few key tips to help your DIY wedding arch stay safe and secure on the big day so you can stay safe as you say I Do:
➤ Anchor it properly. Use sandbags, cinder blocks, or built-in bases hidden by planters to prevent tipping. With some arch designs (like the copper arch), you can also stake them into the ground using metal tent/garden stakes.
➤ Weight your base. Good designs know good physics. If using lightweight materials (like copper or PVC) that have been welded together in some way or if staking into the ground is not an option, you could also fill planters with concrete (to be decorated upon setup) or attach weighted plates at the base to keep everything grounded.
➤ Check your surface. Whether you're setting up on grass, gravel, sand, or patio, test the arch’s balance beforehand so you’re not scrambling last-minute. This is where a wedding planner might be helpful to you! Always be sure to anchor the base securely on uneven ground and account for windy conditions, especially on a beach.
➤ Weather-proof if needed. A coat of clear wood sealant, UV-resistant paint, or rust-protectant spray will help your arch materials hold up — just in case Mother Nature has plans. This is also important if your arch will be given a new life in your backyard or garden after the big day!
➤ Transport carefully. If you're building offsite, disassemble into sections for easier transport and reassembly. Pre-drilled holes or brackets make this even easier.
➤ Double-check venue rules. Even in a backyard, make sure your space allows for potentially staked structures if you’re renting or borrowing the property.
With a little planning and careful attention to the details, your DIY ceremony arch will be both picture-perfect and worry-free so you can focus on the vows, not the hardware.

WRITTEN BY
Chelsea Barton
Founder & Wedding DIY Expert
A former wedding photographer, the founder of Tidewater and Tulle, and author of Cricut Weddings, Chelsea Barton has been helping couples bring their dream weddings to life through creative, approachable ideas since 2009. Her insight and work have been featured in Martha Stewart Weddings, Southern Living, and other top publications around the world. She combines editorial expertise and real-world insight to inspire meaningful celebrations.
Get Inspired by other Wedding DIY Projects on Tidewater and Tulle
• DIY Hanging Upcycled Wood Seating Chart
• 3 Easy DIY Ways to Make Arch Table Numbers
• Ultimate Guide to Cricut Wedding Signs That You'll Want to Make
Editor's Note: Specially curated by us, the above product links are partner-connected and purchasing through these links means we get a small commission from those brands that helps support this website. You can find our full affiliate disclosure policy here on Tidewater and Tulle.

