
Get out that glue gun because it's time to get creative again! If you've seen our YouTube channel (which is a little quiet right now), you'll know that our DIY wax seals video is our most-watched with over 181,000 views, so we knew eventually we'd get to doing a website tutorial on how to make wax seals with a hot glue gun, and our editor-in-chief Chelsea's upcoming wedding clinches it!
Inspired by an English garden wedding aesthetic, this project is a bit of a personal one as you'll read below, but for those wanting to tie in a vellum-esque look to their wedding stationery, look no further than this easy DIY. These handmade cuties are perfect for a little old world touch to any wedding style or theme and can be personalized to any color palette based off of the flowers you choose! Let's get Chelsea to explain the backstory.
A SPECIAL NOTE
As an avid DIY person, there was no way I was not going to DIY a lot of my and Mr. B's wedding details. When I shared that I made vellum wax seals on my personal Instagram, the seals got such a huge response with questions on how I made them, so I decided to do a tutorial here on Tidewater and Tulle after our wedding invitations were delivered to our loved ones. Hopefully they'll inspire other brides or grooms to get crafty with their own days like our other Tidewater and Tulle DIYs!
- Chelsea
Editor-in-Chief of Tidewater and Tulle

How to Make Vellum Wax Seals with a Hot Glue Gun
Difficulty Level: Easy
Color Inspiration: Pinks and blues
PROJECT MATERIALS
• Hot glue gun
• Clear full-sized hot glue sticks
• Silicone mat
• Dried small flower petals
• Blank wax seal stamp (Ours was 25mm in diameter)
• Wax seal backing adhesive stickers
• Ice pack (if in a warm room or location)

INSTRUCTIONS
1. Set out all of your materials and turn on your hot glue gun to heat up. You will want your petals and additional hot glue sticks close by during your project as this helps with the relative speediness of this type of DIY.
2. Organize your petals into clumps for what you want to include in each of your wax seals. Easy ready access is everything when working with hot glue that hardens quickly!

3. When your glue gun is hot and ready, squeeze out about a quarter-sized dot of melted glue stick on your silicone mat. (This may vary depending on the size of the blank wax seal stamp you choose. Always do a tester so you can get the exact diameter you want!)
4. After you have your quarter-sized glue dot, quickly "drop" your petals onto the hot glue. Avoid touching the glue to maintain a clean wax seal-like finish. Your stamp will secure the petals into place.

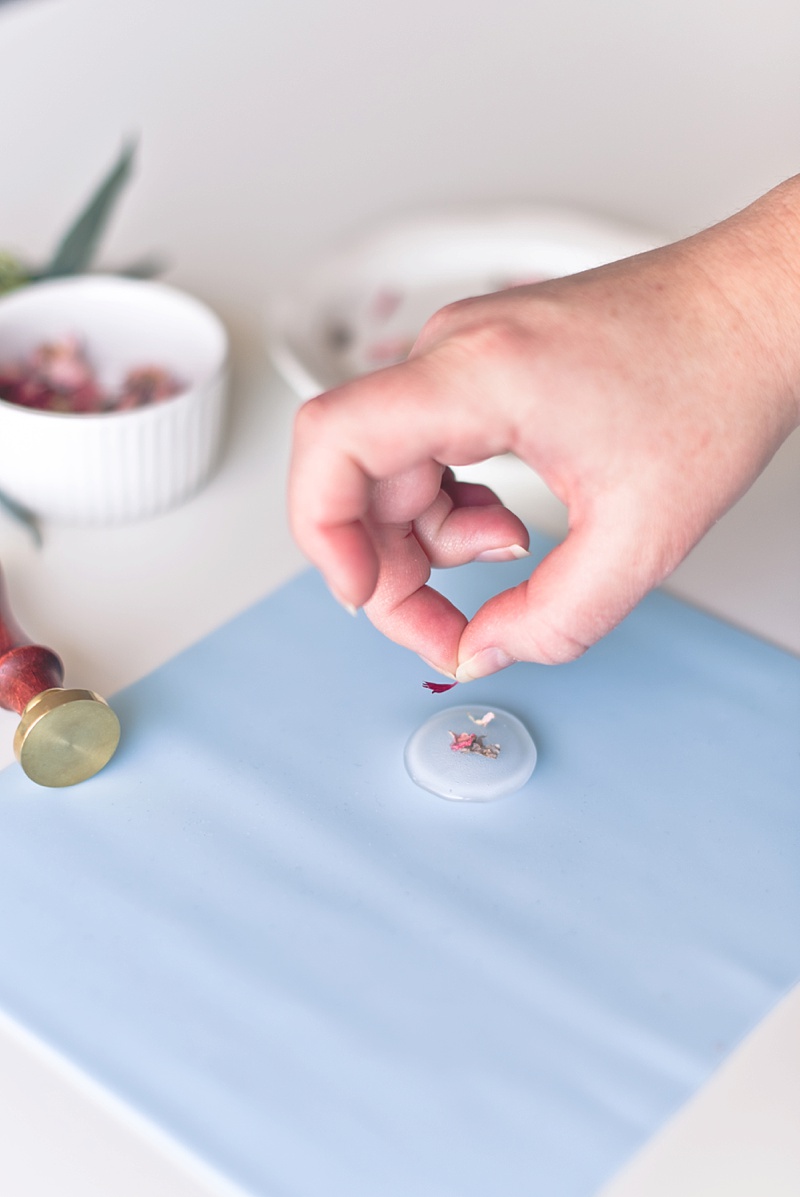
5. Once you have all of the dried petals you want on the glue, lightly place your wax seal stamp on top and allow the weight of the stamp to sink into it. Try to not apply anything but light pressure as this would cause your wax seal to spread or thin at the bottom.
6. When the glue starts to turn cloudy, that means it's ready to be lifted off of the silicone mat for further hardening. If you are doing this project in a warm room, this is where the ice pack comes in! Place your wax seal stamp (with the seal still attached) vertically on top of the ice pack. This will help quicken the hardening process and make your wax seal stamp ready quicker for the next seal you'll make.


7. Peel your new vellum wax seal off of your stamp as soon as it's completely cool to the touch. Set aside and make the rest of the seals you need for your invitations! Ensure the metal part of your seal is "cold" with each seal you make as this does affect your process.
8. Once you have your pile of handmade seals, it's time to put the adhesive sticker on the backs of every seal you've created. Since this project can be made well in advance of stationery assembly, you can either leave the sticker paper on the backs for storage or stick them directly on your invitations. Mileage may vary!
9. Enjoy your little bits of vellum-inspired wax seals!


VENDOR CREDITS
Photography, Styling, Stationery Design, & Tutorial: Chelsea LaVere Barton | Letterpress Printing: Danielle Bleuse via Etsy | Calligraphy: Maria Manuscript | Plant-Dyed Ribbon: The Botanical Dyer via Etsy | Vellum Jackets: Lilac and White via Etsy | Wax Seal Backing Stickers: Blackbird Illustration Co. via Etsy | Dried Petals: Bubble and Berry via Etsy
Get Inspired and Shop Our Latest Shoe Faves!
Some of the above product links are affiliate-linked and purchasing through these links helps support Tidewater and Tulle! You can find our full affiliate disclosure policy here on Tidewater and Tulle.

