

How to Make Beautifully Painted Glass Charger Plates
Difficulty Level: Easy
Color Inspiration: White, gold, deep green, and navy blue
PROJECT MATERIALS
• Large glass plates
• Paintbrush
• Paper towels (as needed)
• Paint palette
• Bowl for water
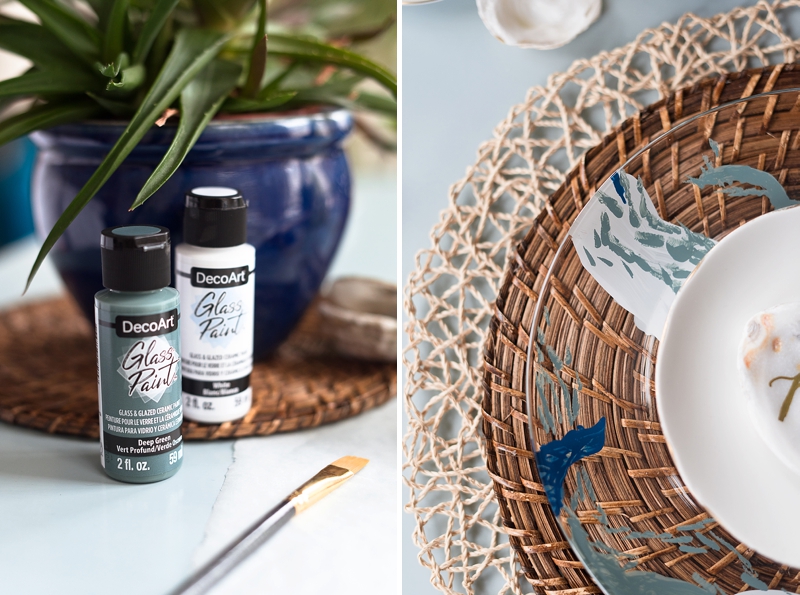
• DecoArt Glass Paint (in Deep Green, Navy, and White found at Michaels)
• DecoArt Glass Paint Marker (in Metallic Gold found at Michaels)
• Parchment paper
TABLE STYLING DETAILS
• Oyster shells
• Gold flatware
• Assorted potted plants
• Rattan chargers
• Glass stemware
• Woven paper place mat

INSTRUCTIONS
1. Set out all of your materials and thoroughly wash your glass plates to clean your painting surfaces. Completely dry your plates and lay down parchment paper to protect your surfaces and use as a scrap paint palette.
2. For your charger plate designs, find some painting inspiration for reference on Pinterest and keep it nearby. If you are not experienced with painting, that's okay! You are creating abstract textures and lines for your chargers, not a Renaissance portrait! Do practice strokes on your parchment paper before painting on your plates. Experiment and have fun with it!

PAINTING TIPS:
If you're new to painting, there are a lot of beautiful ways to use a paintbrush! Consider the amount of pressure you give to your surface. This can give you different textures and darknesses on your charger plate. To make lighter/thinner colors, wipe off your paintbrush on your parchment paper until there's only a little paint left on your brush. Water cannot be mixed with glass paint, so get creative with the paint as it is!

3. Shake your DecoArt glass paint bottle well and squeeze a few paint dots at a time into your palette. With your paintbrush, create your design on the bottom side of your glass plate. You will want to paint in layers to help with opacity of each color, so allow each layer to dry before additional layers. If time is of the essence, use a hair dryer to help speed up the drying.


FUN FACT: DecoArt's new glass and glazed ceramic paint comes in 20+ gorgeous colors for your own wedding DIY style. There's Pink, Mint, Light Blue, and many more trendy hues for your special day's theme. Not only useable on glass, you can also paint glazed ceramics like mugs, cups, non-glass plates, and even vases to personalize your wedding. Creativity is endless, and we are here for it!


4. Switch between your colors and lines for visual interest on your charger plates. While painting, flip over your plate frequently to make sure you like what you're painting. Plan on how you want to layer and connect your paint strokes if going for a coastal vibe. Be intentional with every stroke so you can repeat it on your other charger plates.
5. Once happy with your plates, allow to dry and cure for 4 days before using. Enjoy!
HELPFUL TIP: On appropriate oven-safe products, DecoArt's glass paints can be bakeable for a dishwasher-safe finish. After you're done painting, place your oven-safe dishware (e.g., ceramic mug) in a cool oven. Heat the oven to 275°F degrees and bake for 30 minutes. Allow to cool inside of the oven. This will make your painted creation ready to be washed on the top rack of your dishwasher!


How to Write on Oyster Shells for Your Wedding Place Cards
You don't need a tutorial to learn how to write on oyster shells when you have DecoArt's new opaque metallic glass paint markers. It's absolutely our new favorite DIY crafting tool! Use a pencil, sketch your guest's name, and write over it with the glass paint marker. These markers come in so many different colors, but we especially love the neutrals: black, white, metallic gold, and metallic silver for wedding DIYs. Finally an easier beach wedding option for oyster shell prettiness!


VENDOR CREDITS
Photography, Styling, & Tutorial: Chelsea LaVere for Tidewater and Tulle | Glass Paints: DecoArt
Many thanks to DecoArt for partnering with Tidewater and Tulle for this DIY tutorial feature! And while the disclaimer is that we were compensated to write and design this, the words and our loyal love for the DecoArt brand are all our own. Some of the above product links are affiliate-linked and purchasing through these links helps support our wonderful sponsors and Tidewater and Tulle! You can find our full affiliate disclosure policy here on Tidewater and Tulle.

